
Installing a Tesla Wall Charger transforms your home into a high-efficiency EV charging station. This powerful, Wi-Fi-enabled device delivers up to 48 amps of continuous power, adding about 44 miles of range per hour, making it the top choice for Tesla owners seeking fast, reliable home charging. While Tesla recommends professional installation, many experienced DIYers successfully install the Wall Connector themselves, saving hundreds in labor costs. However, because it involves 240V electrical work, safety, code compliance, and precision are critical. In this guide, you will learn every step, from circuit planning and wiring to app setup and final testing, so you can install your Tesla Wall Charger safely, correctly, and efficiently.
Verify Electrical Panel Capacity for Tesla Wall Charger
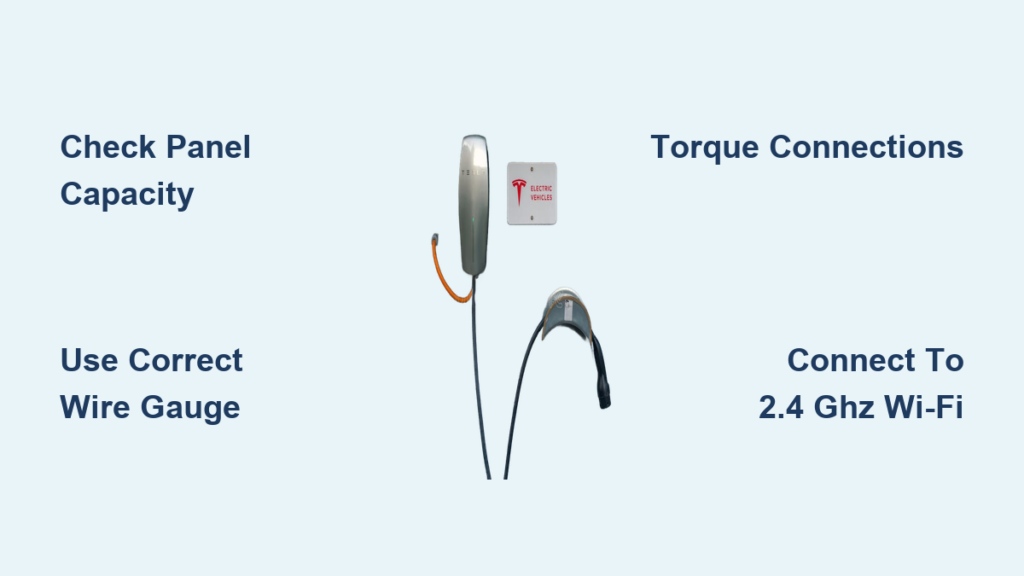
Before touching any tools, confirm your electrical panel can support a 60-amp circuit for the Tesla Wall Charger. This step prevents overloaded circuits, panel damage, and potential fire hazards.
Check Available Space and Load Capacity
Locate an open double-pole slot in your breaker panel. Ensure your panel has at least 60 amps of available capacity for continuous load. Use the 125 percent continuous load rule: 48 amps multiplied by 1.25 equals 60-amp circuit required. If your main panel is full or undersized, consider a subpanel or load analysis by an electrician.
Confirm Breaker Compatibility
Match the breaker brand to your panel manufacturer, such as Eaton, Square D, or Siemens. Use Eaton BR260 for Eaton BR panels. Never force incompatible breakers into the panel, as this risks arcing or fire.
Pro Tip: Take a photo of your panel label and consult a breaker compatibility chart before purchasing any components.
Choose Correct Wiring and Conduit
Selecting the right wire gauge and conduit type ensures safety, efficiency, and NEC compliance. This decision depends on your specific run length and installation environment.
Select Wire Gauge and Type
For runs under 100 feet, use 6 AWG THHN-2 stranded copper with two hot wires and a 10 AWG ground wire. This is the most common configuration. For runs exceeding 100 feet, use 4 AWG THHN-2 to reduce voltage drop. If running inside walls only, 6/3 NM-B Romex is acceptable, but the neutral wire must be capped off since the Tesla Wall Connector does not require it.
Wire Gauge Reference:
- 6 AWG THHN-2 for runs under 100 feet
- 4 AWG THHN-2 for runs over 100 feet
- 6/3 NM-B Romex for inside-wall-only installs
- No neutral required: cap the white wire if reusing NEMA 14-50 wiring
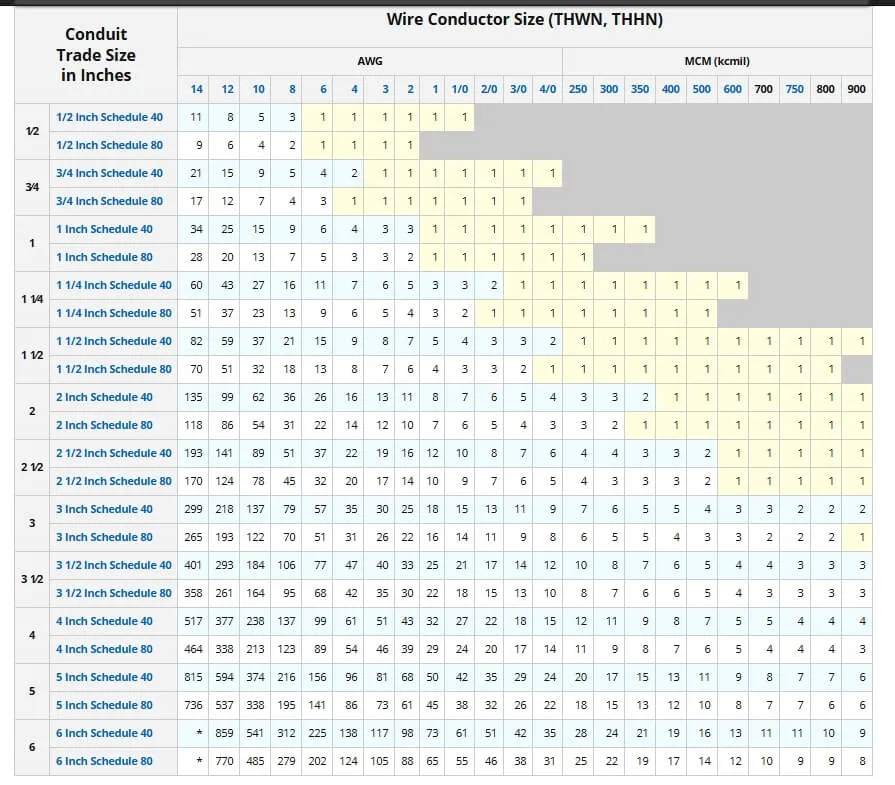
Pick the Right Conduit
Use ¾-inch minimum diameter conduit for three 6 AWG wires. Acceptable types include ¾-inch PVC Schedule 40, ¾-inch EMT metal conduit, or LiquidTight flexible conduit, which is ideal for DIYers because it bends, cuts, and routes easily without special tools. Use strain reliefs at both ends and support every three feet.
Best for DIY: LiquidTight conduit offers the easiest installation for most homeowners.
Run Conduit from Panel to Mounting Location
A clean, protected conduit path ensures long-term reliability and code compliance. This step requires careful measurement and proper technique.
Drill Wall Penetration
Drill through the exterior wall from the garage to the outside or into the attic or crawlspace. Use a 1.5 to 1.6-inch hole saw for ¾-inch conduit plus clearance. Angle the hole one-half inch higher inside than outside to prevent water ingress.
Route and Secure Conduit
Measure the total run length from panel to mounting location. Cut conduit with a pipe cutter and deburr the ends. Use 90-degree LB fittings, reducers, or sweeps for tight turns. Glue PVC joints with solvent cement. Install a pull string before running wires.
Time-Saving Hack: Use wire lube when pulling wires through flexible or long conduit runs to reduce friction and prevent conductor damage.
Mount the Wall Connector
Proper mounting ensures accessibility, weather resistance, and clean cable management. Follow these specifications for optimal placement.
Set Correct Height
Install the top of the unit at 48 inches from the floor. The bottom of the unit will sit at approximately 39.5 inches, which is ideal for most vehicles. Adjust slightly based on your garage layout or conduit entry point.
Secure Mounting Bracket
Use the included cardboard template. Level the top edge and mark the screw hole positions. Locate at least one wall stud, as only one of three holes needs to hit wood for structural support. Drill a 3/32-inch pilot hole in drywall and a 3/16-inch hole into the stud. Fasten with the provided screws.
For Masonry Walls: Use 3/16-inch masonry anchors and a hammer drill. Do not rely on plastic anchors for brick or concrete.
Stability Upgrade: Mount to a wood backer board, such as a 24-inch by 12-inch piece of poplar, secured across multiple studs for added stability.
Connect Wires at the Electrical Panel
This step powers the circuit, so accuracy and proper torque are critical for safety and performance.
Install the 60A Breaker
Turn off the main breaker and remove the panel cover. Punch out a ¾-inch knockout near the breaker slot. Insert a conduit connector with a locknut. Snap the 60-amp double-pole breaker into place and label it Tesla Wall Connector.
Safety First: Confirm power is off with a non-contact voltage tester and verify with a multimeter before proceeding.
Wire the Circuit
Strip 6 AWG wires to ¾ inch. Connect the black and red wires, or two black wires, to the breaker terminals for L1 and L2. Connect the 10 AWG ground wire to the ground bar. Torque the breaker to 45 inch-pounds and the ground connection to 25 inch-pounds. Secure the cable with an SE clamp or strain relief.
Important Note: Polarity does not matter for 240V circuits. L1 and L2 can be reversed without affecting performance.
Wire the Wall Connector Unit
Now connect the other end of the wiring at the Wall Connector location. Precision and proper torque are non-negotiable here.
Prepare the Unit
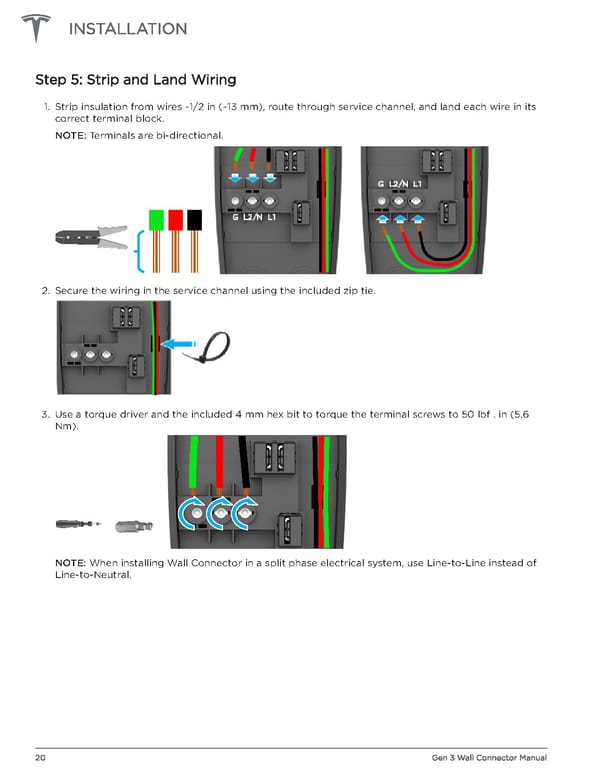
Remove the Wall Connector faceplate. Loosen the three terminal screws: L1, L2, and G. Strip wires to the length shown in the manual or indicated by the strip gauge on the unit.
Make Connections
Insert one hot wire into L1 and the second hot wire into L2. Insert the ground wire into G. Tighten all terminals to 50 inch-pounds or 5.6 Nm using a torque screwdriver. Route wires neatly and secure with zip ties. Apply silicone sealant around the housing before replacing the faceplate.
Torque Warning: Under-tightening causes arcing while over-tightening damages terminals. Always use a calibrated torque tool. Never guess at torque values.
Power Up and Test Voltage
Before commissioning the unit, verify it is receiving correct voltage. This diagnostic step catches wiring errors before they cause problems.
Energize the Circuit
Turn on the main breaker first, then turn on the 60-amp Tesla breaker. Wait up to five minutes for the Wall Connector to wake and initialize.
Check Indicator Light
A pulsing green light indicates the unit is ready for setup. A solid green light means the unit is powered and active. No light indicates a problem requiring further investigation.
Test Voltage with Multimeter
If no light appears, use a multimeter to check voltage. Measure L1 to L2, which should read 220 to 240V. Measure L1 to ground and L2 to ground, which should each read 110 to 120V. If voltage is low or missing, recheck the breaker, connections, and conduit integrity.
Commission via Tesla One App
The Tesla Wall Connector must be set up using the Tesla One app, which is different from the standard Tesla app. This step enables all smart features.
Start Setup Mode
Ensure the indicator light is pulsing green. If not, press and hold the button on the charging handle for five seconds to enter setup mode.
Scan QR Code
Open the Tesla One app, which you can download from the App Store or Google Play. Tap Begin on the installation screen. Scan the QR code from the QuickStart Guide, the back of the Wall Connector, or the manual if needed.
Enter Installation Settings
Select your country. Enter the breaker size, which should be 60A for the recommended setup, though 50A is acceptable. Set the maximum amperage to 48A, which is the default for a 60A breaker.
Connect to 2.4 GHz Wi-Fi
The Wall Connector only supports 2.4 GHz networks, not 5 GHz. This is a common stumbling block for many installers.
Link to Home Network
In the Tesla One app, tap Wi-Fi. Select your 2.4 GHz network from the available networks. Enter your password. Wait for a green checkmark to appear, which indicates a successful connection.
Weak Signal Solution: Use a Wi-Fi extender or relocate your router closer to the Wall Connector if the signal is poor.
Missed Setup Window: If you miss the setup window, press and hold the button on the handle for 10 to 15 seconds to restart commissioning.
Update Firmware and Configure Access
Keeping your charger secure and up to date ensures optimal performance and access to the latest features.
Run Software Update
Tap Software Updates in the Tesla One app. Install the latest firmware. Future updates will happen automatically over Wi-Fi once connected.
Set Access Controls
Choose who can charge at your Wall Connector. Options include All Vehicles, Only Tesla, Authorized Tesla Only by VIN, or Compatibility Mode. To add a vehicle, tap Add and enter your Tesla VIN.
Security Tip: Use Authorized Tesla Only to prevent unauthorized vehicles from charging at your station.
Register to Owner’s Tesla Account
This final step links the charger to your Tesla account for full remote access and monitoring capabilities.
Enter Customer Information
Tap Registration then Enter Customer Info. Search by the email address linked to the customer’s Tesla Account. If an existing site exists, select it. If this is a new site, fill in the address and contact details.
Critical: The email must match the Tesla Account exactly to enable remote access via the Tesla app.
Final Verification
All app tabs should show green checkmarks. The Wall Connector should display a solid green light. The installer gains PowerHub access, and the owner can see the charger in their Tesla app.
Test Charging with Your Tesla
Now it is time to verify your installation works correctly by charging your vehicle.
Start a Charging Session
Plug the charging handle into your Tesla. Wake the car. Charging should begin automatically within moments.
Monitor Performance
Check the Tesla app to verify the charge rate stabilizes at 48 to 50 amps, which equals approximately 11 to 12 kW. Review the kWh delivered and session cost if an energy plan was entered.
Expected Output: 48A multiplied by 240V equals 11.52 kW theoretically. Real-world performance is typically 11 to 11.8 kW due to efficiency losses.
Troubleshoot Common Installation Issues
Even careful installations can encounter problems. Here is how to address the most common issues.
No Power to Unit
Check whether the breaker has tripped, a wire is loose, or voltage is missing. Fix by retightening all connections, testing voltage at each point, and resetting the breaker if needed.
Wi-Fi Won’t Connect
This is usually caused by a 5 GHz network or weak signal. Fix by switching to a 2.4 GHz network, moving the router closer, or using a Wi-Fi extender.
Flashing Red Light
A flashing red light indicates a firmware error or hardware fault. Try holding the button for 10 seconds to reset. Contact Tesla Support if the problem persists.
App Shows Offline
This usually means the router has rebooted or Wi-Fi is down. Fix by rebooting the router and ensuring a stable 2.4 GHz signal.
Ensure Code Compliance and Safety
Following electrical codes protects you from fines, hazards, and insurance issues.
Follow NEC Article 625
Use only listed equipment. Install in a dry, accessible location. GFCI protection may be required locally, though it is rare for hardwired units.
Permit and Inspection
Most jurisdictions require a permit and inspection for new 60-amp circuits. DIYers should call their Authority Having Jurisdiction before energizing the circuit.
DIY Risk Assessment
DIY installation saves $500 to $1,000 in labor costs and provides full control over placement. However, it carries risk of fire or shock if done incorrectly. It may void the warranty if the unit is damaged. An inspection is still required regardless of who performs the work.
Final Advice: Attempt DIY installation only if you have experience with 240V electrical work. Always turn off the main power before working in the panel. Use torque tools and never guess at specifications. When in doubt, hire a licensed electrician.
Frequently Asked Questions About Installing a Tesla Wall Charger
Do I need an electrician to install a Tesla Wall Connector?
While Tesla recommends professional installation, experienced DIYers with 240V electrical knowledge can install the Wall Connector themselves. However, you must obtain any required permits and pass inspection.
What size breaker do I need for a Tesla Wall Charger?
A 60-amp double-pole breaker is recommended for the Tesla Wall Charger Gen 3. This supports the full 48-amp output. A 50-amp breaker can be used but limits charging to 40 amps.
Can I use existing NEMA 14-50 wiring for my Tesla Wall Charger?
Yes, if you have existing NEMA 14-50 wiring, you can use it for the Wall Connector. Simply cap off the white neutral wire with a wire nut since the Wall Connector does not require a neutral connection.
Why won’t my Tesla Wall Connector connect to Wi-Fi?
The Tesla Wall Connector only supports 2.4 GHz networks, not 5 GHz. Ensure you are connecting to a 2.4 GHz network. Weak signals can be improved with a Wi-Fi extender.
How long does it take to install a Tesla Wall Charger?
The physical installation typically takes four to six hours for experienced DIYers. Professional electricians usually complete the job in two to four hours. Plan for additional time for app setup and testing.
What happens if I don’t torque the wires to specification?
Under-torqued connections cause arcing, overheating, and potential fire hazards. Over-torqued connections damage terminals. Always use a torque screwdriver set to 50 inch-pounds for the Wall Connector terminals.
Key Takeaways for Installing Your Tesla Wall Charger
Installing a Tesla Wall Charger requires careful electrical planning, precise wiring, and proper commissioning through the Tesla One app. The most critical steps are verifying panel capacity, using correct wire gauge and conduit, torquing all connections to specification, and completing the Wi-Fi setup on a 2.4 GHz network. Save $500 to $1,000 with DIY installation, but never compromise on safety. Obtain required permits, schedule inspections, and hire a licensed electrician if you lack 240V experience. Once installed and commissioned, your Tesla Wall Charger delivers seamless, high-speed home charging ready whenever you are.


