
Installing a solar power inverter is a critical step in setting up a functional solar energy system for your home, cabin, or RV. The inverter converts DC electricity from your solar panels into usable 120V/230V AC power, making it the brain of your entire photovoltaic setup. Done correctly, it powers everything from lights and refrigerators to well pumps and electronics. But incorrect installation can lead to equipment damage, fire hazards, or voided warranties.
This comprehensive guide walks you through every essential phase of installing a solar inverter, covering off-grid, hybrid, and grid-tied systems with precise steps, safety protocols, and real-world best practices. You will learn how to choose the right inverter, wire connections safely, follow the correct power-up sequence, and enable remote monitoring for long-term reliability.
Choose the Right Inverter Type for Your System
Selecting the correct inverter determines whether your solar system performs reliably under load and environmental conditions. There are four main types to consider based on your energy needs and setup.
Match Inverter Type to Your Energy Needs
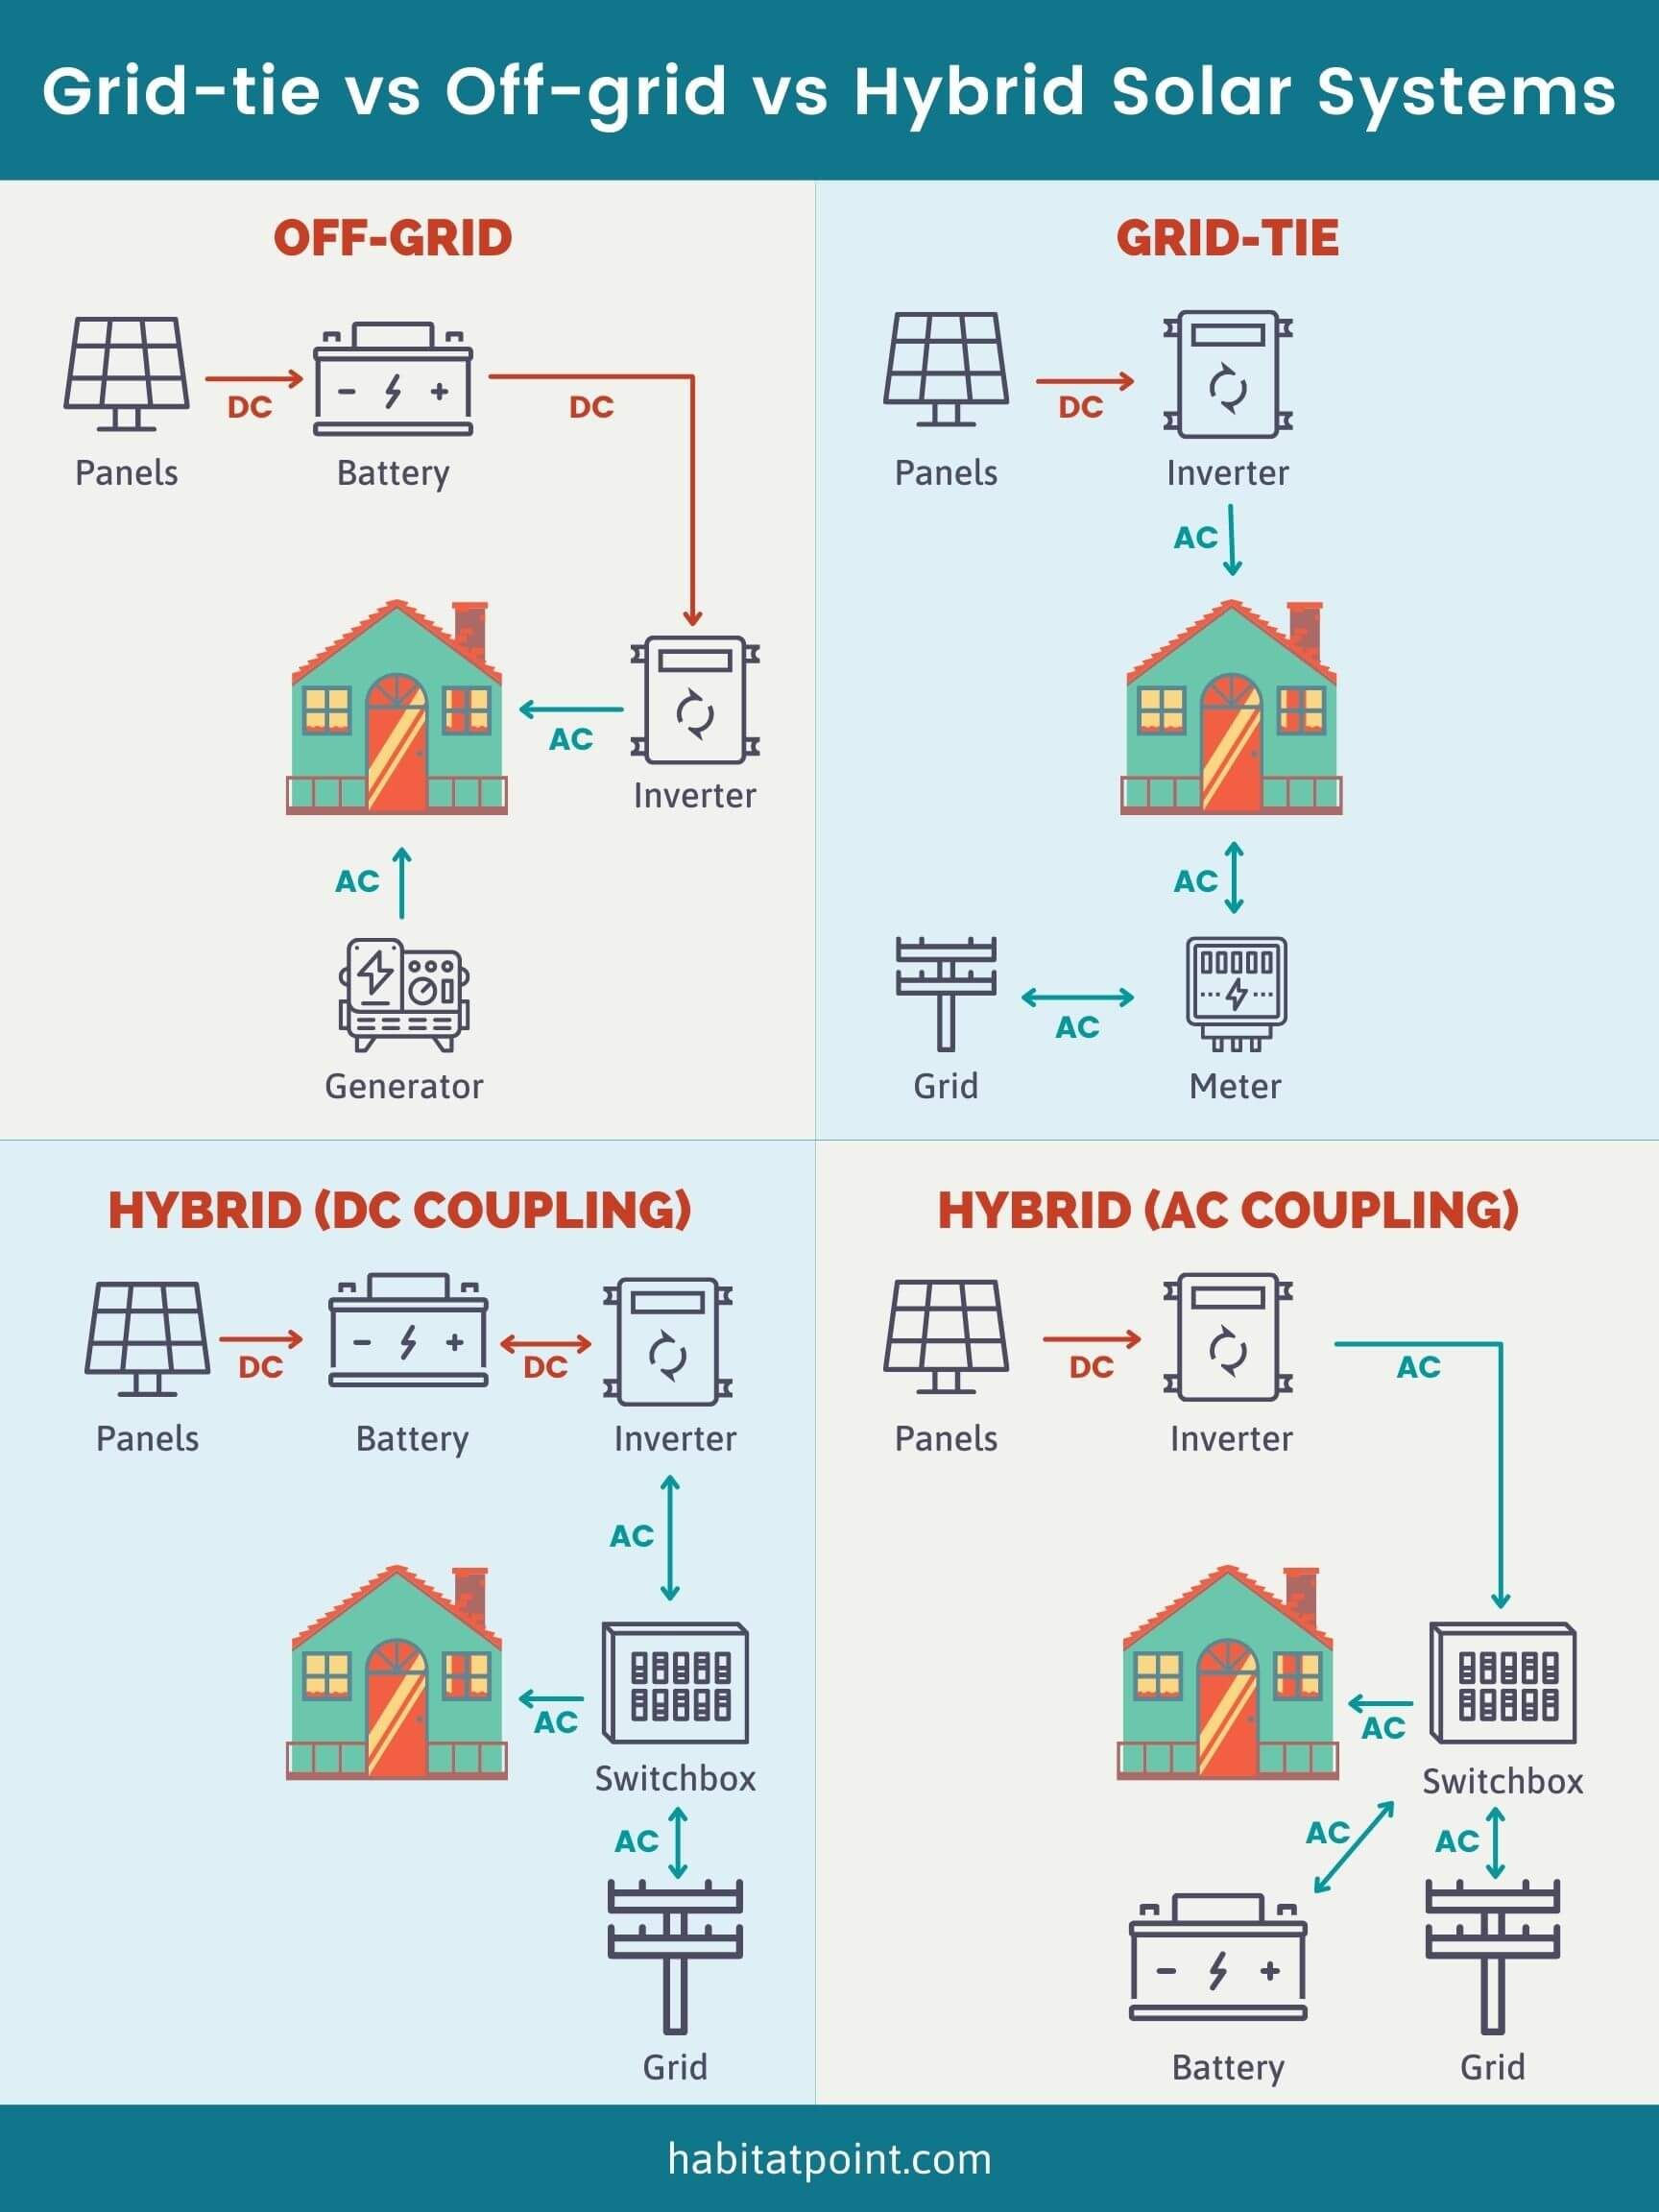
Off-grid inverters work best for remote cabins, RVs, or emergency backup systems. They run independently of the grid and require a battery bank to store energy for use when sunlight is not available. Grid-tied inverters connect directly to the utility grid and feed excess solar energy back through net metering, but they shut down during outages for safety. Hybrid inverters combine grid-tied and off-grid capabilities, supporting battery storage and providing backup power when the grid fails. Microinverters install behind each solar panel and convert DC to AC at the source, making them ideal for shaded roofs or modular DIY builds.
For most home users adding battery backup, hybrid inverters like the SolaX X3 Pro G2 or PAL Mister 3000W offer the best balance of flexibility and functionality.
Prioritize Key Inverter Features
When choosing an inverter, prioritize these important features for optimal performance and safety. Look for MPPT charge controller integration, which maximizes solar harvest by up to 30% compared to PWM controllers. DC oversizing capability allows you to install more solar panels than the rated output, increasing production on cloudy days. Surge capacity handles startup surges from motors like refrigerators or well pumps. Smart monitoring via app enables real-time tracking of solar generation, battery state of charge, and fault alerts. Wi-Fi or Bluetooth connectivity simplifies configuration and firmware updates.
Always avoid inverters without rapid shutdown compliance if installing in the United States, as required by NEC 2017+.
Plan Your Solar Inverter Installation Location
Choosing the right location for your inverter is crucial for performance, safety, and ease of maintenance. A poorly chosen location can reduce efficiency and create safety hazards.
Calculate Your Energy Requirements
Start by listing all appliances you plan to power and their wattage to determine your system size. Your inverter must handle the peak load, which means adding the highest simultaneous loads. For example, running a microwave at 1,000W plus a refrigerator at 150W requires at least 1,150W minimum continuous rating from your inverter.
For battery-based systems, calculate usable capacity carefully. A 12V 100Ah lead-acid battery provides approximately 1,200Wh, but only 600Wh usable at 50% Depth of Discharge. Lithium LiFePO4 batteries allow up to 90% DoD, providing significantly more usable energy.
Select an Optimal Installation Location
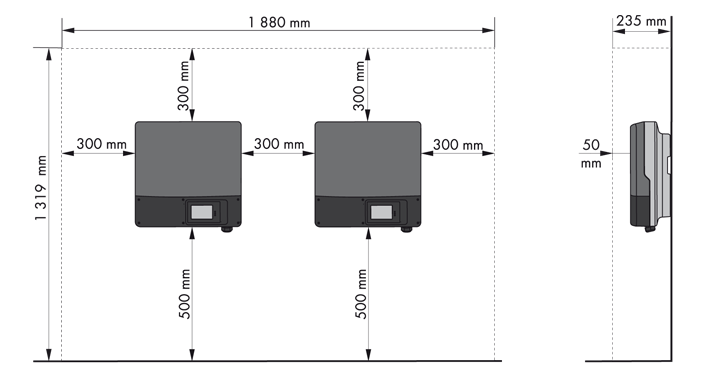
Mount the inverter indoors in a cool, dry, ventilated space away from direct sunlight and moisture. Key considerations include staying within 10 feet of the battery bank to minimize voltage drop on DC cables, and being close to the main electrical panel to reduce AC wiring length.
Mount the unit on structural wall studs, masonry, or concrete, never drywall alone. Maintain minimum 6 inches clearance around the inverter for airflow, and install it out of reach of children and pets. Ensure the wall can support 8–30 kg depending on the model.
Gather Required Tools and Materials
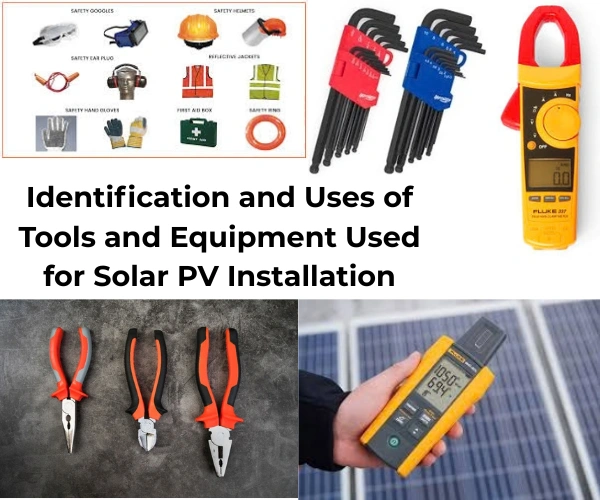
Having the right tools and materials before starting ensures a smooth installation process and prevents delays or safety hazards.
Essential Wiring and Protection Components
Use only high-quality, code-compliant parts for your installation. Required materials include 2 AWG battery cables for low-resistance connection between inverter and battery, 10 AWG AC input/output wires such as THHN or Romex for 120V circuits, and 12 AWG PV input wires that are UV-resistant stranded copper for solar array connections. You will also need MC4 connectors standard for panel-to-inverter DC runs, and conduit such as PVC or liquid-tight to protect wires from abrasion, rodents, and weather.
Safety Devices You Cannot Skip
Each circuit requires proper protection devices for safety. Install a battery disconnect switch rated 2-pole 160A to isolate the battery for maintenance. Use a DC PV input breaker rated 25A to break the solar circuit safely. Add AC input and output breakers rated 40A each to protect against overloads. Install an ANL fuse rated 150A on the positive battery cable to prevent short-circuit fires. Include Type II surge protectors on both AC and DC sides to guard against lightning strikes.
Always use 6 AWG green or bare copper wire for grounding the inverter chassis to a grounding rod per NEC 690 requirements.
Personal Protective Equipment
Before starting any work, gather proper PPE including insulated gloves rated 600V and safety glasses. Use non-conductive footwear and work with one hand behind your back to avoid creating a current path through your chest. Use voltage-rated tools only and never work alone on high-voltage DC systems.
Mount the Inverter Securely
Proper mounting ensures the inverter operates safely and remains stable throughout its service life.
Secure to Structural Support
Position the inverter using its keyhole mounting slots. Mark screw locations on the wall and drill pilot holes into studs, concrete, or masonry using appropriate anchors. Use lag bolts or toggle bolts, never drywall screws, and tighten securely so the unit does not wobble.
Ensure the surface is level to prevent stress on terminals, and double-check clearance for ventilation and access to ports. Avoid placing the inverter near flammable materials or where water might drip, such as under sinks or air conditioning units.
Connect the Battery Wiring First
Connecting the battery before the solar array is a critical safety step that protects your equipment.
Why Battery Connection Comes First
The inverter internal control circuitry needs DC power from the battery to initialize and manage incoming solar voltage safely. Connecting solar panels before the battery may damage the MPPT tracker or trigger fault codes.
Step-by-Step Battery Wiring
Turn off the battery disconnect switch before making any connections. Strip 2 AWG cables and crimp with SC35-5 lugs. Loosen the inverter battery terminals, with the left terminal being positive and the right being negative. Insert the cables, tighten to manufacturer torque specifications usually 5–7 Nm, and perform a snug-and-pull test to ensure connections are secure. Connect the other ends to the battery bank, matching polarity carefully. Install the 150A ANL fuse within 18 inches of the battery positive terminal.
Keep the battery bank within 3 meters of the inverter, as every extra foot increases voltage drop and reduces efficiency.
Wire the Solar Panel Input Circuit
Proper wiring of the solar input ensures optimal energy harvest and safe operation of your system.
Prepare PV Conductors
Run 12 AWG UV-resistant stranded copper wire from solar panels to the inverter through conduit. Use MC4 connectors to join panels in series or parallel, staying within the inverter MPPT voltage range. For example, 7 panels with Voc of 43.82V each connected in series produces 306.74V, which remains within a safe MPPT window of 120–400V.
Check temperature corrections for cold climates, as voltage rises in cold weather and could exceed safe limits.
Connect to Inverter and Breaker
Install a 25A DC PV input breaker near the inverter. At the breaker, connect the positive red wire to the right terminal and the negative black wire to the left terminal. Route wires to the inverter, connecting positive to the left PV terminal and negative to the right PV terminal. Torque all connections and inspect for stray wire strands.
Cover panels or work at night to avoid live DC arcs during installation.
Install AC Output Wiring
Proper AC output wiring delivers safe, reliable power to your loads.
Power Your Loads Safely
Use 10 AWG THHN or Romex cable for AC output connections. Connect the black live wire to the L terminal, white neutral wire to the N terminal, and bare or green ground wire to the ground screw on the inverter chassis.
Route the output to a dedicated sub-panel, transfer switch, distribution box, or directly to critical loads. If using a distribution box, install individual 20A breakers for each circuit and label them clearly.
Ground the entire system using 6 AWG copper wire bonded to a grounding rod.
Add AC Input for Grid or Generator Backup
Hybrid inverters can accept AC input from the grid or a generator to recharge batteries during low sun periods and provide seamless backup power.
Enable Grid or Generator Charging
Connect a heavy-duty extension cord or conduit-run wires to the AC input breaker. Link black to black and white to white, then connect the ground wire to the inverter chassis ground. Even if unused, keep the ground connected for safety.
Never backfeed the grid with a DIY setup, as only certified grid-tied systems with anti-islanding protection are allowed.
Perform Safety Checks Before Power-Up
Verification before powering up prevents damage and ensures safe operation.
Verify Every Connection
Before turning anything on, confirm all breakers are OFF and ensure no AC input is present. Recheck polarity on all terminals, torque on lugs, and ensure no exposed copper or loose strands. Verify conduit seals and drip loops are properly installed, and make sure surge protectors and fuses are in place.
Use a multimeter to test battery voltage, open-circuit PV voltage, and ground continuity before proceeding.
Follow the Correct Power-Up Sequence
Following the exact power-up sequence prevents damage and ensures proper system initialization.
Step-by-Step Activation
Turn on the battery disconnect switch first to power the inverter control board. Flip the inverter rocker switch ON and verify the LCD illuminates. Switch on the AC output breaker to enable power delivery to loads. Turn on distribution panel breakers to energize individual circuits. Finally, close the solar disconnect switch or PV breaker to activate solar input and begin charging.
Success indicators include the LCD showing solar input icon, battery charge level, and AC output active. An outlet tester should show correct wiring with two lights, and there should be no alarm beeps or fault codes.
Configure Inverter Operating Modes
Proper configuration optimizes energy usage and extends battery life.
Set Off-Grid Priority Mode
Many hybrid inverters let you define energy priorities. To avoid drawing from the grid, press Set on the LCD, navigate to Operating Mode, select Off-Grid Priority or Solar First, and disable Grid Charging if not needed. This ensures solar and battery power are used first, reducing utility dependence.
Program Battery Parameters
Match settings to your battery chemistry for optimal performance and longevity. For lead-acid AGM or Gel batteries, use a charge voltage of 14.4V, float voltage of 13.6V, and cutoff voltage of 11.8V. For LiFePO4 lithium batteries, use charge voltage of 14.6V, float voltage of 13.6V, and cutoff voltage of 10.0V.
Enter these values in the Battery Setup menu, always referring to the battery manufacturer datasheet for exact specifications.
Enable Remote Monitoring
Modern inverters support cloud monitoring for ongoing performance tracking and maintenance alerts.
Connect via Solar Man Smart App
Insert the Wi-Fi dongle into the RS485 port and download the Solar Man Smart app for iOS or Android. Create an account and add the device using the serial number. Pair via Bluetooth first, then connect to home Wi-Fi to view real-time solar production, battery state of charge, load consumption, and fault alerts.
Use SolaX Cloud for Advanced Insights
For SolaX models, access the SolaX Cloud portal to track daily and monthly generation, review battery cycle count, receive remote firmware update alerts, and generate PDF performance reports. Keep your system current with firmware updates that improve efficiency, fix bugs, and add features.
Follow Safety and Compliance Requirements
Meeting electrical codes ensures safe operation and maintains warranty coverage.
Meet NEC 690 and Local Codes
In the United States, solar installations must comply with National Electrical Code Article 690, including rapid shutdown requirements that reduce DC voltage to less than 80V within 30 seconds within 1 foot of each module. Label all disconnects, breakers, and equipment, and ensure proper grounding of all metal parts.
DIY installations may void insurance or warranties, especially for grid-tied systems.
When to Hire a Licensed Electrician
Call a professional if you are connecting to the utility grid, your system requires a permit or inspection, you are unfamiliar with AC load centers or transfer switches, or local code mandates third-party certification. Even experienced DIYers should have a licensed installer inspect final wiring.
Troubleshoot Common Installation Issues
Knowing how to diagnose problems saves time and prevents frustration.
Inverter Will Not Turn On
Possible causes include low battery voltage below 21V for a 24V system, loose battery cables, or a tripped disconnect switch. Check voltage with a multimeter, re-tighten connections, and charge the battery if below threshold.
Fault Light Illuminated
Check the LCD display for error codes. E01 indicates overvoltage from too many panels or cold weather boost. E03 means overtemperature from poor ventilation or high ambient heat. E05 signals a short circuit from damaged wiring or reversed polarity. Isolate components and retest.
No Solar Charging
Verify the PV breaker is in the ON position and check panel cleanliness and shading. Inspect MC4 connections for corrosion and measure open-circuit voltage to ensure it is within MPPT range. Clean panels with water and a soft cloth, avoiding pressure washing.
Maintain Your System Long-Term
Regular maintenance ensures optimal performance and extends system lifespan.
Monthly and Annual Tasks
Inspect wire connections monthly and clean inverter vents quarterly. Re-tighten terminals after the first 24–48 hours and then annually. Check battery electrolyte levels for flooded lead-acid batteries monthly. Update firmware via the app whenever updates are available.
Lithium batteries require minimal maintenance but monitor state of charge regularly.
Optimize Performance Over Time
Adjust panel tilt seasonally, adding 15 degrees in winter and subtracting 15 degrees in summer. Add more panels if within the DC oversizing limit, and expand battery capacity for longer backup duration. Use monitoring data to identify underperformance trends early.
Frequently Asked Questions About Installing a Solar Power Inverter
Can I install a solar inverter myself or do I need an electrician?
For off-grid and small hybrid setups, skilled homeowners can tackle DIY installation. However, grid-tied systems require licensed electricians due to code compliance and utility interconnection rules. Even for off-grid installations, having a professional inspect the final wiring is highly recommended.
What size inverter do I need for my solar system?
Size your inverter based on peak load, which is the highest simultaneous wattage of all appliances you plan to run at once. Add a 20-30% buffer for surge capacity to handle motor startup from refrigerators, well pumps, or other appliances with high starting wattage.
How long does it take to install a solar power inverter?
A typical residential installation takes 4-8 hours for an experienced DIYer, including mounting, wiring, and configuration. Professional installers usually complete the job in 2-4 hours. Time varies based on system complexity and whether permits are required.
What is the difference between MPPT and PWM charge controllers?
MPPT Maximum Power Point Tracking controllers are more efficient, maximizing solar harvest by up to 30% compared to PWM Pulse Width Modulation controllers. MPPT controllers adjust the input voltage to find the optimal power point, while PWM simply pulse the charging current.
Do I need a battery to use a solar inverter?
It depends on the inverter type. Grid-tied inverters do not require batteries and can feed excess power back to the grid. Off-grid and hybrid inverters require batteries for energy storage. Hybrid systems can operate with or without batteries depending on configuration.
How do I ground my solar inverter system properly?
Connect the inverter chassis to a grounding rod using 6 AWG green or bare copper wire. Bond all metal parts including mounting brackets and distribution boxes to the same ground. Follow NEC Article 690 requirements and local electrical codes for proper grounding.
Key Takeaways for Installing Your Solar Power Inverter
Installing a solar power inverter is a powerful step toward energy independence when done correctly. The most critical steps include choosing the right inverter type for your system needs, connecting the battery before the solar array to protect internal components, and following the exact power-up sequence to prevent damage. Always prioritize safety by wearing proper PPE, de-energizing circuits before working, and meeting NEC Article 690 requirements for grounding and rapid shutdown. For grid-tied systems, always involve a licensed electrician to ensure code compliance and maintain warranty coverage. With careful planning, proper tools, and adherence to safety practices, your solar inverter will deliver reliable renewable energy for years to come.


