
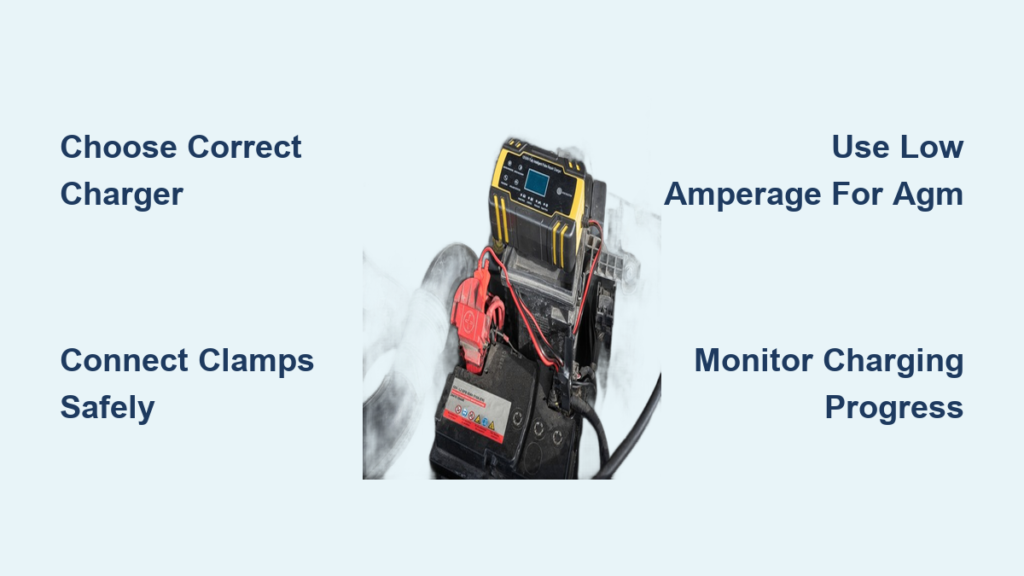
A dead car battery is one of the most common reasons for a vehicle failing to start, especially after long periods of inactivity, frequent short trips, or cold weather exposure. While jump-starting gets you going temporarily, knowing how to charge a car battery with a battery charger is the real solution for restoring full power safely and extending battery life. Unlike the alternator, which maintains charge during driving, a dedicated battery charger delivers controlled, optimal current to revive even deeply discharged batteries. This guide walks you through every step, from choosing the correct charger and testing voltage to connecting safely, monitoring progress, and knowing when a battery cannot be saved.
Choose the Right Battery Charger
Selecting the appropriate charger is the first critical step. Using the wrong type risks undercharging, overcharging, or permanent damage to your battery.
Match Charger to Battery Type
Not all chargers work for all battery chemistries. Understanding your battery type ensures compatibility and prevents costly mistakes.
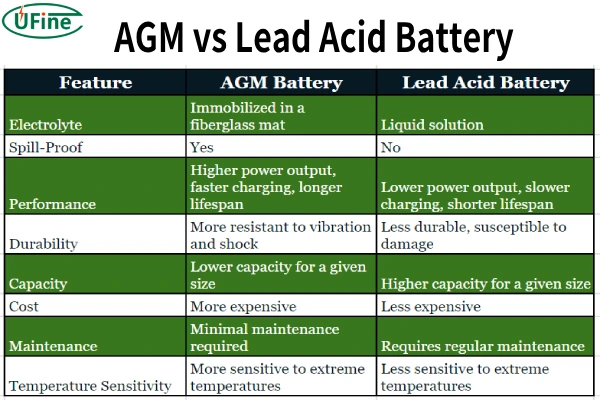
• Flooded lead-acid: Most common battery type. Works with manual, automatic, or smart chargers at 2-10A.
• AGM (Absorbent Glass Mat): Used in modern start-stop vehicles. Requires a charger with AGM mode and low amperage (2A ideal).
• Gel batteries: Sensitive to overvoltage. Need gel-specific charging profiles to prevent damage.
• EFB (Enhanced Flooded Battery): Improved version for start-stop systems. Use EFB-compatible chargers only.
Pro Tip: Smart chargers automatically detect battery chemistry and adjust voltage and current, making them the best choice for beginners and long-term use.
Select Charger Based on Use Case
Different charging scenarios call for different charger types. Choose based on your specific needs.
• Smart chargers: Ideal for daily users and storage. Automatically switch to float mode when full.
• Manual chargers: Require constant monitoring. Best for experienced users who understand charge cycles.
• Heavy-duty chargers (50A+): Provide fast boost for emergencies. Not for extended use due to overheating risk.
• Trickle chargers (1-2A): Slow but safest for deep discharges and seasonal vehicles.
Avoid: Using a standard charger on AGM or gel batteries unless explicitly labeled compatible.
Prepare the Battery and Work Area
Proper preparation prevents accidents and ensures effective charging. Taking a few minutes to set up correctly saves headaches later.
Ensure Safe Charging Conditions
Battery charging produces hydrogen gas, which is flammable. Following safety protocols protects you and your vehicle.
• Work in a well-ventilated area—never charge in enclosed garages without airflow.
• Keep sparks, flames, and smoking away from the battery.
• Wear safety glasses and gloves to protect against acid spray.
• Turn off all vehicle electronics (radio, lights, climate control) before starting.
Myth Busted: Charging on concrete does not drain modern batteries. Cases are sealed and insulated.
Inspect the Battery First
A visual inspection reveals issues that could complicate charging or create safety hazards.
• Corrosion (white or green crust on terminals): Clean with a wire brush and baking soda solution (1 tablespoon baking soda + 1 cup water).
• Cracks, leaks, or bulging case: Replace immediately—do not attempt to charge.
• Loose cables or blocked vent pipes: Clear debris to prevent pressure buildup.
Warning: Never charge a frozen battery. Allow it to warm to room temperature first—charging can cause explosion.
Test Battery Voltage Before Charging
Testing voltage tells you the battery’s current state and helps determine if recovery is possible.
Use a Multimeter to Assess Charge Level
A multimeter provides accurate voltage readings that guide your charging approach.
- Set multimeter to DC volts.
- Touch red probe to positive (+) terminal, black to negative (-) terminal or chassis ground.
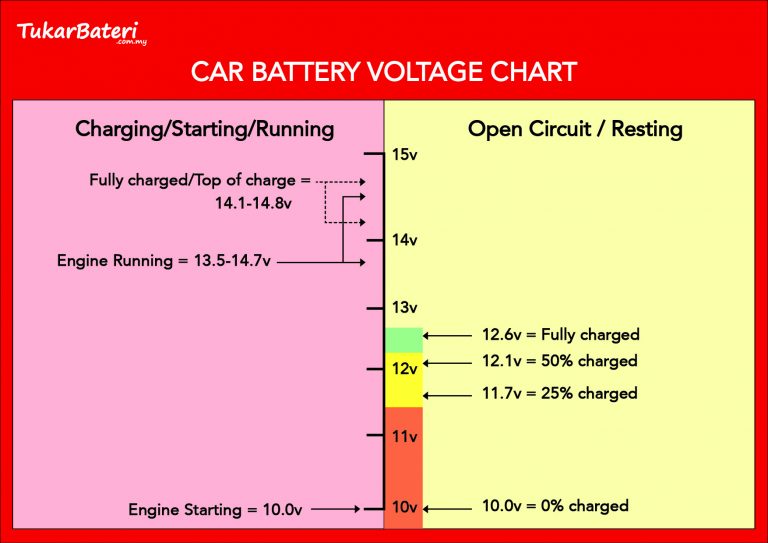
- Read the voltage and compare to the charge level chart:
| Voltage | State of Charge | Action |
|---|---|---|
| 12.6V+ | Fully charged | No charge needed |
| 12.4V | 75% charged | Optional maintenance charge |
| 11.85V or below | Deeply discharged | Charge immediately |
| Below 5V | Severely depleted | May recover with slow charge |
| 0-3V | Likely dead cell | May be unrecoverable |
Real-World Example: A battery at 2.8V can often be revived with a 2A trickle charge over several hours.
Connect the Charger Safely
Connection order matters for safety. Following the correct sequence prevents sparks near the battery, where hydrogen gas may be present.
Follow Correct Clamp Order
Connecting in the wrong sequence creates sparks that could ignite hydrogen gas. Always connect in this order:
- Turn off and unplug the charger before making any connections.
- Attach red (positive) clamp to battery positive (+) terminal.
- Attach black (negative) clamp to:
• Engine block or chassis bolt (preferred for safety), or
• Directly to negative terminal if ground point is not accessible.
Why ground instead of terminal? It reduces spark risk near the battery, lowering explosion chance.
Optional: Disconnect the negative terminal before charging a completely dead battery to protect sensitive electronics from voltage surges.
Set Charging Mode and Start
With connections secure, select the appropriate settings for your battery type and charger model.
For Smart or Automatic Chargers
These chargers handle most of the work automatically once configured.
• Plug in and power on the charger.
• Select battery type (AGM, flooded, EFB) if prompted.
• Charger auto-detects voltage and begins charging.
• LED indicators show progress: red means charging, green means complete.
For Manual Chargers
Manual chargers require user selection and careful monitoring throughout the process.
• Set to 12V (standard for cars).
• Choose amperage based on your situation:
• 2A (trickle): Safest option. Takes 12-24 hours. Best for deep discharges.
• 6-10A: Faster charging. 4-8 hours. Appropriate for moderate discharge.
• Plug in and monitor every few hours to prevent overcharging.
Avoid engine start or boost mode (50-200A) for long charging. Use only 10-15 minutes maximum for emergency starts.
Monitor Charging Progress
Active monitoring ensures safe charging and helps identify problems before they cause damage.
Watch for Signs of Proper Function
Check these indicators within the first 5-10 minutes of charging.
• LED lights or gauge: Should indicate current flow is active.
• Battery temperature: Warm is normal. Hot to touch means stop immediately—risk of overcharging or internal short.
• No current after 10 minutes? Battery may have a dead cell or be beyond recovery.
Pro Tip: Smart chargers display charge percentage and estimated time remaining, eliminating guesswork.
Charging Time Estimates
Use this reference to plan your charging session based on charger amperage.
| Charger Amperage | Time to Charge 400-500 CCA Battery |
|---|---|
| 1-2A (trickle) | 12-24 hours (overnight) |
| 5A | Approximately 12 hours |
| 6-8A | 6-8 hours |
| 10A | 4-6 hours |
| 50A+ (boost) | 10-15 minutes (emergency only) |
Rule of Thumb: Lower amperage equals safer charging and better battery lifespan.
Handle Deeply Discharged Batteries
Batteries below 5V require special handling. Many automatic chargers refuse to start on such low voltage.
Use Manual Mode to Jump-Start the Charge
- Set charger to 12V, 2A or 10A manual mode.
- Connect and let run for 1-2 hours to raise voltage.
- Switch to automatic or smart mode to finish safely.
If no current flows after 10 minutes, the battery may be irreparable.
Expert Note: A 2.8V battery revived with 2A charge over 4 hours (to 75%), then overnight to full, represents a common success story.
Charge AGM and EFB Batteries Correctly
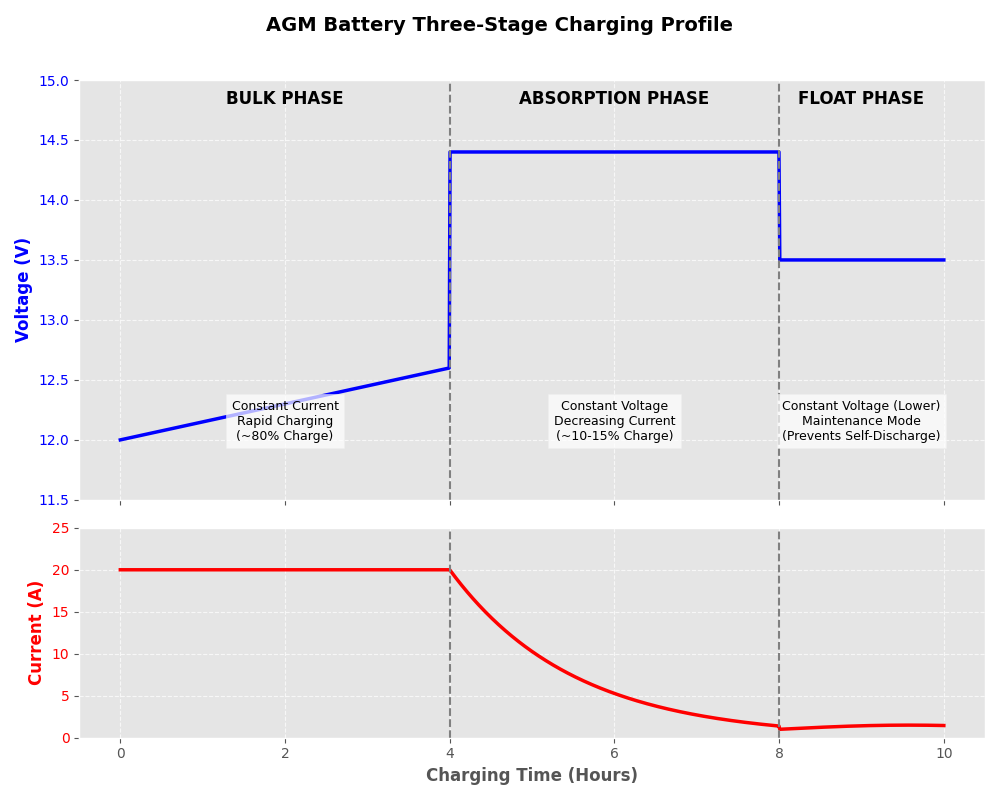
AGM and EFB batteries are common in modern vehicles but easily damaged by incorrect charging methods.
Use Low Amperage and Proper Mode
These advanced batteries require specific handling to maintain performance and longevity.
• Always use 2A setting for safe charging.
• Select AGM or EFB mode on smart chargers.
• Never use high-amperage boost mode unless manufacturer-approved.
Warning: High current causes gassing and dry-out in AGM batteries, reducing lifespan permanently.
Unplug and Disconnect in Reverse Order
Proper disconnection prevents sparks and protects vehicle electronics from damage.
Prevent Sparks and Short Circuits
Always disconnect in the exact reverse order of connection.
- Turn off and unplug the charger from the wall.
- Remove black (negative) clamp first.
- Remove red (positive) clamp second.
If you disconnected the battery earlier, reconnect positive first, then negative last.
Critical: Reversing this order risks shorting across terminals with tools or cables.
Know When the Battery Cannot Be Saved
Even with proper charging techniques, some batteries are beyond recovery. Recognizing failure signs saves time and prevents repeated frustration.
Identify Signs of Failure
Replace the battery if you observe any of these indicators:
• Voltage stays below 3V after 24 hours of charging attempts.
• Battery gets hot during charging.
• Emits rotten egg (sulfur) smell—sign of internal breakdown.
• Shows bulging, cracks, or acid leaks.
• Fails a load test at an auto parts store.
Reality Check: A battery that goes completely dead loses significant lifespan, even if it seems to work again afterward.
Test and Maintain After Charging
Charging completion is not the final step. Proper testing confirms success and prevents repeat issues.
Start and Drive to Confirm Health
After charging, verify the battery can hold a charge and the vehicle operates normally.
• Start the engine.
• Drive for at least 30 minutes to let the alternator stabilize the charge.
• Avoid shutting off immediately—short drives drain the battery again.
Perform a Load Test
For definitive battery health assessment, perform additional testing.
• At rest, a healthy battery reads 12.6V or higher.
• For definitive results, get a free load test at AutoZone, O’Reilly, or similar retailers.
• Check for parasitic drain if the battery dies again quickly—this is a common issue in modern vehicles.
Avoid Common Charging Mistakes
Learning from others’ errors helps you charge safely and effectively.
Critical Errors and How to Prevent Them
| Mistake | Risk | Solution |
|---|---|---|
| Connecting negative first | Sparks near battery | Always connect positive first, disconnect negative first |
| Charging a frozen battery | Explosion | Thaw completely before charging |
| Leaving manual charger on | Overcharging, boiling | Monitor and unplug manually |
| Using 10A+ on AGM battery | Permanent damage | Use 2A only |
| Charging in enclosed space | Hydrogen buildup | Work in ventilated area |
| Ignoring corrosion | Poor connection, slow charge | Clean terminals before charging |
Pro Tip: A slow 2A charge overnight is safer than rushing with high amperage, even if it takes longer.
Use Best Practices for Long-Term Care
Regular maintenance extends battery life and prevents unexpected failures. Proper care is especially important for vehicles stored long-term.
Maintain Batteries in Storage
For vehicles stored for extended periods, establish a maintenance routine.
• Charge every 6-8 weeks to prevent gradual discharge.
• Use a smart charger with float or maintainer mode for automatic upkeep.
• Store in a cool, dry place—avoid extreme temperatures that accelerate degradation.
Expert Insight: “A slow charge is best for the battery.” While it may take days, it maximizes lifespan significantly.
Frequently Asked Questions About Charging a Car Battery
Can I charge a car battery while it is still connected to the vehicle?
Yes, you can charge most batteries while they remain connected, provided you follow proper safety procedures. However, some experts recommend disconnecting the negative terminal before charging a completely dead battery to protect sensitive vehicle electronics from voltage surges. Always ensure all vehicle electronics are turned off before connecting the charger.
How long does it take to charge a dead car battery completely?
Charging time depends on the battery’s state of discharge and charger amperage. A completely dead battery at 2.8V may require 4 hours at 2A to reach 75%, then overnight to reach full charge. Using a 10A charger reduces this to 4-6 hours for moderate discharges. Trickle charging at 1-2A takes 12-24 hours but is safest for battery longevity.
What happens if I use the wrong charger on my battery type?
Using an incompatible charger can cause permanent damage. Charging an AGM battery with high amperage (10A+) can destroy internal cells through gassing and dry-out. Gel batteries are sensitive to overvoltage and can be damaged by incorrect charging profiles. Always match your charger to your battery type and use the appropriate mode.
Is it safe to charge my battery indoors?
Charging produces hydrogen gas, which is flammable and potentially explosive in enclosed spaces. Never charge in a closed garage without ventilation. Work in a well-ventilated area, open garage door, or outdoors. Keep sparks, flames, and smoking materials away from the battery during charging.
Why won’t my automatic charger start charging a dead battery?
Many automatic chargers have a voltage threshold (typically 5V) below which they refuse to start. This protects the charger from detecting a battery as non-existent rather than deeply discharged. Use a manual charger set to 2A or 10A for 1-2 hours to raise voltage above the threshold, then switch to automatic mode to complete the charge.
When should I replace my car battery instead of charging it?
Replace the battery if it shows physical damage (cracks, bulging, leaks), emits a rotten egg sulfur smell, stays below 3V after 24 hours of charging attempts, fails a load test, or is more than 3-5 years old. Batteries that have experienced complete discharge lose significant lifespan even if they appear to recover.
Key Takeaways for Charging Your Car Battery
Charging a car battery properly requires matching the right charger to your battery type, following safe connection and disconnection procedures, and monitoring the process appropriately. Smart chargers with automatic detection simplify the process for most users, while manual chargers offer control for experienced technicians. AGM and EFB batteries require low amperage (2A) and specific modes to avoid permanent damage.
Remember that the alternator maintains charge during driving but cannot fully recharge a dead battery. Regular use of a proper battery charger prevents unexpected failures and extends battery life by years. If your battery is over 3-5 years old or fails a load test, consider replacement, especially if still under warranty. Investing in a quality smart charger pays dividends through reliable vehicle starts and extended battery lifespan.


