A dead car battery can leave you stranded, especially when you don’t have a battery charger available. Whether you’re stuck in a remote area, facing an emergency, or simply forgot to maintain your battery, knowing how to charge a car battery without a charger can save the day and get you back on the road quickly.
This guide covers proven methods to revive a dead or weak battery using everyday tools, mechanical techniques, solar power, and improvised setups. You’ll learn step-by-step instructions for jump-starting with another vehicle, using portable power packs, push-starting a manual car, harnessing solar energy, and building DIY charging systems. Each method includes safety tips and realistic expectations so you can act quickly and effectively.
Jump-Start With Another Vehicle

The fastest and most reliable way to revive a dead battery is using a donor car and jumper cables. This method transfers enough power from a healthy battery to start your engine, after which your alternator takes over the charging process.
Connect Cables in Correct Order
Park the donor vehicle close enough for cables to reach, but ensure the cars do not touch. Turn off both engines and remove keys. If terminals are corroded, clean them with a wire brush or baking soda paste for better contact.
Connect the cables in this specific order to minimize spark risk:
- Attach red clamp to the dead battery’s positive (+) terminal
- Connect the other red clamp to the donor battery’s positive terminal
- Attach black clamp to the donor battery’s negative (-) terminal
- Connect the final black clamp to a grounded metal surface on the disabled car, such as the engine block (never connect directly to the dead battery’s negative terminal)
Start and Recharge
Start the donor car and let it idle for 10 minutes to transfer charge to the dead battery. Longer idling helps deeply discharged batteries. Attempt to start your vehicle. If successful, remove cables in reverse order: black clamps first, then red clamps.
Once your engine is running, drive for at least 30 minutes to allow the alternator to recharge the battery. This method provides a surface charge sufficient for starting but does not fully recharge the battery. Follow up with a slow charge using a smart charger for best results.
Use a Portable Jump Starter
A portable jump starter is a compact, self-contained power pack that starts your car without needing another vehicle. These devices are small enough to store in your glove compartment and can be recharged via wall outlet or USB before use.
How to Use a Jump Starter
Turn off all electronics in the car. Connect the red clamp to the battery’s positive (+) terminal. Attach the black clamp to the negative terminal or a grounded metal surface. Power on the jump starter. If your model requires it, press and hold the activation button to override safety sensors. Start the engine. Once running, drive for 30 minutes or more to recharge via your alternator.
Why It Works
Portable jump starters deliver a surface charge capable of starting a vehicle even when the battery reads 0V. This is particularly useful because many smart chargers won’t recognize a battery at 0V and won’t initiate charging. The jump starter raises voltage above 10V, allowing subsequent charging to begin.
Keep your jump starter regularly charged. A dead pack is useless in an emergency. Some models include USB ports, flashlights, and voltage displays for added utility.
Push-Start a Manual Transmission Car
Push-starting (also called roll-starting) uses kinetic energy to start the engine when the battery cannot power the starter motor. This method only works on vehicles with manual transmissions, which have a mechanical link between wheels and engine.
Steps to Push-Start Safely
Turn the ignition to “On.” Press and hold the clutch pedal. Shift into second gear, which reduces jerking compared to first gear. Have helpers push the car to 5-10 mph, or roll downhill if available. Quickly release the clutch while simultaneously pressing the accelerator. The engine should fire. Press the clutch again immediately to avoid stalling.
What Happens After Start
Once the engine is running, the alternator begins charging the battery. Drive for at least 30 minutes to restore usable charge. This method does not work on automatic transmissions because there is no mechanical link between wheels and engine.
Only attempt push-starting on safe, flat, traffic-free roads. Ensure the parking brake is off and no obstacles are in the way.
Charge With a Solar Panel
Solar charging provides a slow but sustainable method ideal for long-term maintenance and off-grid situations. This approach works well for RVs, boats, seasonal vehicles, and preventing sulfation during storage.
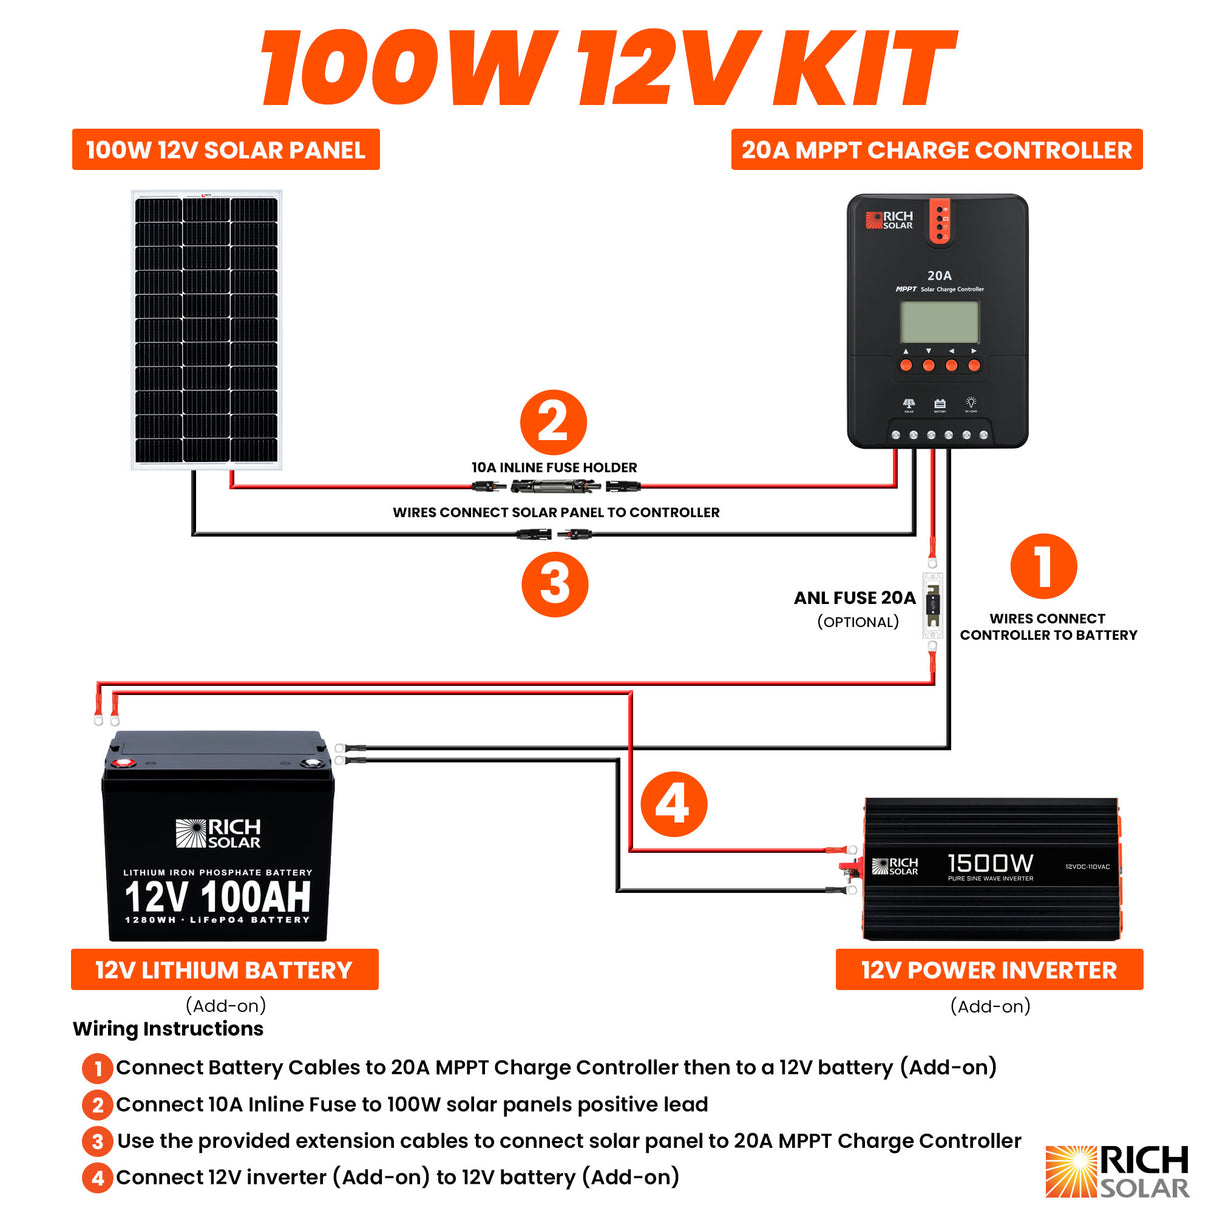
Required Setup
You will need a solar panel (10-100W, with 100W recommended for faster charging), a solar charge controller (mandatory to prevent overcharging and reverse current), alligator clips or battery clamps, and direct sunlight.
Step-by-Step Solar Charging
Place the panel in full sun, angled toward the sun. Connect the solar panel to the charge controller input. Link the controller output to the battery: red wire to positive (+), black wire to negative (-). Let charge for 8-72 hours depending on panel size and sunlight availability.
Charging Time Estimates
A 10W panel typically takes 3-5 days to charge a flat 12V battery. A 20W panel takes 2-3 days. A 100W panel can charge a flat battery in 8-10 hours under ideal conditions.
Never connect a solar panel directly to a battery without a charge controller. This risks overcharging, fire, or permanent damage to the battery.
Hand-Crank Battery Charger Method
A hand-crank charger is a human-powered option for emergencies when no electricity is available. These devices convert physical effort into electrical energy, making them useful for survival kits and camping trips.
How to Use a Hand-Crank Charger
Connect the red lead to the positive (+) battery terminal. Attach the black lead to the negative (-) terminal. Crank the handle steadily for 10-20 minutes. Attempt to start the engine.
Realistic Expectations
Hand-crank chargers have low power output and are not sufficient for full charging. They work best to deliver a surface charge sufficient to start the engine. Output depends on user strength and device quality. This method is not reliable for large or deeply discharged batteries.
DIY Charging With Power Supply and Light Bulbs
This improvised method uses household items and incandescent bulbs as current limiters to create a safe trickle charge. It’s an emergency workaround when no commercial tools are available.
What You Need
Gather a 12V DC power source such as a bench supply or spare battery, three 5-10W incandescent holiday light bulbs, alligator clips, a multimeter, and safety gloves and goggles.
Build the Circuit
Test the power source voltage with a multimeter. It should read 12-14V. Check the dead battery voltage to confirm the discharge level. Place the power source and battery apart to prevent sparks during connection.
Wire three bulbs in series between the power source and battery. Connect the black (negative) wire first from the source to the battery. Connect the red (positive) wire through the bulbs to the battery.
Monitor and Charge
The bulbs should glow dimly. Bright or hot bulbs indicate too much current. Charge for 20-30 minutes, checking battery voltage every 10 minutes. Disconnect in reverse order: remove positive first, then negative.
This method can raise a 0V battery to 10V or higher, allowing smart chargers to detect and continue charging. Never leave this setup unattended due to fire risk.
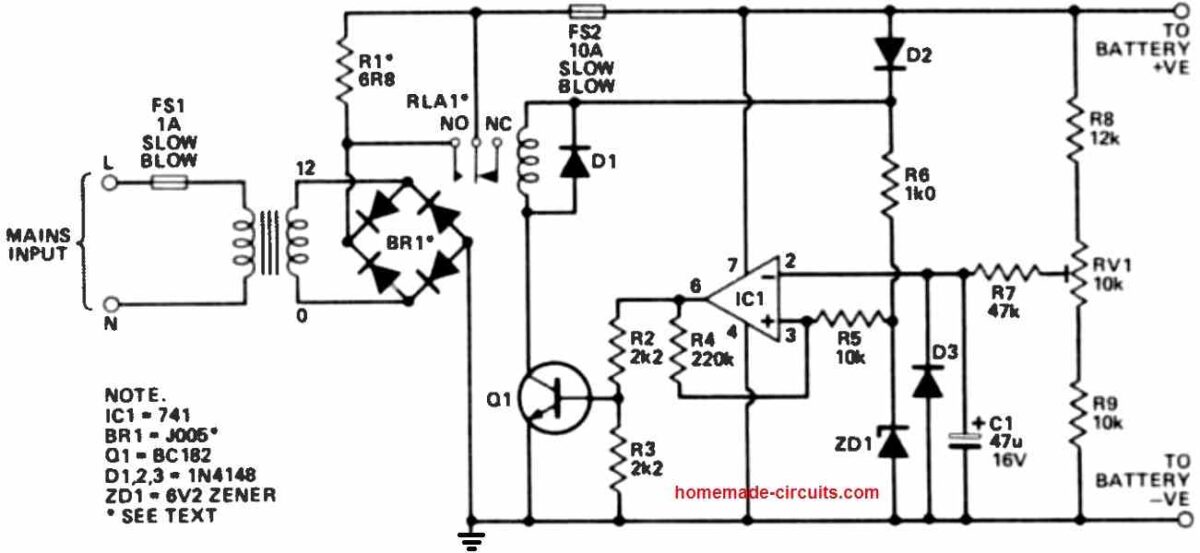
Use a Home Inverter or UPS
You can convert household AC power into DC to charge the battery, but this requires caution and proper regulation.
Option A: AC-to-DC Inverter
Use a 1500W or higher inverter with DC output terminals. Plug it into a wall outlet. Connect the inverter’s DC leads to the battery (red to positive, black to negative). Can charge in 1.5 to 3 hours if properly regulated.
Most inverters lack voltage regulation, creating high risk of overcharging or fire. Only use this method if you can monitor voltage continuously.
Option B: UPS Inverter
Most consumer UPS units cannot charge car batteries. Only tall tubular battery UPS systems (common in backup power setups) support external charging. Check your manual for compatibility.
Option C: Home Solar Battery System
A home solar battery system cannot charge a car battery directly. You must power a smart charger via the AC output. The smart charger regulates voltage to a safe 13.8-14.4V range.
Engine-Driven Generator Charging
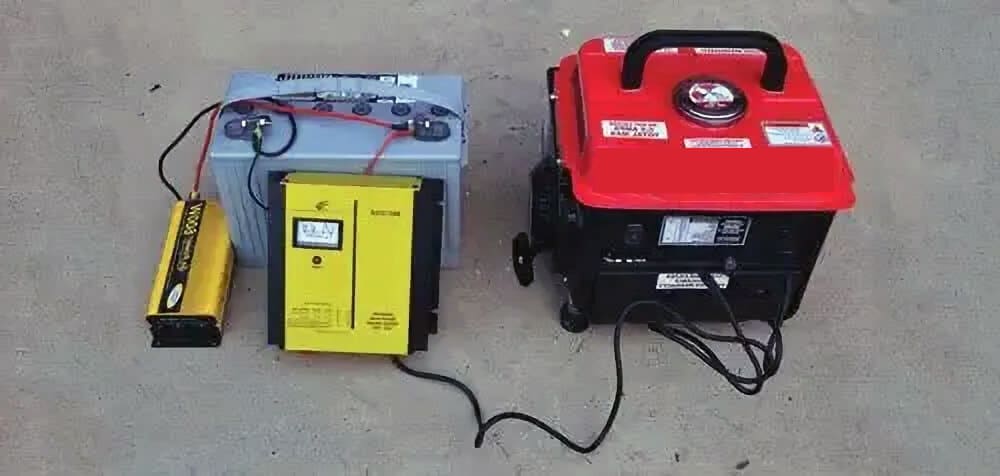
Use a gas-powered generator to run a battery charger in off-grid situations. This approach works well for farms, remote workshops, or off-grid living.
Safe Process
Run the generator until stable output is achieved. Plug a smart battery charger into the generator’s AC outlet. Connect the charger to the car battery. Let charge for 2-8 hours depending on charger and battery state.
Never connect a battery directly to a generator. This causes overvoltage and damage. A proper charger or regulator is always required.
Battery Swapping Technique
This method lets a healthy vehicle’s alternator charge your dead battery by temporarily installing it in another car.
How to Swap Safely
Remove the dead battery from your disabled car. Install it in a donor vehicle, either replacing the donor battery or using auxiliary terminals. Start the donor car (jump-start if needed). Drive for 30-60 minutes to charge. Reinstall the battery in your original vehicle.
Ensure both vehicles use 12V systems and compatible battery sizes. This method works well for mechanics, RV owners, or those with multiple vehicles.
Recharge With the Alternator After Start
Once your engine is running through any method, the alternator takes over battery charging. This is the critical final step that restores your battery to a usable state.
How Long to Drive
Thirty minutes of city driving provides a partial charge. Two or more hours of highway driving provides a full recharge. The longer you drive at higher RPMs, the more charge the alternator delivers.
Voltage Checks
Measure voltage with the engine off. A fully charged battery reads 12.6V. With the engine running, healthy alternator output reads 13.8-14.4V. If voltage doesn’t rise while driving, suspect a faulty alternator, bad wiring, or internal battery damage.
A sulfated or old battery may not accept charge even with a working alternator.
Critical Safety Rules
Follow these protocols for every method. Wear gloves and eye protection because battery acid and sparks are dangerous. Work in a ventilated area since batteries emit flammable hydrogen gas. Never connect positive to negative, which causes short circuits and explosions.
Disconnect negative first and connect last to reduce spark risk. Check battery condition before attempting any method. Replace immediately if the case is bulging. Stop use if you smell rotten eggs (sulfur leak). Clean heavy corrosion with baking soda and water.
Always use voltage regulation. Include a charge controller, smart charger, or current limiter like light bulbs to prevent overcharging.
Test Battery Health After Charging
Even if your car starts, the battery may still be failing. Verify health with these steps.
Step-by-Step Verification
Measure voltage with the engine off. A reading of 12.6V or higher means fully charged. A reading of 12.4V is acceptable. A reading below 12.2V needs more charging or replacement. Check voltage with the engine running. It should read 13.8-14.4V. If not, the alternator may be faulty.
Perform a load test with a battery tester. Inspect for parasitic drain if the battery dies again quickly. Replace batteries over 3-5 years old since most batteries degrade beyond this point.
Key Takeaways for Charging Without a Charger
Knowing how to charge a car battery without a charger gives you control in emergencies. From jump-starts to solar setups and DIY hacks, multiple methods exist to get your car running when traditional chargers aren’t available. The fastest options are jump-starting with another vehicle or using a portable jump starter, both getting you back on the road in minutes. For long-term battery health, follow any emergency start with 30+ minutes of driving to allow the alternator to recharge, and consider a full slow charge with a smart charger for deeply discharged batteries. Always prioritize safety by wearing protective gear, working in ventilated areas, and using proper voltage regulation to prevent damage or injury.
Frequently Asked Questions About Charging a Car Battery Without a Charger
Can I charge a car battery completely without a charger?
Most methods provide enough charge to start the engine rather than a full recharge. The alternator charges the battery while driving after a jump-start. For a complete charge, you need a smart charger or solar setup with a charge controller, which takes several hours to days depending on the method.
How long does it take to charge a car battery with solar panels?
A 100W solar panel in full sun charges a flat 12V battery in 8-10 hours. Smaller panels (10-20W) take 2-5 days for partial charge. Solar charging works best for maintenance and storage situations rather than emergency starts.
Is push-starting safe for my car?
Push-starting is safe when done correctly on manual transmission vehicles. It puts stress on the engine and drivetrain but causes no damage if performed properly. Never attempt push-starting on automatic transmissions or on busy roads.
Why won’t my smart charger work after a jump-start?
Smart chargers may not recognize a battery reading 0V. Use a jump starter or DIY method with light bulbs first to raise voltage above 10V. Once the battery reaches this threshold, smart chargers can detect and continue charging.
How do I know if my battery is actually charging while driving?
Use a multimeter to check voltage at the battery terminals with the engine running. Healthy alternator output reads 13.8-14.4V. If voltage stays at 12V or lower while driving, your alternator or charging system has a problem.