
Imagine your phone dying during a camping trip, or a power outage leaving you without lights or communication. A solar power battery charger solves this problem by converting sunlight into usable electricity anywhere you need it. Whether you’re building a tiny DIY AA charger or a full off-grid power station for tools and laptops, how to make a solar power battery charger comes down to understanding four core components: the solar panel, charge controller, battery, and output system. This guide walks you through selecting the right parts, matching voltages, and assembling safe, efficient systems that work in real-world conditions.
Choose the Right Solar Panel
Your solar panel is the heart of any solar charging system, converting sunlight into electrical energy. Selecting the right panel involves matching wattage to your needs, choosing the correct voltage, and picking a panel type that fits your application.
Match Wattage to Your Needs
Your solar panel wattage determines what you can charge and how fast charging occurs. The right size depends entirely on your intended devices and usage patterns.
For small electronics like phones, earbuds, or USB-powered gadgets, a 10 to 25 watt panel works well and stays lightweight for backpacking or emergency kits. If you’re powering larger devices such as laptops, CPAP machines, or power tools, aim for 50 to 200 watts. Off-grid setups with camping fridges or inverters need 100 watts or more, especially when paired with an MPPT charge controller for maximum efficiency.
A 100W solar panel can fully recharge a 50Ah battery in 6 to 8 hours under full sun, making it a popular choice for portable power stations.
Select the Correct Voltage
For most DIY systems, 12V nominal is the standard. However, the panel open-circuit voltage should be 18 to 22V to ensure reliable charging even in low-light conditions. Panels above 22V require an MPPT controller to step down voltage efficiently and prevent energy loss.
For compact lithium-based chargers using ICs like the LT3652, the input range is 0 to 40V, offering flexibility with higher-voltage panels.
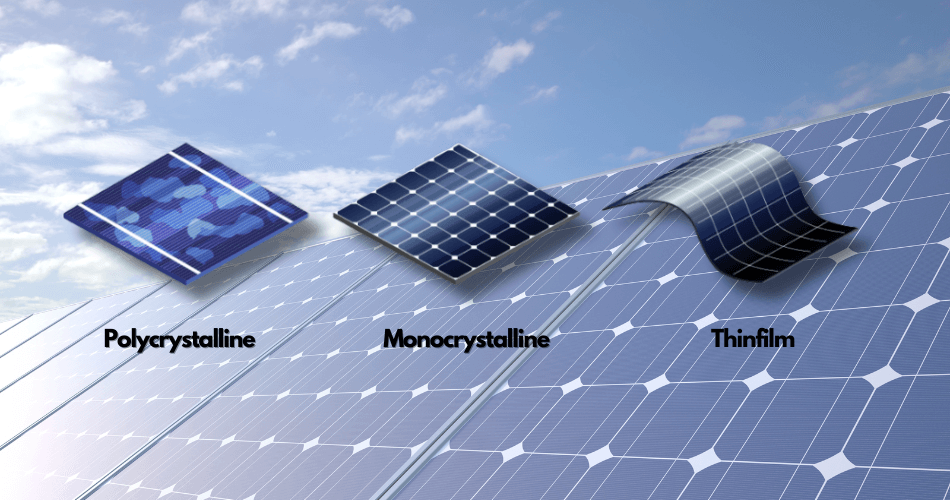
Pick the Best Panel Type
Different solar panels suit different applications. Rigid panels offer high efficiency and durability for permanent installations. Foldable panels are lightweight and portable, perfect for camping and overlanding. Flexible panels conform to curved surfaces, ideal for RVs or boats, and some include built-in BMS for direct phone charging. Salvaged panels from garden lights or scrap systems enable ultra-low-cost builds under $5 for educational projects.
Budget builders can find 1W 9V panels for around $17, great for charging AA batteries or powering small sensors.
Select and Size a Charge Controller

The charge controller protects your battery by regulating voltage and current, preventing overcharging and optimizing energy harvest. Choosing the right type and sizing it correctly ensures system longevity and performance.
Understand PWM vs MPPT
Two main types of charge controllers exist, each with distinct characteristics.
PWM controllers are affordable, typically costing $15 to $30, and work best for systems under 100W. They require panel voltage to closely match battery voltage, which reduces efficiency in cloudy conditions. MPPT controllers can be up to 30% more efficient, especially in variable light, and convert excess panel voltage into usable current. They’re ideal for systems over 100W but cost more.
Many cheap MPPT controllers are actually fake PWM units. Stick with trusted brands like Morningstar, Victron, or EPEVER to ensure real performance.
Size for Safety and Growth
Use these guidelines when selecting controller size. A 10A controller handles up to 120W on a 12V system. A 20A controller supports up to 240W. Always oversize by 25% to accommodate peak output and future upgrades.
Match Battery Chemistry
Ensure your controller supports your battery type. LiFePO4 requires specific charging profiles. Look for models with user-selectable settings for flooded lead-acid, AGM, gel, or lithium. The Morningstar ProStar 15 supports both PWM and MPPT and works with 12V AGM batteries.
Pick the Best Battery for Storage

The battery stores the energy your solar panel generates for use when sunlight is unavailable. Choosing the right battery type and capacity is critical for system performance and longevity.
Compare Battery Types
Battery chemistry affects weight, lifespan, usable capacity, and cost.
LiFePO4 batteries are 70% lighter than lead-acid, offer 2,000 to 5,000 cycle life, and allow 90 to 100% usable capacity. They charge fast but cost more upfront, typically $300 to $600. AGM lead-acid batteries are heavier but more affordable at $100 to $200, with 300 to 700 cycle life and 50% recommended depth of discharge. NiMH batteries are very light and inexpensive under $20, perfect for simple low-power builds like emergency flashlights, with 500 to 1,000 cycle life.
Choose the Right Capacity
Match capacity to your devices. A 20Ah battery handles phones, LED lights, and fans. A 50Ah battery powers CPAP machines, radios, and small fridges. A 100Ah battery runs power tools, laptops, and inverters for extended off-grid use.
Use Integrated Battery Hubs
Some batteries like the PowerMax 100Ah LiFePO4 come with a Max Hub that includes a built-in charge controller, state-of-charge indicator, and USB, Anderson, and SAE outputs. This simplifies wiring significantly: connect the solar panel directly to the battery via the Max Hub, then connect devices to the battery outputs. No external controller is needed, making this ideal for beginners.
Wire the Output System
The output system delivers power from your battery to the devices you need to charge. Adding the right outputs ensures compatibility with all your electronics.
Add Direct DC Outputs
Most users need more than just a battery terminals. Add these outputs to your system. USB and USB-C ports charge phones, tablets, and power banks. Anderson connectors handle high-current applications like power tools with polarity safety. SAE or cigarette lighter sockets work with standard car devices. Powerpole connectors offer modular, secure connections used in emergency kits.
These outputs are often built into Max Hub batteries, saving time and complexity.
Include an AC Inverter (Optional)
To run standard appliances, add a 12V to 110V inverter. A 300W inverter handles laptops, cameras, and phone chargers. A 600 to 1000W inverter powers power tools, blenders, and microwaves.
Choose pure sine wave inverters for sensitive electronics like laptops or medical devices. Avoid modified sine wave models for critical gear. Pick inverters with less than 0.5A idle draw to prevent overnight battery drain.
Assemble the System Step by Step
Proper assembly ensures safety and functionality. Follow the correct wiring order and use appropriate tools for reliable results.
Follow the Correct Wiring Order
Always connect components in this sequence. First, connect the solar panel to the charge controller. Second, connect the controller to the battery. Third, connect the battery to output devices. If using a Max Hub battery, skip the external controller and connect directly: solar panel to battery via Max Hub, then battery to devices.
Gather Essential Tools
You will need wire cutters and strippers, screwdrivers, a multimeter to test voltage and polarity, a soldering iron for small builds, and zip ties, fuses, and circuit breakers for installation.
Connect Components Safely
For systems with an external controller, follow these steps.
First, connect the solar panel to the controller using 10 to 12 AWG wire for 100W systems. Install an inline DC circuit breaker. Observe polarity carefully: red to red, black to black.
Second, connect the controller to the battery. Always connect the battery before connecting the solar input. Confirm the controller shows battery voltage and charging status.
Third, connect the battery to outputs. Attach the inverter positive first, then negative, expecting minor sparking. Wire USB hubs, sockets, or Anderson connectors.
Fourth, add fuses. Use a 30A fuse between the battery and 300W inverter. Install a disconnect switch for safety during maintenance.
For a simple AA charger, the process is more straightforward. Solder the black wire from the panel to the negative terminal of the AA battery holder. Solder a 1N4001 diode in series on the positive line with the anode connected to the panel red wire and the cathode banded end connected to the battery holder red wire. Seal connections with electrical tape or silicone. Mount the panel in a clear takeout container for weatherproofing.
The diode gray band must face the battery to block reverse current at night.
Boost Performance with Key Upgrades
Several enhancements can improve efficiency and extend component life in your solar charging system.
Install a Blocking Diode
Even small systems benefit from a blocking diode like the 1N4001 to prevent battery discharge when the sun goes down. While some argue it’s unnecessary for larger systems with controllers, real-world testing shows it extends battery life, especially in partial shade.
Use MPPT for Maximum Harvest
In cloudy or low-light conditions, MPPT controllers extract up to 30% more energy than PWM. They convert excess panel voltage into extra current, making them essential for high-performance systems.
Add a State-of-Charge Indicator
Know your battery level at all times. Use the built-in Max Hub display by pressing the button to see percentage. Install an external digital voltmeter. Use LED indicators on IC-based chargers.
Build a Compact LT3652 Solar Charger
For advanced builders, the LT3652 IC enables sophisticated small-scale solar chargers with integrated MPPT and constant-current constant-voltage charging.
Why Use the LT3652
The LT3652 IC is perfect for small, efficient solar chargers. It has built-in MPPT and CC/CV charging for LiPo batteries. The 0 to 40V input range works with many panel types. No firmware is required, as it’s fully analog operation. It auto-restarts when battery voltage drops approximately 2.5% below full charge.
Design the Circuit
Set the full-charge voltage via resistor divider, for example 4.2V for LiPo. Adjust the MPPT set-point to determine when panel voltage is optimal. Add LED indicators where solid red means charging, blinking red indicates fault like no battery detected, and off means fully charged.
Fabricate the PCB
Design a PCB sized 35mm by 25mm using Upverter or similar tools. Export Gerber files to JLCPCB for fast, affordable manufacturing. Use turnkey assembly to save time.
Assemble and Test
Apply solder paste with a stencil. Place components with tweezers. Reflow using a hot plate or oven. Clean with isopropyl alcohol.
Test with a 3W panel and 3.7V LiPo for high efficiency and autonomous charging.
Build a Portable Solar Station
For larger power needs, build a wheeled solar cart capable of running tools, laptops, and appliances off-grid.
Gather Key Components
A portable solar station requires several major components. A 140W panel like the SolarLand SLP140-12 costs $150 to $200. A Morningstar ProStar 15 controller runs $100 to $130. A MK/Deka 12V AGM battery costs $100 to $200. Fused cables with holder run $30 to $50. A hand dolly with pneumatic tires for the frame and wheels costs $20 to $40. Total investment is approximately $400 to $600.
Assemble the Cart
Mount the panel on a tilted frame for optimal sun exposure. Secure the battery and controller with straps or brackets. Wire the panel to controller to battery, observing polarity. Add fused cables and 10-foot two-strand cable for DC loads. Attach an inverter for AC power if needed.
Make It Mobile
Add wheels from a hand dolly. Use zip ties for clean cable routing. Store in a garage or shed, ready to deploy for camping, emergencies, or job sites.
Avoid Common Mistakes
Several common errors can reduce performance or create safety hazards. Avoid these pitfalls for a successful build.
Use Fuses on All High-Current Lines
Never skip fuses. A 30A fuse between battery and inverter prevents fire risks from short circuits.
Prevent Reverse Polarity
Double-check all connections with a multimeter before powering up. Reversed wires can destroy controllers and batteries.
Ventilate Lead-Acid Batteries
Flooded lead-acid types emit hydrogen. Only use them in well-ventilated areas. AGM batteries are sealed and safer for indoor or enclosed use.
Weatherproof Connections
Seal all joints with silicone, heat shrink, or electrical tape. Use UV-resistant enclosures for outdoor setups.
Optimize for Real-World Use
Understanding charging times and maintenance needs helps you get the most from your system.
Charging Times by Device
Four AA NiMH batteries with a 1W panel take 10 to 15 hours to fully charge. Phones charge in 2 to 4 hours with a 10 to 25W panel. Laptops need 4 to 6 hours with a 60W or larger system. A 50Ah LiFePO4 battery charges in 6 to 8 hours with 100W panel and MPPT controller.
MPPT significantly improves performance in cloudy or morning and evening light conditions.
Start Small, Scale Up
Begin with a $20 AA charger using a 1W panel and diode. Once confident, upgrade to a 100W lithium station.
Monitor and Maintain
Check connections monthly. Clean the panel surface with a damp cloth. Replace batteries showing reduced capacity.
Final System Examples
These three builds demonstrate the range of possible solar battery chargers from simple to sophisticated.
Compact Charging Station
Use a 100W panel, a 12V 100Ah lithium battery with Max Hub, an integrated controller, and outputs including USB, Anderson, and 110V inverter. Enclose in scrap wood. This setup works for off-grid tools and emergency power.
Emergency AA Charger
Use a 1W 9V panel, four AA NiMH batteries, a 1N4001 diode as controller, and a takeout container enclosure. Charge time is 10 to 15 hours. This works for flashlights and radios.
Portable Camping Kit
Use a 100 to 200W foldable panel, a 50 to 100Ah LiFePO4 battery, an MPPT controller, and outputs including DC and a 300 to 1000W inverter with inline fuses. This setup powers fridges, CPAP machines, and lights.
Key Design Principles
Seven principles guide successful solar battery charger builds.
Match components by ensuring voltage and current compatibility across your system. Prioritize efficiency by using MPPT controllers and LiFePO4 batteries for best results. Ensure safety by including fuses, disconnects, and proper grounding. Plan for your specific use case by designing outputs based on your devices. Start small with a simple AA charger before scaling up. Weatherproof by protecting electronics from moisture. Monitor charge level using indicators or meters.
Frequently Asked Questions About Solar Power Battery Chargers
Can I build a solar charger with no experience?
Yes, start with a simple AA charger using a 1W panel and diode. This basic project teaches fundamental concepts without complexity. Once you understand how panel voltage, diode orientation, and battery charging work, you can tackle larger systems.
What size solar panel do I need to charge a phone?
A 10 to 25W panel fully charges a smartphone in 2 to 4 hours under direct sunlight. Smaller 5W panels work but take longer, typically 6 to 8 hours. Add a USB output module or use a battery bank to store daytime energy for overnight charging.
Do I really need a charge controller?
For small NiMH builds with just a diode, a controller is optional. For any lithium battery or larger system, a charge controller is essential. It prevents overcharging, manages voltage, and protects your investment from damage.
How long do solar batteries last?
LiFePO4 batteries last 2,000 to 5,000 cycles. AGM lead-acid batteries last 300 to 700 cycles. NiMH batteries last 500 to 1,000 cycles. Proper sizing, regular maintenance, and avoiding deep discharges extend battery life significantly.
Can I use a solar panel without direct sunlight?
Yes, but output drops significantly. MPPT controllers extract more power in cloudy conditions than PWM types, recovering up to 30% more energy. Panels still generate some power on overcast days, just at reduced efficiency.
What’s the difference between PWM and MPPT controllers?
PWM controllers simply pulse current to the battery, requiring panel voltage to match battery voltage closely. MPPT controllers actively track maximum power point and convert excess voltage into additional current, making them 20 to 30% more efficient, especially in variable light conditions.
Key Takeaways for Building Your Solar Power Battery Charger
Building a solar power battery charger comes down to understanding four core components and how they work together. Match your solar panel wattage to your device needs, select the appropriate charge controller type and size, choose a battery with sufficient capacity for your use case, and add the outputs required for your devices.
Start with a simple project like an AA charger to learn the basics, then scale up to more complex systems. Invest in quality components from reputable brands, always include fuses for safety, and weatherproof your connections for outdoor use. Whether you need emergency power for outages, off-grid charging for camping, or a portable station for job sites, a properly designed solar battery charger provides reliable renewable energy anywhere the sun shines.


