
Imagine you’re on a weekend camping trip, deep in the woods with no power outlets and your phone battery drops to 5%. It is moments like this where a solar phone charger becomes more than a gadget: it is a lifeline. Building your own solar phone charger at home is not only practical but also an empowering DIY project that combines sustainability, tech know-how, and real-world utility. Using basic electronic components, you can create a portable device that harnesses sunlight to keep your phone charged anytime, anywhere.
This guide walks you through every step of building a reliable solar-powered charger from scratch. Whether you are a hobbyist, student, or outdoor enthusiast, you will learn how to select the right parts, wire them correctly, and assemble a weatherproof system that delivers stable 5V USB power.
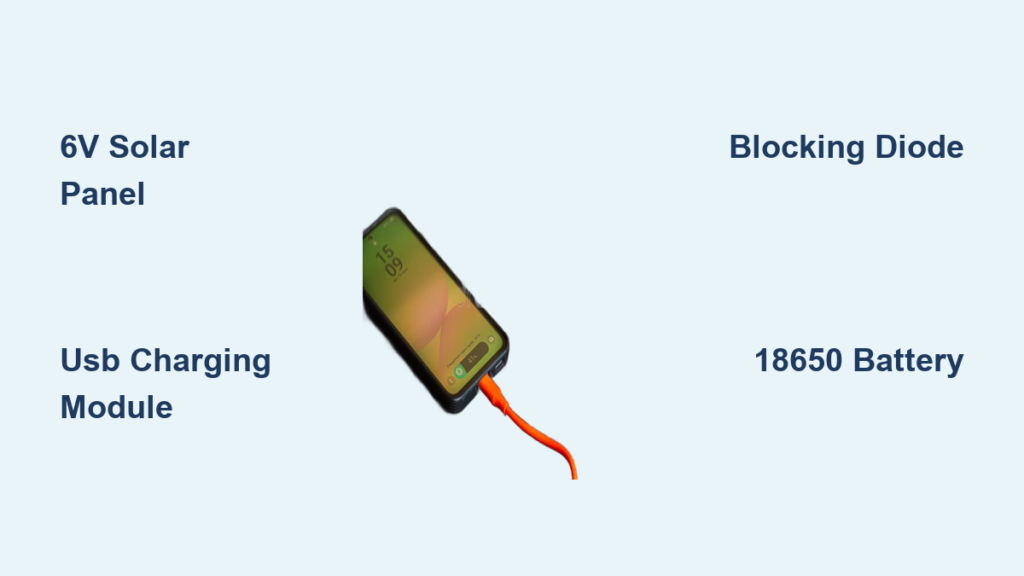
Choose the Right Components for Your Solar Charger

Selecting compatible, high-efficiency parts is the first step to a working solar phone charger. Each component plays a critical role in converting sunlight into usable power.
Match Voltage and Current Needs
Smartphones require 5V DC at 500mA to 2A for charging. Your solar panel must generate enough voltage and current under sunlight to meet this standard. A 6V 200 to 1000mA solar panel is ideal. It provides a slight voltage boost to offset losses, which a regulator will stabilize at 5V.
Pro Tip: Monocrystalline panels are more efficient than polycrystalline, especially in low-light conditions.
Use a USB Charging Module for Stable Output
The USB charging module, also called a voltage regulator, is essential. It converts fluctuating solar voltage into a steady 5V output. Look for modules based on MT3608 or TP4056 chips. They handle input from 3.7V to 6V and deliver clean USB power.
Warning: Charging without a regulator often fails. Phones detect unstable voltage and refuse to charge.
Install a Blocking Diode to Prevent Drain
Without a blocking diode, your battery can discharge back through the solar panel at night. Connect a 1N4007 diode on the positive wire from the panel. The banded end should face away from the panel, toward the battery or USB module.
Better Option: Use a Schottky diode (1N5819). It has lower voltage drop (0.3V versus 0.7V), improving efficiency.
Prepare the USB Cable for Connection
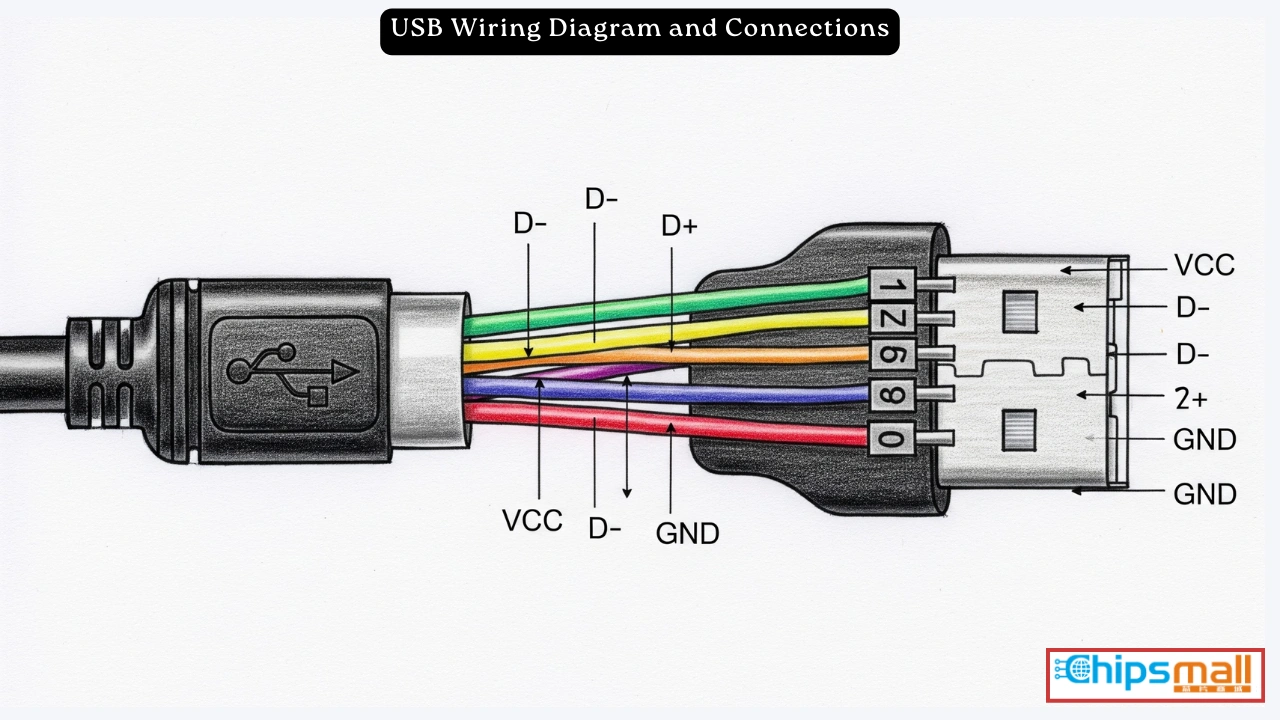
You will need a USB cable to deliver power from your solar circuit to your phone.
Cut and Strip the Cable
Keep the USB-A or USB-C end that plugs into your phone. Cut off the other end and strip the outer insulation to expose four inner wires. The red wire is positive (5V), black is ground, and green and white are data lines that are not needed for basic charging. Trim and insulate the green and white wires with electrical tape or heat-shrink tubing to prevent short circuits.
Note: Some phones charge only when data pins are connected. For universal compatibility, use a dedicated charging cable with no data lines or a charging-only USB module.
Build a Direct Solar Charger (No Battery)
This simple version works only in sunlight, perfect for daytime hikes or beach days.
Connect Panel to USB Module
Wire the solar panel red lead to the input positive terminal of the USB module. Connect the black lead to the input negative terminal. Plug your phone into the USB port.
Test It: In full sun, use a multimeter to check the USB output. It should read approximately 5V.
Add the Blocking Diode
Even in direct systems, install a 1N4007 diode on the positive wire. It prevents minor backflow and protects components during cloudy moments.
Visual Cue: If the phone shows “Charging” under sunlight, the circuit works.
Limitation: Charging stops when clouds block the sun or shadows fall on the panel.
Add a Battery for All-Weather Charging

To charge your phone anytime, even at night, integrate a rechargeable battery.
Choose the Right Battery Type
18650 lithium-ion batteries offer high capacity (2600 to 3500mAh), are compact, and powerful. They are ideal for portable builds. AA NiMH batteries are safer and easier to replace, but they have lower voltage (1.2V per cell). Use two in series for approximately 2.4V. You may need a boost converter. Pre-built power banks are a plug-and-play option. Just connect it to the solar panel via a charge controller.
Avoid: Non-rechargeable batteries. They can leak or explode if charged.
Use a Charge Controller or BMS
Lithium batteries must have a battery management system (BMS) or charge controller to prevent overcharging (fire risk), over-discharging (battery damage), and short circuits. The TP4056 module is perfect. It includes overcharge protection, USB output, and micro-USB charging input.
Wire the Complete Solar-Battery Circuit
Follow this sequence for safe, reliable energy flow.
Connect Solar Panel to Charge Controller
Connect Solar positive to Blocking diode to TP4056 IN positive. Connect Solar negative to TP4056 IN negative. This ensures solar energy charges the battery safely.
Attach the Battery
Connect Battery positive to B+ on TP4056. Connect Battery negative to B- on TP4056.
Warning: Reversing polarity can destroy the module. Double-check connections.
Link Battery to USB Output
Connect TP4056 OUT positive to USB module input positive. Connect TP4056 OUT negative to USB module input negative. Or, if your TP4056 has a built-in USB port, connect directly to your phone.
Pro Tip: Label all wires with tape to avoid confusion during assembly.
Connect Multiple Solar Panels for More Power
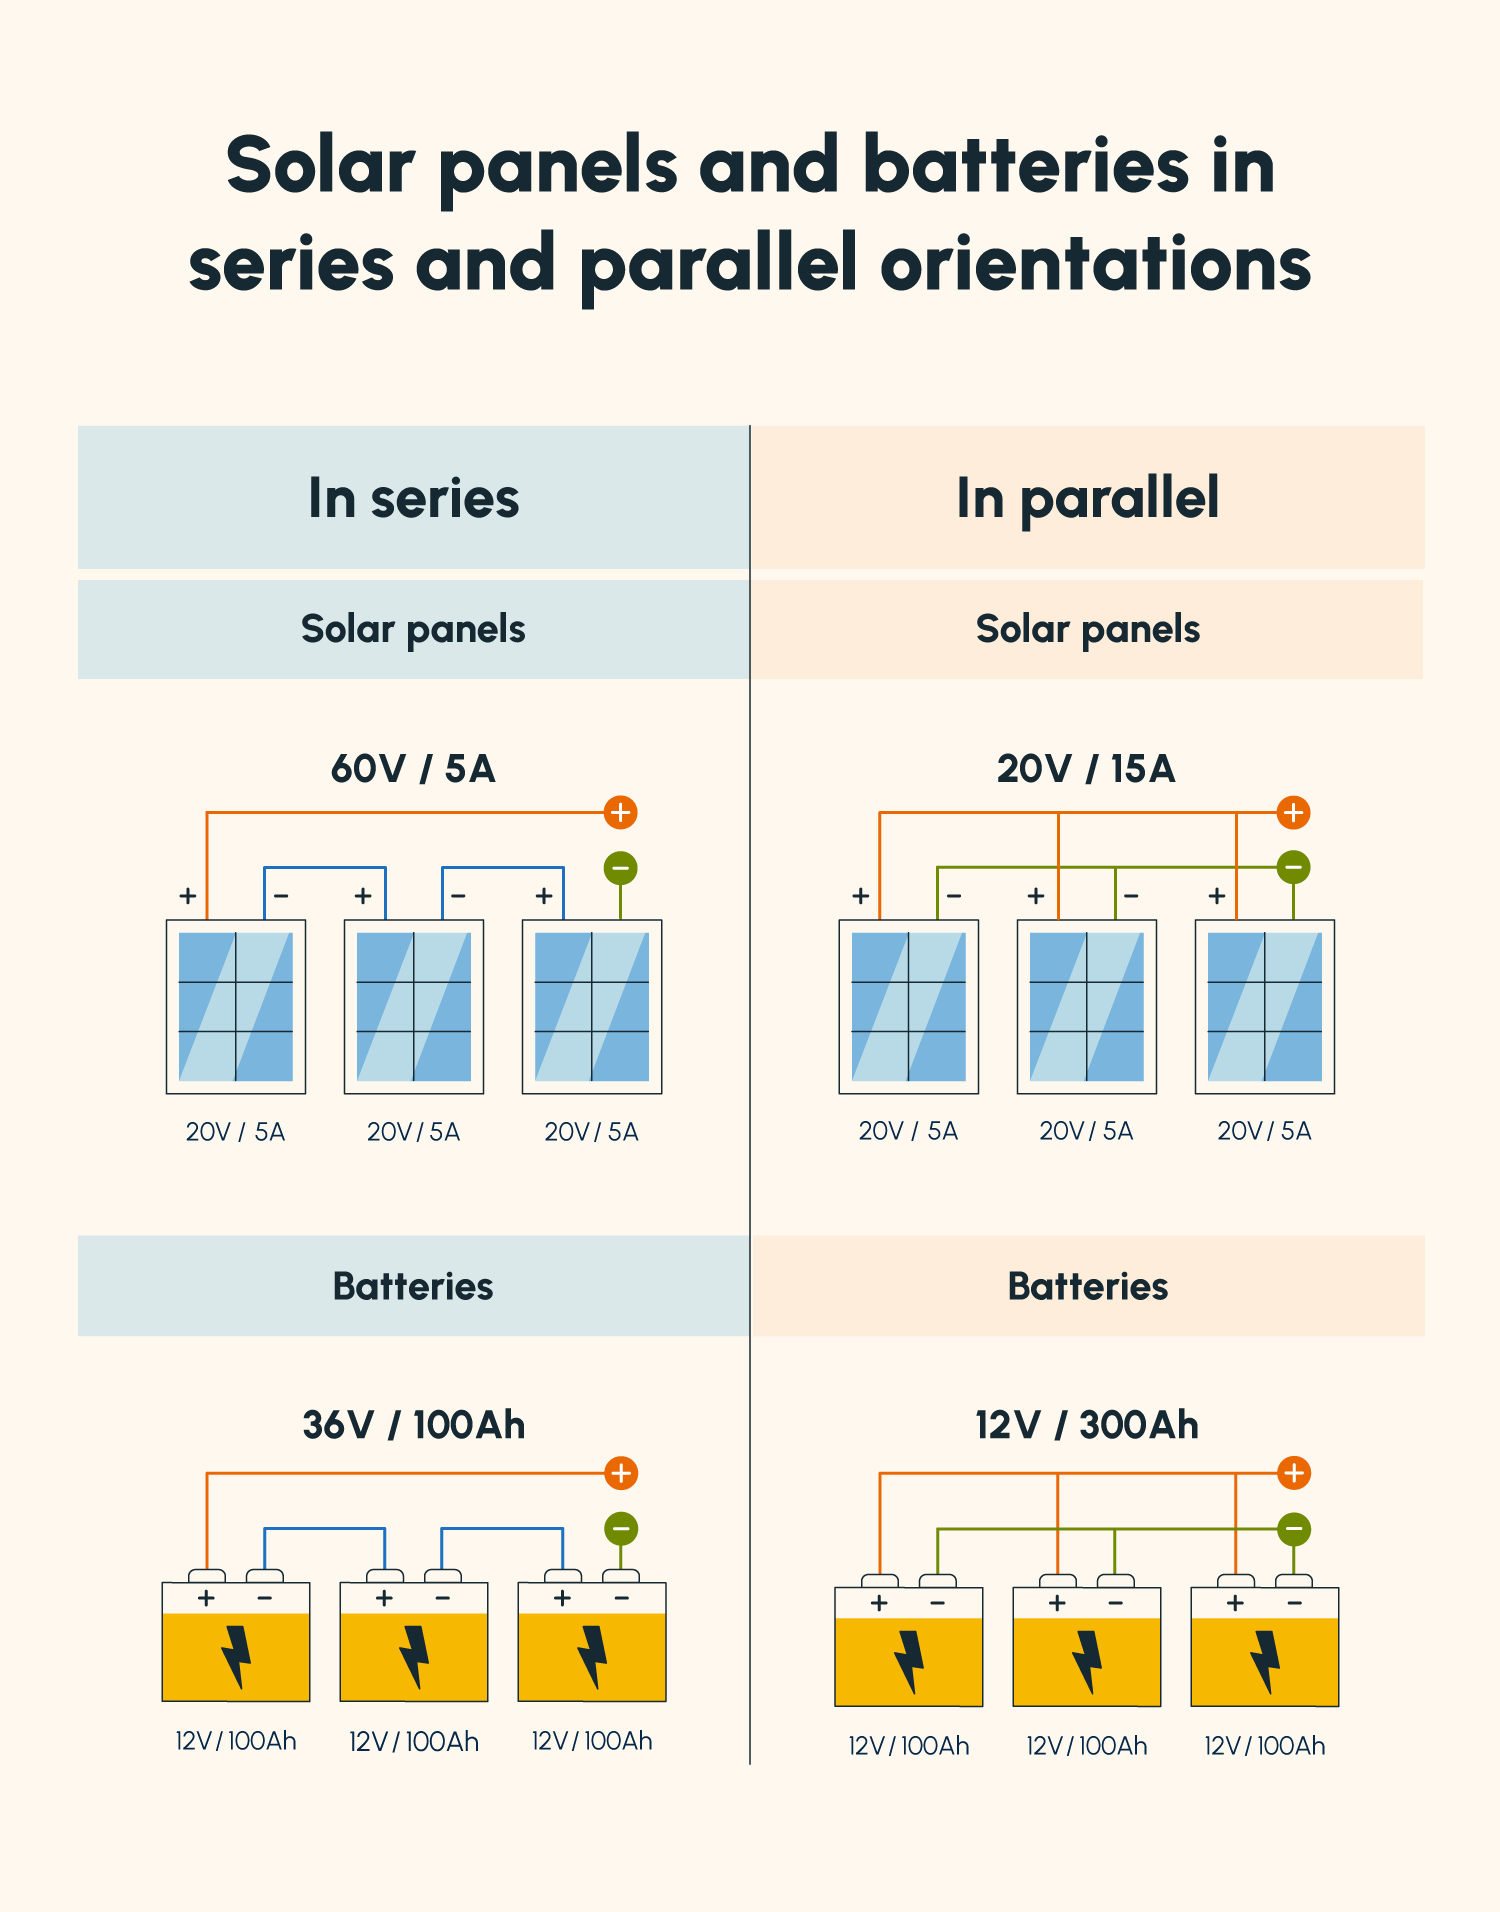
Need faster charging? Combine panels to increase current or voltage.
Wire Panels in Parallel (More Current)
Join all red leads together. Join all black leads together. Voltage stays the same (for example, 6V), but current adds up. Two 200mA panels become 400mA.
Best For: Maintaining 5 to 6V while boosting charging speed.
Wire Panels in Series (More Voltage)
Connect red of Panel 1 to black of Panel 2. The free red and black ends become your output. Voltage doubles (for example, 6V plus 6V equals 12V), but current stays the same.
Caution: 12V requires a buck converter to step down to 5V. Otherwise, you will damage your USB module.
Never connect red-to-red and black-to-black in series. It creates a short circuit.
Assemble in a Weatherproof Enclosure
Protect your circuit from moisture, dust, and physical damage.
Select a Suitable Case
Use a plastic project box rated IP65 or higher for outdoor durability. Size it to fit all components with room to spare.
Mount Components Securely
Drill holes for the USB port (output), solar panel wires, and a switch (optional, to turn power on or off). Use foam padding or zip ties to secure the battery and circuit board. Seal wire entry points with silicone sealant to prevent water ingress.
Attach the Solar Panel Externally
Mount the panel on top of the enclosure using Velcro strips or adhesive mounts. This allows repositioning for optimal sun angle and easy replacement if damaged.
Design Hack: Use a larger box as a multi-purpose kit. Store first-aid supplies, tools, or spare cables inside.
Test the Solar Charger
Before relying on it in the wild, verify it works under real conditions.
Check Voltage Output
Place in direct sunlight. Use a multimeter on the USB port. Confirm approximately 5V output.
No Voltage? Check diode orientation and loose connections.
Charge a Phone
Plug in your device. Look for the “Charging” icon. Some phones show slow or intermittent charging in weak light. This is normal.
Test at Night (With Battery)
Cover the panel or move indoors. Plug in the phone. If it charges, your battery storage works.
Troubleshooting: Phone not charging means verify 5V output and correct polarity. Battery not charging means ensure the TP4056 is receiving at least 5V from the panel.
Estimate Charging Time and Performance
Know what to expect from your DIY charger.
Solar-Only Charging
A 6V 200mA panel produces approximately 1 watt. It charges slowly and may take 8 to 12 hours of sun to fully charge a phone. It is best for maintaining battery, not fast charging.
With 18650 Battery Storage
A single 3500mAh 18650 battery can deliver approximately 3500mAh divided by 500mA equals 7 hours of 500mA output. After efficiency losses (approximately 70%), expect 30 to 60% charge for a 3000mAh phone.
Real-World Tip: Two parallel panels can halve charging time.
Customize Your Design
Tailor the charger to your lifestyle.
Make a Backpack Charger
Attach a flexible solar panel to your backpack with Velcro. Run wires through a small hole into a side pocket. Connect to a USB port inside the pocket. Charge while hiking with no extra weight.
Build a Camping Power Station
Use a larger enclosure with multiple USB ports. Add a 10,000mAh battery pack. Include LED indicators to show battery level. Mount on a tent or RV roof.
Create a Window Charger
Stick a small solar panel to a sunny window. Run wires inside to a USB outlet. Charge devices using daylight with zero electricity cost.
Follow Safety Best Practices
Avoid hazards with proper handling.
Prevent Battery Fires
Always use a BMS with lithium-ion cells. Never leave charging unattended during first use. Keep batteries away from heat sources and direct flame.
Avoid Short Circuits
Insulate all exposed wire ends. Use heat-shrink tubing instead of tape for long-term builds. Double-check polarity before powering on.
Wear Safety Gear
Use eye protection when drilling enclosures. Work in a well-ventilated area when soldering.
Maximize Efficiency and Longevity
Get the most from your solar charger.
Optimize Sun Exposure
Angle the panel directly toward the sun. Re-adjust every few hours for peak performance. Clean the surface regularly. Dust reduces output.
Use Short, Thick Wires
Long or thin wires increase resistance and power loss. Keep connections under 12 inches when possible.
Monitor with Indicator LEDs
Some USB modules and TP4056 boards have built-in LEDs. Red means charging. Green means fully charged. These help diagnose issues at a glance.
Troubleshoot Common Problems
Fix issues quickly with this guide.
Phone Won’t Charge
Cause: Low voltage or no sunlight. Fix: Move to direct sun. Check panel output with multimeter.
Cause: No voltage regulator. Fix: Add a USB charging module.
Battery Not Charging
Cause: Reversed diode or wiring. Fix: Check diode band direction. The banded end faces load, not panel.
Cause: Missing charge controller. Fix: Add TP4056 or equivalent.
Intermittent Charging
Cause: Loose wire connections. Fix: Solder all joints or tightly twist and insulate.
Cause: Shading on panel. Fix: Relocate to full sun. Clean surface.
Save Money vs. Store-Bought Chargers
Building it yourself cuts costs significantly.
| Component | Cost |
|---|---|
| 6V 200mA Solar Panel | $6 |
| USB Charging Module | $3 |
| 18650 Battery + Holder | $8 |
| TP4056 Charge Controller | $2 |
| 1N4007 Diode | $0.10 |
| Enclosure | $5 |
| Total | $24.10 |
Commercial Equivalent: Pre-made solar chargers cost $30 to $80. DIY saves 20 to 70%.
Frequently Asked Questions About Making a Solar Phone Charger
What components do I need to build a solar phone charger at home?
You will need a solar panel (5 to 6V, 200 to 1000mA), a USB charging module (voltage regulator), a blocking diode (1N4007 or Schottky), optional rechargeable battery (18650 lithium-ion recommended), an enclosure, and wiring. A charge controller like TP4056 is essential if using a battery.
Can I charge my phone directly from a solar panel without a battery?
Yes, but it only works in direct sunlight. Connect the solar panel to a USB charging module to regulate the voltage to 5V. Charging stops when shadows or clouds block the sun. Adding a battery provides all-day and overnight charging capability.
How long does it take to charge a phone with a DIY solar charger?
A 6V 200mA solar panel alone may take 8 to 12 hours of sunlight to fully charge a phone. With a 3500mAh 18650 battery storage, you can get approximately 30 to 60% charge for a typical smartphone before the battery depletes.
Is it safe to use lithium batteries in a DIY solar charger?
Yes, but you must use a battery management system (BMS) or charge controller like the TP4056. This protects against overcharging, over-discharging, and short circuits. Never leave charging unattended during initial testing.
How much does it cost to build a solar phone charger?
Total cost ranges from $15 to $30 for components. This is significantly cheaper than commercial solar chargers, which typically cost $30 to $80 or more.
Key Takeaways for Building Your Own Solar Phone Charger
Building a solar phone charger at home is a practical project that combines renewable energy with everyday utility. The essential components are a 6V solar panel, USB charging module (voltage regulator), blocking diode, and optionally a rechargeable battery with a charge controller like TP4056. Always use a BMS with lithium batteries to prevent fire hazards.
The simplest version (solar panel plus USB module) works only in sunlight and charges slowly. Adding a battery provides all-weather charging capability and stores energy for nighttime use. Multiple panels can be wired in parallel for more current or in series for more voltage (though series requires a buck converter).
Your total build cost will be approximately $24, compared to $30 to $80 for commercial options. Now go harness the sun and build your own solar phone charger.


