
Imagine your solar panels generating clean energy all day, but your lights flicker and your appliances refuse to run. This frustrating scenario happens when the inverter, the critical heart of your solar system, isn’t used correctly. Learning how to use a solar power inverter properly transforms unpredictable power into reliable electricity for your home. Whether you’re setting up an off-grid cabin, adding battery backup, or simply trying to reduce your utility bills, understanding your inverter is non-negotiable.
This guide walks you through every essential step, from selecting the right type to maintaining it for decades. You’ll discover how to start your system safely, avoid costly mistakes, and keep your inverter running efficiently for its full 10 to 15 year lifespan.
Choose the Right Inverter Type

Match Inverter to System Design
Your solar inverter must align with your energy goals, roof layout, and whether you’re grid-tied or off-grid. Four primary options exist, each serving different purposes.
String inverters connect multiple panels in series to a single central unit. They’re cost-effective and efficient but suffer dramatically when any single panel experiences shading, dirt, or damage. This drags down the entire string’s output.
Microinverters attach to each individual panel, converting DC to AC right at the source. This allows panel-level optimization, meaning one shaded or dirty panel won’t drag down the rest of your system. They’re ideal for complex roofs with multiple angles or partial shading.
Hybrid inverters combine solar inversion with battery management capabilities. They’re the go-to choice if you want backup power during outages or plan to use stored solar energy at night. These units automatically switch between solar, battery, and grid power based on your settings.
Power optimizers work alongside string inverters rather than replacing them. They perform panel-level maximum power point tracking, then send optimized DC to a central inverter. This offers a middle ground between cost and performance.
Pro Tip: If you plan to add batteries later, install a hybrid inverter from the start. Upgrading later costs significantly more than planning ahead.
Consider Output and Surge Capacity
Size matters enormously. An undersized inverter trips or shuts down the moment you run major appliances. Always calculate your peak load before purchasing.
Add up the running wattage of every device you might use simultaneously. Then add your highest surge wattage, which accounts for motors in refrigerators, air conditioners, or well pumps that can draw 2 to 5 times their normal power at startup.
Example calculation:
• Refrigerator: 800W running, 2,400W surge
• Microwave: 1,200W
• Lights and electronics: 500W
Total continuous load: 2,500W
Peak surge: 2,400W from refrigerator
Recommended inverter: At least 3,000W continuous with 6,000W surge capacity
Choose an inverter rated 20% above your calculated peak to ensure sufficient headroom.
Size Your Inverter Correctly

Calculate Daily Energy Needs
Start by reviewing your electricity bills to find average daily consumption in kilowatt-hours. This tells you how much energy your system must produce daily.
List every appliance you plan to power. Note each device’s wattage, hours used per day, and surge requirements. Multiply wattage by daily hours to get watt-hours, then add them all up.
Example calculation:
• LED lights: 10W × 5 hours = 50Wh
• Laptop: 60W × 4 hours = 240Wh
• Refrigerator: 150W × 8 hours = 1,200Wh (actual ~600Wh due to intermittent operation)
• Well pump: 1,000W × 0.5 hours = 500Wh plus 3,000W surge
Total daily need: approximately 2,000Wh or 2kWh
Size your inverter for peak demand, not average use. Even if you only need 2kWh daily, a 3,000W inverter may be necessary to start high-draw appliances.
Balance Solar Array with Inverter Capacity
Your solar array should exceed your inverter’s rated output by 10% to 30%. This DC-to-AC ratio compensates for real-world losses from dust, heat, and low-light conditions.
A ratio below 1:1 means you’re underutilizing your inverter. A ratio above 1.3:1 causes clipping, where excess solar energy gets cut off because the inverter can’t convert it fast enough.
Example:
• 6,000W solar array + 5,000W inverter = 1.2:1 ratio (ideal)
• 8,000W array + 5,000W inverter = 1.6:1 ratio (excessive clipping)
This balance maximizes production without wasting money on oversized components.
Install in a Safe, Cool Location
Avoid Heat and Humidity
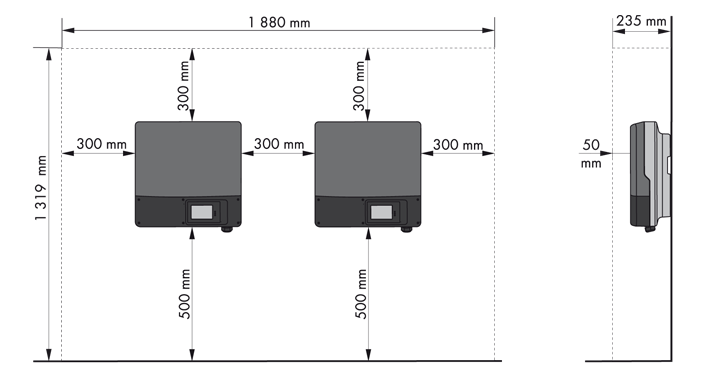
Heat is the enemy of inverters. Operating above 40°C dramatically reduces efficiency and shortens lifespan. Mount your inverter indoors or in a shaded, well-ventilated area, never in direct sunlight or poorly ventilated enclosures.
Maintain at least 12 inches of clearance around all vents to allow proper heat dissipation. Wall-mount vertically unless your manual specifies otherwise.
Avoid damp locations like basements unless the inverter has a high IP rating like IP65 for dust and water resistance.
Use Surge Protection and Proper Grounding
Lightning strikes and voltage spikes destroy inverters instantly. Install both DC and AC surge protection devices on input and output sides.
Ground all components including panels, racking, and inverter to prevent electrical faults. Follow local codes and hire certified electricians for installation.
Label all circuits clearly to help during troubleshooting and ensure safety during maintenance.
Follow the Correct Startup Sequence
Perform Pre-Power Checks
Before turning anything on, verify all connections are secure and correctly polarized. Check battery voltage is within inverter specifications, typically 24V or 48V.
Measure PV input voltage to confirm it matches your array’s open-circuit voltage and stays below the inverter’s maximum limit. Use a multimeter to verify no short circuits exist.
A single reversed wire can permanently damage the inverter.
Power On in the Right Order
Never rush startup. Follow this exact sequence to avoid damage:
-
Close battery breaker for hybrid or off-grid systems. This powers the inverter’s control board and enables battery monitoring.
-
Turn on inverter switch. The display should illuminate, showing system status and voltages.
-
Close PV input breaker. This allows solar panels to feed DC power. If it’s daytime, the inverter begins processing energy.
-
Close AC output breaker. This connects the inverter to your electrical panel or grid.
-
Check display for errors. Confirm normal readings: grid voltage, battery state of charge, and active power generation.
-
Test AC output. Use a multimeter to confirm 110 to 120V or 220 to 240V output depending on your region.
-
Add loads gradually. Start with lights and small electronics, then power larger appliances one at a time.
Warning: Never plug or unplug live wires. Always de-energize the system before working on it.
Monitor Performance Daily
Use Built-In Monitoring Tools
Most modern inverters include apps or web portals showing real-time data. Monitor energy production in kWh, system efficiency percentages, voltage and current levels, and fault codes.
Check these daily, especially after installation or storms. A sudden drop in output indicates shading, dirt, or a failed component.
Microinverters and hybrid models often provide per-panel performance tracking, ideal for spotting underperforming units.
Respond to Alerts Immediately
Inverters display error codes for overvoltage, ground fault, overheating, and grid disconnection. Don’t ignore warnings.
A grid lost message during daylight might simply mean a tripped breaker. An overtemperature alert could signal blocked vents. Address problems early to prevent permanent damage.
Maintain for Long-Term Reliability
Clean and Inspect Regularly
Dust and debris clog cooling vents, causing overheating. Clean the inverter enclosure and fan areas every 3 to 6 months using a dry cloth or soft brush.
Annually inspect terminals for loose connections, corrosion, or signs of arcing. Tighten any loose screws and replace damaged cables immediately.
Update Firmware and Software
Manufacturers release firmware updates to improve efficiency, fix bugs, and add features. Apply updates via USB, WiFi, or Ethernet as instructed in your manual.
Outdated software reduces performance and blocks remote monitoring access.
Optimize for Efficiency and Safety
Ensure MPPT and Pure Sine Wave Output
Maximum Power Point Tracking adjusts electrical load to extract maximum energy from panels under changing sunlight. All quality inverters include MPPT. Ensure it’s enabled in your settings.
For sensitive electronics like laptops, medical devices, or variable-speed tools, use a pure sine wave inverter. Modified sine wave models cause interference, noise, or damage to these devices.
Prevent Clipping and Idle Loss
Slight oversizing of your solar array by 10% to 20% improves morning and evening production. Too much causes clipping during peak sun hours.
On the flip side, idle consumption matters. Hybrid inverters draw 5 to 20W at night to maintain monitoring and battery checks. If you’re off-grid, this vampire load drains batteries over time.
Some models offer eco mode to reduce standby power. Enable it if available.
Troubleshoot Common Issues
No Power Output? Check These First
If your inverter isn’t producing electricity, start with these checks:
• Is it daytime? Some inverters shut down at night or in very low light.
• Are breakers tripped? Reset DC, AC, and battery breakers in the correct order.
• Is there shading or dirt? Clean panels and remove obstructions.
• Did a fault occur? Check the display for error codes.
Use a multimeter to verify DC input voltage. If zero, check fuses and disconnects.
Why Does the Inverter Shut Down Frequently?
Common causes include:
• Overheating: Ensure proper ventilation and shade.
• Voltage fluctuations: High or low grid voltage triggers shutdowns.
• Battery issues: Low charge or incorrect voltage settings.
• Grid outages: Grid-tied inverters automatically shut off during blackouts unless paired with batteries.
For off-grid systems, frequent shutdowns often mean the battery bank is undersized or nearing end of life.
Extend Lifespan and Plan for Replacement
Expect 10 to 15 Years of Service
Solar panels last 25 years or more, but inverters typically need replacement after 10 to 15 years. Budget for this expense early.
Register your warranty, which usually covers 5 to 12 years but is often extendable to 20 years. Keep your purchase records.
Top brands like Enphase, SolarEdge, and SMA offer long coverage. Take advantage of it.
Know When to Upgrade
Technology improves rapidly. Consider upgrading if your inverter lacks remote monitoring, battery integration, or smart energy management.
Upgrade especially if you want backup power or time-of-use savings. Also upgrade if repair costs exceed 50% of a new unit’s price.
Frequently Asked Questions About Solar Power Inverters
What is the correct startup sequence for a solar inverter?
Start with the battery breaker, then the inverter switch, followed by the PV input breaker, and finally the AC output breaker. Always de-energize before performing any maintenance.
How do I calculate what size inverter I need?
Add up the running wattage of all devices you might use simultaneously, then add the highest surge wattage from motors. Choose an inverter rated 20% above this peak.
Can I use a solar inverter without batteries?
Grid-tied systems work without batteries, but off-grid systems require batteries for consistent power when solar generation is low.
How often should I perform maintenance on my inverter?
Clean vents and inspect connections every 3 to 6 months. Update firmware annually and monitor performance through built-in tools.
What causes a solar inverter to fail?
Heat, voltage spikes, and poor ventilation cause most failures. Regular maintenance and proper installation prevent most issues.
When should I replace my solar inverter?
Plan for replacement after 10 to 15 years. Upgrade sooner if repair costs exceed half the price of a new unit or if you need modern features.
Does the type of inverter matter for my system?
Absolutely. Your inverter type affects energy production, safety, and future expandability. Choose based on your specific needs and system design.
Can I install my own solar inverter?
Professional installation ensures safety and code compliance. Certified electricians understand local regulations and maximize system performance.
Key Takeaways for Using Your Solar Power Inverter
Using a solar power inverter correctly means more than flipping a switch. Choose the right type for your situation, whether string, microinverters for shading, or hybrid for battery backup. Size it correctly by calculating peak loads and balancing your solar array. Install in a cool, ventilated location with proper surge protection.
Follow the correct startup sequence every time, and monitor performance daily through built-in apps. Clean vents regularly, update firmware, and address alerts immediately. With proper care, your inverter will power your home reliably for over a decade, making the most of every ray of sunlight your panels capture.


