
You’ve been hiking and your phone battery hits zero. No outlets nearby. No backup power. This exact scenario is why building your own portable mobile charger makes perfect sense. It’s not just a fun electronics project, it’s a practical skill that could save you in an emergency.
This guide shows you how to make a portable mobile charger from basic components. We’ll cover three builds ranging from beginner-friendly to advanced. You’ll learn which battery type fits your needs, how to regulate voltage safely, and which mistakes to avoid. By the end, you’ll have a working charger and real electronics knowledge.
Choose Your Battery Type for DIY Charging
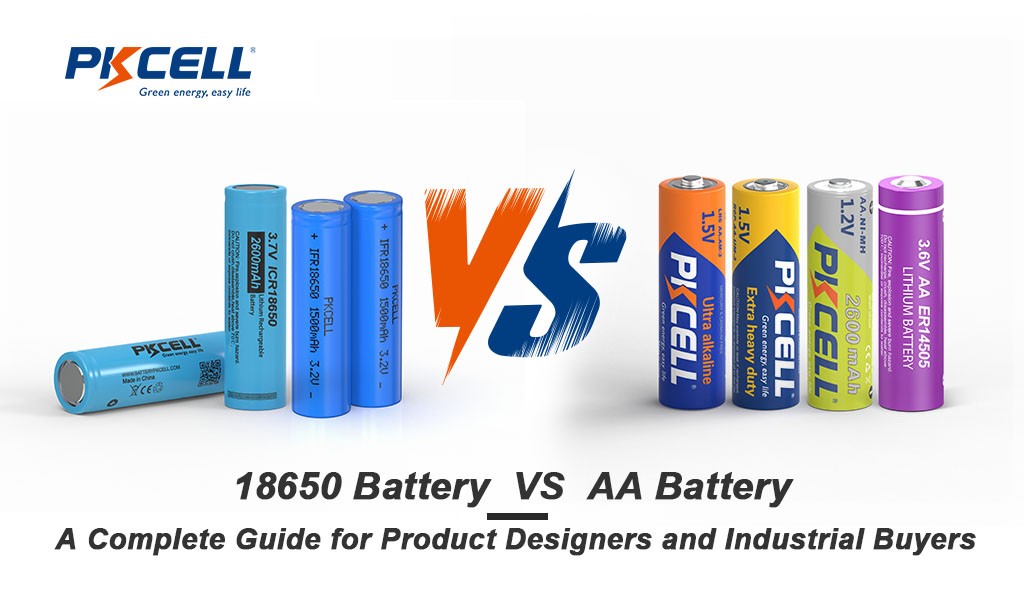
Your battery choice determines everything about your build. Capacity, safety, complexity, and performance all depend on this decision. Let’s look at your options.
NiMH AAA Battery Pack
Four 1.2V NiMH AAA batteries in series give you 4.8V total. When fully charged, they reach 5.6V, which is close to USB’s 5V standard. This setup works well for beginners because the batteries are safe, rechargeable, and easy to find. You won’t need a protection circuit.
The downside is capacity. Each AAA cell provides 500 to 1000 mAh. That translates to roughly 30 to 40 percent of a typical smartphone charge. Voltage also drops as batteries drain, so performance decreases over time.
9V Battery with Car Charger Module
A standard 9V battery powers a salvaged car USB charger module. The module has a built-in voltage regulator that outputs stable 5V. This method requires no soldering and assembles quickly.
The catch is capacity. A 9V battery only offers about 500 mAh. You’ll get maybe 5 to 10 percent of a phone charge. It’s an emergency solution, not a daily charger.
18650 Li-ion Cells for High Capacity
For serious power, use a 3.7V 18650 lithium-ion cell. These provide 2000 to 3500 mAh, enough for a full phone charge. However, you must add a protection circuit module and a boost converter to step up to 5V.
Lithium batteries deliver excellent performance but pose fire risks if damaged or improperly handled. Only attempt this build if you understand battery safety basics.
Build a NiMH Battery Pack Charger
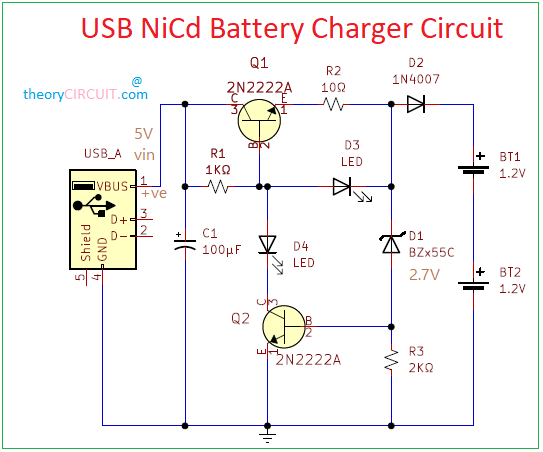
This method teaches core electronics skills while producing a working charger. You’ll use four rechargeable AAA batteries and a USB cable.
Step 1: Assemble the Battery Holder
Get a 4-cell AAA battery holder wired in series. Insert four NiMH rechargeable AAA batteries, each rated at 1.2V. Use a multimeter to check total voltage. A fresh pack reads 5.2 to 5.6V. Nominal voltage is 4.8V.
If voltage exceeds 5.25V, do not connect directly to a phone. Use a voltage regulator to prevent damage.
Step 2: Prepare the USB Cable
Cut the male end off a USB extension cable. Strip the insulation to expose four wires. The red wire is VBUS (positive 5V). The black wire is GND (ground). The green and white wires are data lines (D+ and D-).
For basic charging, you only need red and black. Cut or insulate the green and white wires if you’re not setting up fast charging.
Step 3: Solder and Insulate Connections
Solder the red wire to the positive terminal of the battery holder. Solder the black wire to the negative terminal. Apply heat-shrink tubing or electrical tape to every joint. Exposed connections cause short circuits and potential fire hazards.
Pro Tip: Twist wire strands tightly before soldering. Cold joints fail prematurely and can overheat.
Step 4: Add a Power Switch
Wire an on/off toggle switch into the positive (red) line. This lets you stop power flow when not using the charger. Mount the switch on your enclosure where you can access it easily.
Step 5: Enclose the Components
Use an Altoids tin or plastic project box as your housing. Drill or cut a hole for the USB port. Secure the port with hot glue or double-sided tape. Place the battery holder inside and cushion with foam or tape.
If using a metal tin, insulate all exposed wires. Prevent battery terminals from touching the case. Use plastic spacers wherever metal meets connections.
Step 6: Recharge the Batteries Safely
This DIY charger has no built-in recharge circuit. To recharge, remove the batteries and use a dedicated NiMH charger. Alternatively, use a male-to-male USB cable connected to a wall adapter rated at 1A or less.
Charge for no more than four hours. Stop immediately if batteries become hot to the touch. Never leave charging unattended.
Create a 9V Battery Charger Without Soldering
This is the fastest path to a working charger. No soldering iron required. No complex circuits. Just basic wiring and a salvaged component.
Step 1: Salvage a Car USB Charger
Take an old 12V car USB charger and open the case. Remove the internal circuit board carefully. This board contains a buck converter that outputs stable 5V from 9 to 24V input. Keep the USB-A port exposed and the circuit intact.
Step 2: Connect to a 9V Battery
Get a 9V battery snap connector. Connect the red wire (positive) to the input positive on the car charger board. Connect the black wire (negative) to the input negative.
No soldering required. Twist the connections firmly and wrap with electrical tape. Add a switch in the positive line for on/off control.
Step 3: Test the Output
Turn on the switch. Most car charger modules have an LED indicator light. Use a multimeter to verify approximately 5V at the USB port.
Plug in a phone. If it starts charging, your build works. This setup delivers about 1A, suitable for moderate-speed charging.
Remember: a standard 9V battery has very limited capacity. This method provides emergency top-ups only, not full charges.
Add Fast Charging Support to Your Charger
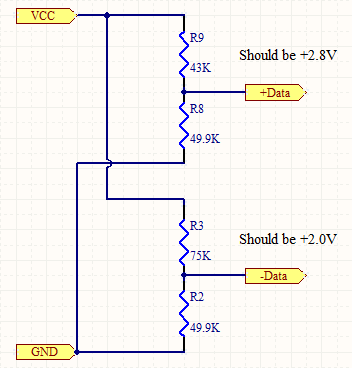
Most phones default to 500mA charging unless they detect a dedicated charging port. To unlock faster speeds, you must configure the data lines correctly.
Use Resistor Networks on Data Lines
Solder resistors between the D+ and D- lines to simulate a fast-charging port. For Android DCP mode, connect a 200Ω resistor between D+ and D-. Apple devices require specific voltage dividers, such as 56kΩ pull-ups on both lines.
An alternative: simply short D+ and D- together with a wire. Many devices interpret this as a charging port and allow higher current.
Use a Pre-Wired USB Charging Module
Skip the resistor math entirely. Buy a dual USB charging module with built-in DCP support. These boards output 5V, support 1A or 2.1A per port, include status LEDs, and accept 5 to 24V input.
Connect your battery to the input terminals and plug in devices. Simple and effective.
Upgrade to 18650 Li-ion for Higher Capacity
For a rechargeable power bank that rivals commercial units, use 18650 cells with proper protection circuits.
Use TP4056 Charging Module with Protection
Buy a TP4056 module with DW01A and FS8205A protection circuitry. This board charges a single 18650 cell safely via micro-USB. It prevents overcharge, over-discharge, and short circuits. Red and green LEDs show charging status.
Wire the 18650 battery to the B+ and B- terminals on the module.
Add a Boost Converter for 5V Output
The TP4056 outputs 3.7V from the battery. To get 5V USB power, connect an MT3608 boost converter. Take input from the OUT+ and OUT- terminals of the TP4056. Connect output to a USB-A female port.
Adjust the potentiometer on the boost converter to exactly 5.0V. Use a multimeter to verify the output before connecting devices.
Now you have safe charging via micro-USB, regulated 5V output, full protection circuitry, and reusability. This build delivers 2000 to 3000 mAh, enough for one full phone charge.
Avoid These Common DIY Charger Mistakes
Small errors cause failure or danger. Learn what to avoid before building.
Never Overcharge NiMH Batteries
DIY NiMH chargers lack cutoff circuits. Charging beyond four hours risks reduced battery life, leaking electrolyte, and overheating. Use a standalone smart charger or set a timer to prevent overcharging.
Avoid Short Circuits
A single exposed wire touching metal drains batteries fast or starts fires. Insulate every solder joint. Check polarity with a multimeter before connecting anything. Keep metal cases properly insulated.
Don’t Exceed USB Voltage Limits
USB devices accept 5V plus or minus 5 percent (4.75 to 5.25V). Fresh NiMH packs can hit 5.6V, which is too high. Use a 7805 linear regulator or a boost/buck module to clamp voltage at 5V.
Don’t Mix Battery Types
Never combine old and new batteries or mix alkaline with NiMH. Mismatched cells cause uneven discharge, reverse charging, and potential leakage or rupture. Use four identical, same-age batteries.
Test and Verify Your Portable Charger
Always test before connecting your phone. Use these verification steps.
Use a Multimeter
Check input voltage to confirm the battery pack is within safe range. Verify output voltage reads 4.75 to 5.25V at the USB port. Confirm polarity: red is positive, black is ground.
Try a Dummy Load
Use a USB power meter or LED test board to simulate device draw. Watch for voltage drop under load, overheating components, or unstable LED indicators.
Charge a Low-Risk Device First
Test on Bluetooth earbuds, a fitness tracker, or an old phone. Once confirmed safe, use on your primary devices.
Understand DIY Charger Limitations
DIY chargers are educational projects, not replacements for commercial power banks.
Why Commercial Units Outperform DIY
Store-bought power banks include switch-mode power supplies for high efficiency. They have microcontrollers for USB PD and Quick Charge negotiation. They feature thermal protection and multiple output protocols. A ten-dollar commercial power bank outperforms most DIY builds in safety, speed, and reliability.
When DIY Makes Sense
Build your own for learning electronics, emergency backup, off-grid projects, or custom form factors. Don’t rely on DIY chargers for daily use or charging expensive devices.
Critical Safety Warnings for Battery Projects
Electricity demands respect. Follow these rules without exception.
Never Use Mains Voltage
Do not connect your DIY charger to wall outlets unless using a certified AC-DC adapter. Mains voltage can kill. Keep your projects battery-powered only.
Monitor Battery Temperature
If any battery or component becomes too hot to touch, disconnect immediately. Overheating indicates a short circuit, overload, or faulty regulation. Address the problem before continuing.
Store Batteries Properly
Keep batteries in a cool, dry place. Avoid metal contact by using plastic cases. Remove batteries if storing long-term.
Dispose of Damaged Cells Properly
Swollen, leaking, or dented batteries must go to a recycling center. Do not throw them in the trash. Handle damaged cells with gloves and dispose safely.
Final Tips for Building a Reliable Charger
These insights help you build smarter.
Label Wires During Assembly
Use colored tape or markers to identify VBUS (red), GND (black), D+ (green), and D- (white). This saves time and prevents polarity mistakes.
Use Pre-Built Modules When Possible
Skip complex circuits. MT3608 boost converters, TP4056 charging boards, and dual USB output modules are cheap, safe, and reliable. Let the modules handle the technical complexity.
Start Simple Then Upgrade
Begin with the 9V car charger method. Once comfortable, move to NiMH packs, then to 18650 builds. Progress at your own pace.
Learn from Experts
Study teardowns and tutorials from Ken Shirriff’s blog, YouTube channels like GreatScott!, and Texas Instruments application notes. These resources deepen your understanding of power supply design.
Frequently Asked Questions About Making a Portable Mobile Charger
Can I use regular alkaline batteries in a DIY charger?
Alkaline batteries work but aren’t rechargeable. They also have higher voltage (1.5V per cell) that can exceed USB limits. Use NiMH rechargeable batteries for a functional, reusable charger.
How long does a DIY portable charger last?
It depends on capacity. A 4x AAA NiMH pack provides 30 to 40 percent of a phone charge. A 9V battery provides 5 to 10 percent. An 18650-based build provides one full charge. Duration also depends on battery age and condition.
Do I need special tools to build a portable charger?
Basic tools suffice. You’ll need a soldering iron, wire strippers, electrical tape, a multimeter, and an enclosure. The 9V method requires no soldering, making it more accessible for beginners.
Can I charge multiple devices at once?
Yes, if you use a dual USB output module. Each port provides 5V at up to 2.1A. However, total capacity divides between devices, so charging slows with multiple devices connected.
Is it cheaper to build or buy a power bank?
Building is rarely cheaper. Commercial power banks cost around ten dollars for better performance and safety. DIY builds make sense for learning, not cost savings.
What happens if I connect my charger with reversed polarity?
Reversed polarity damages connected devices and can cause component failure. Always verify polarity with a multimeter before powering up. Protect circuits with reverse-polarity diodes if concerned.
Key Takeaways for Building Your Own Portable Mobile Charger
Building a portable mobile charger teaches real electronics skills. You learn about voltage regulation, USB standards, battery management, and circuit design. Three builds suit different skill levels: the solder-free 9V method for beginners, the NiMH pack for intermediate learners, and the 18650 setup for advanced builders seeking full recharge capability.
Safety matters most in any battery project. Never exceed USB voltage limits. Monitor battery temperature. Insulate every connection. Use protected lithium cells when possible.
Commercial power banks remain the better choice for daily use. DIY builds excel as educational projects and emergency backups. Use what you build for learning, keep a commercial unit for reliability, and never stop experimenting.