
You plug in your Dell laptop, expecting it to charge, but instead you see “plugged in, not charging” or a warning that the AC adapter is not recognized. The battery stays stuck at the same level, and sometimes the system even throttles performance. This is a frustrating issue that affects thousands of Dell users across Inspiron, XPS, and Latitude models. The good news is that most cases of how to fix Dell charger not charging can be resolved with simple repeatable fixes ranging from power resets to targeted software updates.
This guide walks you through every proven solution step by step. We’ll cover how to diagnose whether the problem is software-related, hardware-related, or adapter-related, and give you exact procedures that have worked for real users on models like the Inspiron 5568, XPS 15, and Latitude e6230.
Perform a Hard Power Reset
Resetting your laptop’s power system clears residual electricity and resets the charging circuit. This simple fix resolves many “not charging” issues and is the first step recommended by Dell technicians.
Hold Power Button for 30 Seconds
Follow these steps exactly:
- Shut down the laptop completely
- Unplug the AC adapter and disconnect all peripherals
- If your model has a removable battery, take it out
- Press and hold the power button for 30 seconds
- Reconnect the battery if removed and plug in the charger
- Power on the laptop
This drains stored power from the motherboard, resetting the charging controller. It’s effective for Inspiron and XPS models alike.
Check If Charging Starts Automatically
After the reset, wait 1 to 2 minutes to see if the battery begins charging. If the status changes from “Not Charging” to “Charging,” the issue was likely a temporary power management glitch. Repeat this reset every few weeks as a preventive measure if your laptop frequently misreads the adapter.
Test the Charger Voltage

Even if the laptop powers on, a weak or failing adapter may not deliver enough voltage to charge the battery. Testing the adapter output confirms whether the charger itself is faulty.
Measure Output with a Multimeter
Set your multimeter to DC voltage at the 20V range. Insert the red probe into the center pin of the charger tip and place the black probe on the outer metal ring. Read the voltage displayed:
A normal reading falls between 19.0V and 19.5V, such as 19.3V. A reading below 18V or zero indicates the adapter is failing and should be replaced, even if the laptop still runs on it.
Try a Known-Good Dell Charger
Borrow or use another Dell OEM adapter with the correct wattage, such as 65W, 90W, or 130W. Plug it in and check whether the battery starts charging and whether Windows or BIOS recognizes the adapter. An Inspiron 5568 user fixed the issue by switching to a 130W adapter even though the original 45W was OEM.
Check Adapter Status in BIOS
If the adapter is not recognized at the firmware level, the problem is not Windows-related. Checking BIOS confirms whether the issue is OS-level or hardware-related.
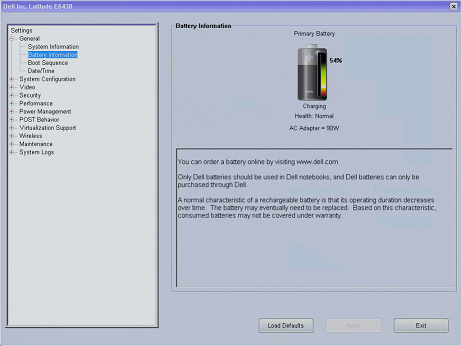
Enter BIOS and Verify Adapter Type
Restart the laptop and press F2 repeatedly at the Dell logo to enter BIOS. Navigate to General then System Information. Look for AC Adapter Type. If the correct wattage shows, such as “65W,” the issue may be OS-related. If it shows “Unknown,” you have a firmware or hardware problem.
Run Built-in Diagnostics
While in the BIOS menu, press F12 during boot instead to access diagnostics. Run tests for battery, AC adapter, and motherboard. Some users pass diagnostics at service centers but fail at home, suggesting grounding or outlet issues may be involved.
Reinstall Battery Drivers in Device Manager

Corrupted ACPI drivers are a top cause of “plugged in, not charging” in Windows. Reinstalling them often resolves the issue.
Uninstall Microsoft Battery Drivers
Press Windows + X and choose Device Manager. Expand the Batteries section. Right-click and uninstall Microsoft AC Adapter and Microsoft ACPI-Compliant Control Method Battery. Restart the laptop. Windows automatically reinstalls the drivers on boot.
This fixed charging for an Inspiron 7559 user after all other methods failed. However, one Inspiron 5568 user reported no success, suggesting hardware or firmware involvement in some cases.
Prevent Driver Corruption
After reinstalling, avoid sudden shutdowns during updates. Keep Windows updated and do not disable battery-related services. These practices prevent the driver corruption from recurring.
Charge While Powered Off or in BIOS
Bypass Windows entirely to test if the operating system is blocking the charge. This method isolates software issues from hardware problems.
Leave Laptop Off for 30 to 60 Minutes
Shut down the laptop and plug in the charger. Let it sit undisturbed for at least 30 minutes. Turn it on and check the battery level. Some background processes or power plans interfere with charging, and charging in a pre-OS state avoids these conflicts.
Stay in BIOS Menu to Charge
Power on and press F2 to enter BIOS. Leave the laptop idle in BIOS with the charger connected for 20 to 30 minutes. Exit and check the battery level. This method restored charging on systems where Windows blocked the process.
Update BIOS and Dell Software
Outdated firmware can prevent adapter recognition even with OEM chargers. Updating BIOS resolves many firmware-level issues.
Download Latest BIOS from Dell
Go to Dell Support and enter your Service Tag. Under Drivers and Downloads, find the latest BIOS update. Download and run the installer. The battery must be at least 10% charged, the AC adapter must remain connected throughout the update, and do not shut down during the process. A failed BIOS update can brick the motherboard.
Install Dell QuickSet
In the same Drivers section, look for Dell QuickSet and install it to enable advanced battery management. Use it to monitor battery health and charging status. Not all models support QuickSet, especially newer Windows 11 devices.
Check for Charging Disable Hotkeys
Some Dell laptops let you disable battery charging via keyboard shortcuts. This feature can be accidentally enabled.
Check Fn Key Combinations
Try pressing Fn + F2, Fn + B, or Fn + P. Look for a “Battery Charging Disabled” message in the system tray or Dell Battery Meter. An XPS 15 user found charging was manually disabled in software, resolving the issue without any hardware work.
Use Dell SupportAssist to Monitor
Open Dell SupportAssist and go to Battery Health. Check for warnings like “Charging paused” or “Battery maintenance mode active.” Disable battery conservation mode if enabled to restore normal charging behavior.
Clean the Charging Port
Dust, lint, or oxidation can block proper contact between the charger and port. Regular cleaning prevents this issue.
Use Compressed Air and Brush
Power off and unplug the laptop. Blow compressed air into the charging port. Gently scrub the outer contacts with a dry toothbrush.
Clean the Center Pin
Cut a bristle from a plastic brush and insert it into the center pin hole. Twist gently and wipe with a dry cotton swab. Never use metal objects because they can short the circuit. An e6230 user restored charging temporarily after cleaning, suggesting intermittent contact was the culprit.
Swap Components to Isolate the Fault
Use a test matrix to identify which part is failing. This systematic approach eliminates guesswork.
Try Different Adapters and Batteries
Test the original adapter on another Dell laptop to confirm it charges. Use a known-good adapter on your laptop to see if it works. Test your battery in another compatible laptop to verify it charges. A higher-wattage Dell adapter may force the system to recognize charging, then let you switch back to the original. An M2800 user charged with a 65W adapter, then reconnected the 130W, and it was finally recognized.
Replace DC Jack or Motherboard
If all else fails, the issue is likely hardware-related. These repairs require technical skill but can save your laptop.
Replace the DC Power Jack
Power off and remove the battery. Open the laptop, which requires screwdrivers and disassembly. Desolder and replace the DC jack, then reassemble and test. This is an intermediate-level repair requiring soldering and precision.
Consider Motherboard Replacement
If the DC jack is fine but charging still fails, the charging circuit on the motherboard is likely damaged. Replacement is costly but often necessary. One technician noted that if replacing the DC jack does not work, replace the mainboard because the charge circuit is bad.
Run Windows Power Troubleshooter
Let Windows diagnose and fix common power issues with its built-in tools.
Launch the Built-in Tool
Press Windows + R, type control, and press Enter. Search for Troubleshooting and go to System and Security then Power. Run the troubleshooter and apply the fixes recommended. This tool often misses firmware or hardware-level issues, but it is worth trying.
Prevent Future Charging Issues
Avoid recurrence with these best practices that keep your Dell charging reliably.
Use OEM Adapters with Correct Wattage
Never use underpowered or third-party chargers. Check your laptop’s label or manual for required wattage. Ultrabooks typically need 45W to 65W, while gaming and performance laptops need 90W to 130W. A 45W charger on a 65W-required system may power the laptop but not charge it.
Keep BIOS and Drivers Updated
Set a quarterly reminder to check Dell Support for BIOS updates and update chipset and power drivers. This prevents firmware-related charging issues from developing.
Maintain Battery Health
Avoid full discharges and keep charge between 20% and 80% for daily use. Use Dell Battery Meter to track wear and replace the battery when health degrades significantly.
Use Grounded Outlets
Prefer three-prong outlets over two-prong ones. Grounding improves adapter stability and recognition. Some laptops charge at service centers but not at home, possibly due to better grounding at professional facilities.
Key Takeaways for Fixing Dell Charger Not Charging
Most cases of Dell charger not charging are fixable without replacing hardware. Start with a 30-second power reset and reinstalling battery drivers because these resolve the majority of issues. If those fail, test the adapter voltage, check BIOS recognition, and try charging while powered off. Only after exhausting software and adapter options should you consider DC jack or motherboard replacement. By following this guide, you systematically eliminate causes and restore reliable charging, saving time, money, and frustration.
Frequently Asked Questions About Dell Charger Not Charging
Why does my Dell laptop say plugged in not charging?
This message appears when Windows detects the adapter but cannot charge the battery. Common causes include corrupted battery drivers, outdated BIOS, faulty DC jack, or using an underpowered adapter. Start with a power reset and driver reinstallation as these fix most cases.
How do I know if my Dell charger is bad?
Test the charger voltage with a multimeter set to DC 20V range. Insert the red probe into the center pin and black probe on the outer metal ring. A reading below 18V or zero indicates the adapter is faulty and needs replacement.
Can a BIOS update fix charging issues?
Yes, outdated BIOS firmware can prevent adapter recognition even with OEM chargers. Download the latest BIOS from Dell Support using your Service Tag. Ensure the battery has at least 10% charge and keep the adapter connected throughout the update process.
Should I use a higher wattage charger for my Dell laptop?
Using a higher-wattage Dell adapter can force the system to recognize charging, especially if your original adapter is not being detected. Some users fixed the issue by using a 130W adapter instead of a 45W. However, always use Dell OEM adapters when possible.
When should I replace the DC jack or motherboard?
Replace the DC jack if it is physically loose or damaged. If DC jack replacement does not fix the issue, the motherboard charging circuit is likely faulty and requires motherboard replacement. These are last-resort options after all software and adapter tests fail.


