

Imagine you’re camping off-grid, your phone is dying, and you need to power a mini-fridge to keep food fresh. Or perhaps there’s a power outage, and you want to run essential electronics from your car. Connecting a power inverter to a car battery turns your vehicle into a mobile power station, converting 12V DC from the battery into usable 110-120V AC for everyday devices. This setup is not only possible but practical for emergency use, outdoor adventures, or mobile work.
But here’s the catch: while it seems simple, improper installation can lead to overheating, electrical fires, or permanent battery damage. Many users plug in high-wattage appliances without checking wire gauge, skip fuses, or use cheap cables, putting themselves at risk. The key is matching your inverter size to your battery capacity, using the right wiring, and following strict safety protocols.
Match Inverter Size to Battery Capacity
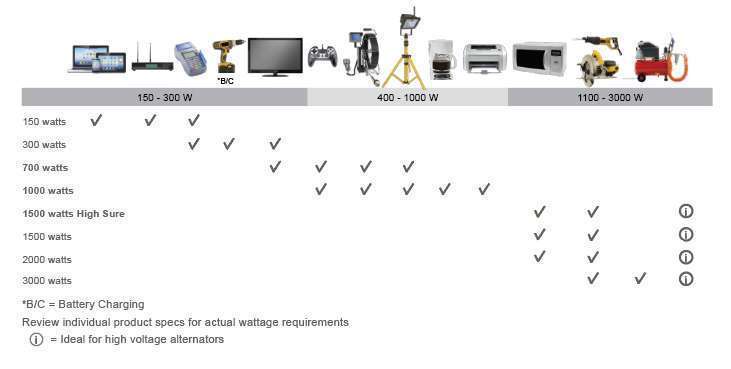
Before connecting any inverter, determine how much power your devices consume. Start by listing all devices you plan to use simultaneously, like a laptop (60W), LED lights (20W), and phone charger (10W). Add their running wattage for a total of 90W. But do not stop there: motor-driven devices like refrigerators or drills require 2-3 times more power at startup (surge wattage). A 100W fridge might need 300W briefly when the compressor kicks in.
Your inverter must handle both continuous wattage (total running load) and peak/surge wattage (highest momentary draw). If your combined load exceeds the inverter rating, it will shut down or fail. Always leave a 20% buffer between your total load and the inverter maximum output.
Estimate Battery Runtime
Even if your inverter can handle the load, your battery might not last long. Use this formula to estimate how long your battery will power the devices:
Battery Capacity (Ah) × 12V × Efficiency Factor ÷ Load (W) = Runtime (hours)
Use 0.5 efficiency factor for starter batteries (to avoid deep discharge) and 0.8 for deep-cycle batteries. Include inverter efficiency (~85-90%), which increases DC draw by 10-15%. A 70Ah car battery powering a 300W load gives approximately 1.4 hours of runtime.
Choose the Right Battery Type
Not all batteries are created equal. Your starter (automotive) battery is designed to deliver a short burst of energy to start the engine, not to power devices for hours. Starter batteries have a max safe discharge of 50%, and repeated deep cycling shortens lifespan. They are best for short-term use only, like charging phones with the engine running.
Deep-cycle batteries are built for long, steady discharges and can be safely discharged up to 80%. They are ideal for inverters used more than 30 minutes or with loads over 200W. Types include flooded lead-acid (FLA), AGM (sealed, maintenance-free), and lithium (LiFePO4), which offers lightweight construction and 2000+ cycle life.
Select Proper Inverter and Wiring Components

Power inverters come in two main types. Modified sine wave inverters have lower cost and are suitable for basic devices like lights, heaters, and phone chargers. However, they may cause buzzing in audio equipment or issues with sensitive electronics. Pure sine wave inverters provide clean, grid-quality power required for laptops, medical devices, and motor-driven appliances. They offer higher efficiency, less heat, and quieter operation.
Ensure your inverter is rated for 12V DC input and has built-in protections including overload shutdown, low-voltage alarm, and thermal protection.
Use Correct Cable Gauge
![]()
Undersized wires are a leading cause of inverter failure and fire. Voltage drop and overheating occur when cables cannot handle the current. Use AWG (American Wire Gauge) standards to select the right thickness.
For inverters up to 300W, use 10 AWG cable (max 25A). For 300-600W inverters, use 8-6 AWG (max 42A). For 600-1000W inverters, use 4 AWG (max 83A). For 1000-1500W inverters, use 2 AWG or 1/0 AWG (max 125A). For 1500-2000W inverters, use 2/0 AWG (max 167A).
For every foot over 6 ft, increase wire gauge by one size. Always use the shortest, thickest cable possible. Never use speaker wire, extension cords, or CCA (Copper-Clad Aluminum) cables because they overheat quickly and are unsafe.
Install a Fuse on the Positive Cable
A fuse is non-negotiable. It protects against short circuits that could melt wires or ignite hydrogen gas from the battery. Place an ANL or Maxi fuse within 6-12 inches of the battery positive terminal. Size the fuse at 110-125% of max current draw. A 500W inverter draws ~42A, so use a 50A fuse. A 1000W inverter draws ~83A, so use a 100A fuse.
The fuse must be on the battery side of any disconnect. If the cable is live after disconnection, the system is unsafe. Match fuse size to wire ampacity and never exceed it.
Follow Safe Installation Steps
Safety starts before you touch a tool. Turn off the vehicle, remove the key, and disconnect the negative battery terminal. This prevents accidental shorting during installation. Wear safety glasses and gloves, remove metal jewelry, and work in a well-ventilated area because batteries emit flammable hydrogen gas.
Mount the Inverter Securely
Install the inverter in a dry, cool, ventilated location, away from heat sources, moisture, and foot traffic. Leave 6+ inches of clearance around it for airflow. Secure it with brackets or screws, never let it sit loose. Avoid placing it on carpeted or flammable surfaces.
Route and Connect Positive Cable
Run the red (positive) cable from the inverter to the battery. Use existing firewall grommets or drill a new hole with a step drill bit and rubber grommet to protect the wire. Avoid sharp edges, moving parts, and hot surfaces. Secure with wire loom and zip ties every 12-18 inches.
Install the fuse holder within 12 inches of the battery. Connect in this order: Battery → Fuse → Cable → Inverter. Attach a hoop (ring) terminal to the battery positive post and tighten securely. A small spark is normal due to capacitor charging.
Ground the Negative Connection
Most vehicles use the chassis as the negative return path. Instead of running a full cable back to the battery, connect the black (negative) wire to a bare metal point on the chassis. Choose a bolt or bracket in the engine bay or under the dash. Remove paint with a wire brush for clean contact. Use a lock washer or nylon nut to prevent loosening from vibration.
Test continuity using a multimeter to confirm near-zero ohms between the ground point and battery negative terminal.
Reconnect and Test the System
Reattach the negative battery terminal. Turn on the inverter; most have a green indicator light when operating normally. Check input voltage, which should read 12.4-14.6V. Plug in a low-wattage device (like a phone charger) and monitor for overheating, buzzing, or shutdowns.
A brief beep at startup is normal. Persistent alarms indicate low voltage or overload, so reduce load or check connections.
Use Safe Connectors and Grounding
The right connector ensures a stable, high-current connection. Hoop (ring) terminals are best for permanent installations and should be crimped and soldered with heat-shrink tubing. Anderson PowerPole connectors are ideal for frequent connect/disconnect and are rated up to 50A. Battery quick disconnects are heavy-duty and bolt-on, good for 100A+ systems. Fused battery posts provide direct access with built-in fuse protection.
Avoid alligator clips (except for temporary use under 300W), household plugs, or CCA cables.
Prevent EMI and Ensure Proper Grounding
Metal-enclosed inverters should be grounded to the chassis to prevent electric shock, provide a fault current path, and reduce electromagnetic interference (EMI). Modified sine wave inverters often cause radio static or audio buzzing. Fix this by installing ferrite cores on DC and AC cables, keeping the inverter away from audio systems, and using shielded cables if interference persists.
Upgrade for Long-Term Use
Running high loads from your starter battery risks leaving you stranded. A better solution is to install a second (auxiliary) battery dedicated to the inverter. Use a 100Ah AGM or LiFePO4 battery mounted in the trunk or under seats. Connect via a battery isolator or DC-DC charger to charge the auxiliary battery from the alternator and prevent draining the starter battery.
A 100Ah LiFePO4 battery can power a 500W load for approximately 2 hours with minimal voltage drop.
Consider a Big 3 Electrical Upgrade
For inverters over 1000W, upgrade the Big 3 cables: battery positive to alternator, battery negative to chassis, and alternator case to chassis. Replace stock cables with 1/0 AWG or larger. Benefits include reduced voltage drop, improved charging efficiency, and cooler inverter operation.
Installers report 5-8% voltage improvement and more stable power delivery after the upgrade.
Follow Critical Safety Rules
Fusing is the single most important safety step. Without it, a short circuit can send hundreds of amps through the wire, melting insulation and igniting nearby materials. No fuse means no installation. Always install a correctly sized fuse within 12 inches of the battery.
Connecting positive to negative destroys inverters instantly and can cause explosions or fire. Double-check that the red cable goes to battery positive and black cable goes to chassis ground or battery negative. Use color-coded terminals and label wires if needed.
Never place flooded lead-acid batteries inside the cabin because they release hydrogen gas and sulfuric acid mist, which are hazardous. Instead, use AGM or lithium batteries that are sealed, spill-proof, and safe for interior mounting.
Seek professional help if the inverter exceeds 1000W, you are adding a second battery or isolator, routing cables through the firewall, or you lack experience with automotive electrical systems.
Maximize Performance and Longevity
Keep your setup reliable with regular care. Clean battery terminals every 3-6 months. Recharge after use; do not leave batteries in a discharged state. Use a smart charger to prevent overcharging. Inspect cables for wear, corrosion, or loose connections. For FLA batteries, check electrolyte levels monthly.
When not in use, store the inverter in a cool, dry place. Keep vents clear of dust and avoid exposure to moisture. Units with cooling fans and thermal shutdown last longer under heavy loads.
Most inverters come with 1-3 year warranties. Premium brands offer extended coverage with registration. Lithium battery plus inverter kits often include 5-10 year warranties, reflecting their durability and efficiency.
Frequently Asked Questions About Connecting a Power Inverter to a Car Battery
Can I run a power inverter while the car is off?
Yes, but only for a limited time. A starter battery will discharge quickly, and deep discharging can damage it. For extended use with the engine off, use a deep-cycle auxiliary battery. Monitor voltage and start the engine periodically to recharge.
What size inverter can I run off a car battery?
This depends on your battery capacity and cable gauge. A 300W inverter works with a standard car battery using 10 AWG cables. For 1000W or more, you need thicker cables (4 AWG or larger), a deep-cycle battery, and possibly an auxiliary battery setup.
Do I need a pure sine wave inverter?
You need a pure sine wave inverter if running sensitive electronics like laptops, medical devices, or motor-driven appliances. Modified sine wave inverters work for basic devices like lights and phone chargers but may cause buzzing or damage to sensitive equipment.
How long will a car battery power an inverter?
A 70Ah starter battery at 50% safe discharge can power a 300W load for approximately 1.4 hours. A 100Ah deep-cycle battery at 80% discharge can run a 500W load for about 2 hours. Runtime decreases with higher loads and lower battery capacity.
Can I use my car battery while driving?
Yes, the alternator charges the battery while driving. However, high-wattage inverters can strain the alternator, especially at idle. For consistent high-power use, an auxiliary battery connected to the alternator is recommended.
What happens if I skip the fuse?
Skipping the fuse creates a serious fire hazard. A short circuit can send hundreds of amps through undersized wiring, melting insulation and igniting nearby materials. The fuse is your primary protection against this scenario.
Key Takeaways for Connecting Your Power Inverter to a Car Battery
Connecting a power inverter to a car battery is a powerful solution for off-grid energy, but only when done safely. Use pure copper cables with the correct AWG rating based on your inverter power. Always install a properly sized fuse within 12 inches of the battery positive terminal. Choose a deep-cycle battery (AGM or LiFePO4) for any application exceeding 30 minutes or loads over 200W.
Match your inverter type to your devices: pure sine wave for laptops and sensitive electronics, modified sine wave for basic appliances. Leave a 20% buffer between your total load and the inverter maximum rating. Test all connections before use, and monitor for overheating or voltage drops.
Whether you are powering a CPAP machine during an outage or running tools at a job site, following these steps ensures a reliable, long-lasting setup. When in doubt, consult a professional because your safety is worth it.


