
If your RV, boat, or solar setup suddenly loses power, the culprit might not be the battery itself but how it is being charged. A deep cycle battery charger is engineered specifically to restore energy in batteries designed for long, sustained discharges, unlike regular car battery chargers that deliver quick bursts. These chargers use intelligent, multi-stage processes to safely bring a deeply depleted battery back to full capacity without causing damage.
Understanding how a deep cycle battery charger works is essential for anyone relying on off-grid power, marine systems, or backup energy storage. Using the wrong charger can lead to sulfation, overheating, or even fire, especially with lithium batteries. The right charger extends battery life, ensures full recharges, and prevents long-term degradation.
Multi-Stage Charging Explained
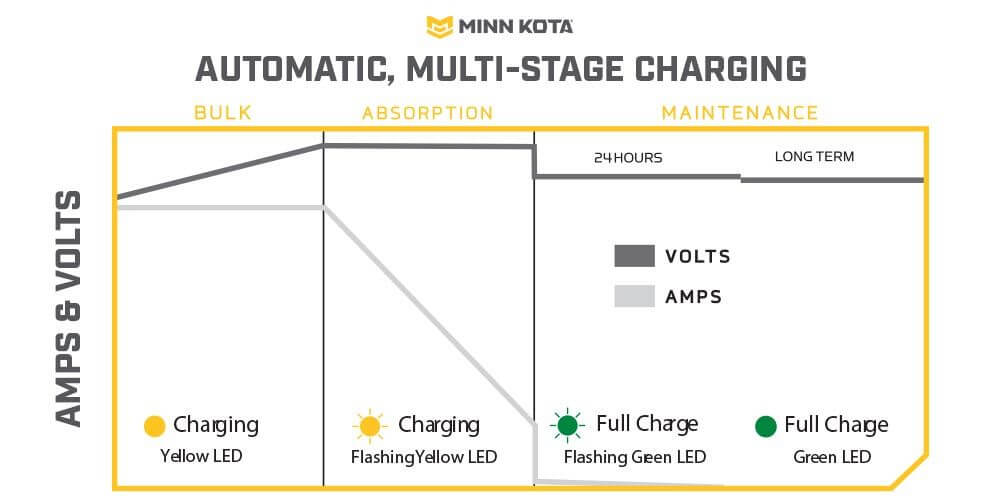
Modern deep cycle battery chargers do not simply pump electricity into a battery. They follow a precise sequence of voltage and current adjustments tailored to the battery is condition. This multi-stage approach maximizes efficiency, prevents damage, and ensures complete charging. Most chargers use three or four distinct phases: Bulk, Absorption, Float, and sometimes Equalization.
Each stage responds to the battery is real-time needs, monitored by microprocessors that adjust output automatically. Without this control, overcharging or undercharging would shorten battery life significantly.
Bulk Charging: Fast Recharge Phase
This is the first and fastest stage, responsible for restoring 70 to 80 percent of the battery is capacity. When the battery is deeply discharged below 80 percent state of charge, the charger delivers its maximum rated current at a steadily increasing voltage.
The process continues until the battery reaches a preset absorption voltage, which varies by chemistry:
* 14.4V for 12V AGM
* 14.8V for flooded lead-acid
* 14.2V for gel
During bulk charging, the battery acts like a sponge, eagerly absorbing current. A 100Ah battery charged at 10 amps can gain most of its charge in 4 to 6 hours during this phase, depending on depth of discharge.
Pro Tip: Never interrupt bulk charging early. Doing so leads to chronic undercharging and sulfation buildup.
Absorption Stage: Controlled Top-Off
Once the battery hits the absorption voltage, it transitions to the second stage. Here, the charger holds voltage constant while current gradually tapers off as internal resistance rises. This phase safely adds the remaining 20 to 30 percent of charge.
The duration depends on how deeply the battery was drained and the charger is output. A typical 12V system may stay in absorption for 1 to 4 hours. Smart chargers monitor the declining current and determine when to switch to float mode, usually when current drops to about 1 to 3 percent of battery capacity.
For example, on a 100Ah battery, if current falls below 1 to 3 amps during absorption, the charger knows the battery is nearly full.
Warning: Leaving a non-smart charger in this stage too long can cause excessive gassing and electrolyte loss in flooded batteries.
Float Mode: Long-Term Maintenance
After full charge, the charger reduces voltage to a safe maintenance level, typically 13.2 to 13.8V for 12V lead-acid batteries, and supplies a tiny trickle of current. This float stage counteracts self-discharge without overcharging.
Float charging is ideal for:
* Boats on docks
* RVs in storage
* Solar backup systems
It keeps the battery ready for use while preventing sulfation. Many smart chargers include temperature compensation, automatically lowering float voltage in hot environments and raising it slightly in cold conditions.
Expert Note: Lithium LiFePO4 batteries often switch to zero-current standby instead of float, as they do not require continuous voltage.
Equalization: Prevent Sulfation in Flooded Batteries
This optional fourth stage applies only to flooded lead-acid batteries. It is a periodic, controlled overcharge at higher voltage, around 15.5V for 12V systems, that stirs the electrolyte and breaks down sulfate crystals forming on the plates.
Equalization helps:
* Balance cell voltages
* Restore lost capacity
* Extend battery life
It should be done every 10 to 50 cycles, or monthly, depending on usage. Because it produces hydrogen gas, proper ventilation is mandatory.
Critical: Never equalize AGM, gel, or lithium batteries. Doing so can cause permanent damage or thermal runaway.
Types of Deep Cycle Chargers

Not all chargers are created equal. Choosing the right type depends on your application, mobility needs, and battery setup.
Onboard vs Portable Chargers
Onboard chargers are permanently installed in boats, RVs, or solar systems. They automatically start charging when AC power is available and often support multiple battery banks independently.
Benefits include:
* Hands-free operation
* Integrated with system wiring
* Often include advanced diagnostics
Drawbacks include:
* Not portable
* Limited to one vehicle or setup
Portable chargers offer flexibility. You can move them between a boat, ATV, or backup battery bank. They are ideal for seasonal users or those with limited space.
Use Case: A small fishing boat with no room for installation? A portable charger is the smarter choice.
Smart Chargers: The Gold Standard
Smart chargers contain microprocessors that detect battery type, state of charge, and temperature, then apply the correct charging profile automatically.
Key advantages:
* Auto-detects AGM, gel, flooded, or lithium LiFePO4
* Prevents overcharging with automatic cutoff
* Adjusts for temperature changes
* Displays charge status via LED indicators or digital screens
Unlike basic chargers that deliver constant current until unplugged, smart models adapt in real time, making them safer and more efficient.
Pro Tip: For lithium batteries, always use a smart charger with a dedicated LiFePO4 mode. Regular chargers can cause overheating or fire.
Match Charger to Battery Chemistry
Using the wrong charger can destroy your battery, even if it fits the voltage. Each chemistry has unique voltage and current requirements.
| Battery Type | Bulk Voltage 12V | Float Voltage | Notes |
|---|---|---|---|
| Flooded Lead-Acid | 14.4 to 14.8V | 13.2 to 13.5V | Supports equalization, needs water checks |
| AGM | 14.4 to 14.6V | 13.2 to 13.5V | Sealed, maintenance-free, faster charge |
| Gel | 14.0 to 14.2V | 13.1 to 13.3V | Sensitive to overvoltage, slower charge |
| Lithium LiFePO4 | 14.2 to 14.6V | 13.5 to 13.6V or off | Requires BMS, no float needed |
Critical Rule: Never use a standard automotive charger on deep cycle batteries. These deliver unregulated high voltage, leading to overcharging, gassing, and shortened lifespan.
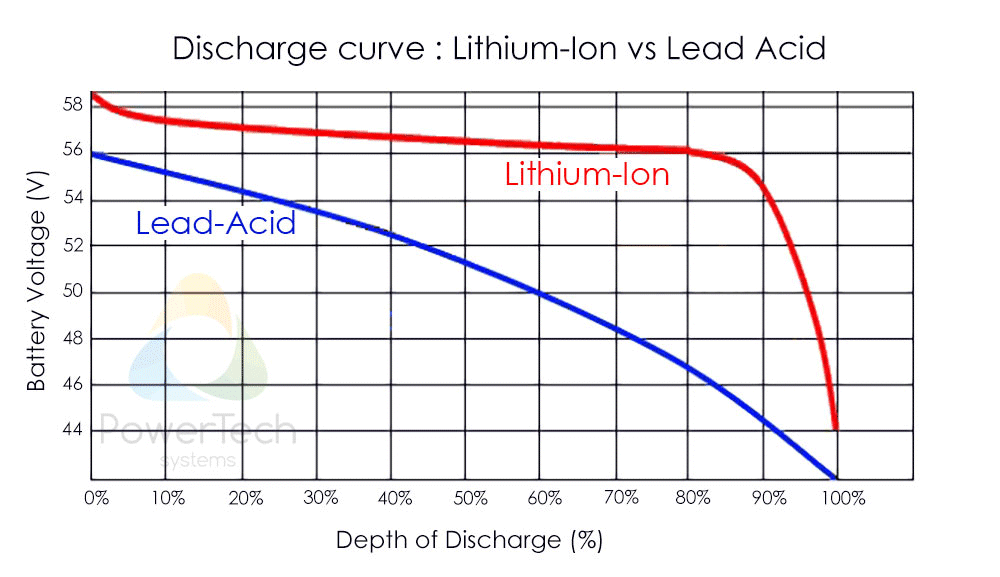
Why Lithium Needs Special Handling
Lithium iron phosphate LiFePO4 batteries accept higher charge currents and require precise voltage control. They also rely on an internal Battery Management System to monitor cell balance and prevent overcharge.
A compatible charger must:
* Recognize the BMS signal
* Stop charging when full
* Avoid applying float voltage unless specified
Danger Alert: Using a lead-acid charger on lithium can bypass safety controls, leading to thermal runaway or fire.
Charging Sources: Solar, Alternator, and More
Deep cycle batteries can be recharged through various power sources, but each requires regulation.
Solar Charging with MPPT
Solar panels generate DC power, but without a charge controller, they can overcharge the battery. Two types exist: PWM Pulse Width Modulation and MPPT Maximum Power Point Tracking. PWM is affordable but less efficient. MPPT converts excess panel voltage into usable current, boosting efficiency by 20 to 30 percent.
An MPPT controller adapts to changing sunlight and temperature, extracting the most energy possible.
Example: A 100W solar panel produces about 5 to 6 amps under full sun, enough to charge a 100Ah battery in 5 to 8 days, assuming 6 peak sun hours.
Alternator Charging with DC-DC Boost
Vehicle alternators can recharge deep cycle batteries while driving, but standard systems often do not provide enough voltage to fully charge them.
A DC-DC charger between the alternator and battery boosts voltage and regulates output, ensuring complete charging even after deep discharges.
Best Practice: Use DC-DC chargers in dual-battery setups, starter plus deep cycle, to prevent draining the starter battery.
Generator and Shore Power
Generators supply AC power to run onboard or portable battery chargers. While effective, they are noisy and require fuel.
Shore power, plugging into grid electricity, works similarly and is common in marinas or RV parks. Both methods pair well with multi-stage chargers for full, safe recharges.
Charging Speed: Amperage and Time
How fast your battery charges depends on charger amperage and battery capacity.
Choose the Right Amp Rating
General rule: Charger output should equal 10 to 20 percent of battery is Ah rating.
- 100Ah battery: Use a 10 to 20A charger
- Lower amps, 2 to 5A: Slower, gentler charge, ideal for maintenance
- Higher amps, 30 to 50A: Faster recharge, best for daily use
Trade-off: High amperage charges faster but generates more heat, which can reduce longevity if overused.
Estimate Charging Time
Use this formula: Charge Time equals Battery Capacity times Depth of Discharge divided by Charger Output times 1.5. The 1.5 factor accounts for inefficiencies and the tapering current in absorption stage.
| Battery Type | Recharge Time from 50% DOD |
|---|---|
| Flooded Lead-Acid | 8 to 14 hours |
| AGM | 8 to 10 hours |
| Gel | 10 to 14 hours |
| Lithium LiFePO4 | 1 to 3 hours |
Why lithium is faster: It can accept nearly full charger current throughout the cycle, with no absorption tapering.
Safety and Best Practices
Charging deep cycle batteries safely requires attention to environment, connections, and timing.
Ventilation and Gas Risks
Flooded lead-acid batteries release hydrogen gas during charging, especially in bulk and equalization stages. This gas is highly flammable.
Always:
* Charge in well-ventilated areas
* Keep sparks and flames away
* Avoid charging indoors unless properly vented
AGM, gel, and lithium batteries are recombinant or sealed, so they emit little to no gas under normal conditions.
Correct Connection Order
Follow this sequence:
1. Connect charger to battery, positive first, then negative
2. Plug charger into outlet
3. When done: Unplug first, then disconnect clamps, negative first
This prevents sparks near the battery, reducing explosion risk.
Pro Tip: Clean terminals with a baking soda solution before connecting. Corrosion increases resistance and slows charging.
Temperature Compensation Matters
Battery chemistry slows in cold and accelerates in heat. Without adjustment, this leads to undercharging in cold and overcharging in heat.
Smart chargers with temperature sensors automatically modify voltage: lower voltage when hot, higher voltage when cold.
Rule of Thumb: Never charge a frozen battery. Thaw it first to avoid damage.
Extend Battery Life with Maintenance
Proper care doubles the lifespan of your deep cycle battery.
Water Level Checks: Flooded Only
Only check and refill before charging, never after. Charging expands the electrolyte. Adding water afterward can cause overflow.
Steps:
1. Remove caps
2. Use a straw or turkey baster with distilled water
3. Fill to just below the split ring or plate level
4. Wipe terminals clean
Never use tap water. Minerals accelerate sulfation.
Storage Tips
Store batteries at 70 to 100 percent charge in a cool, dry place, 50 to 70 degrees Fahrenheit. A fully discharged battery left in storage will sulfate quickly.
Best practices:
* Use a float or maintenance charger during storage
* Check voltage monthly
* Recharge when SOC drops below 80 percent
Fact: Deep cycle batteries should be charged at least twice a year, even if unused.
Diagnose Charge Status
How do you know your battery is fully charged?
Voltage Test
Measure resting voltage, after 2 or more hours off charge:
* 12.6 to 12.8V: Fully charged
* 12.0V: 50 percent discharged
* 11.9V or below: Deeply discharged
Hydrometer: Flooded Batteries
Test specific gravity in each cell:
* 1.265 or higher: Full charge
* Consistent readings across cells: Healthy battery
Charger Indicators
Smart chargers show:
* Green light: Charged
* Blinking: Charging in progress
* Error code: Fault detected
Lithium batteries with BMS provide SOC percentage and health alerts via Bluetooth or display.
Avoid These Charging Mistakes
| Mistake | Risk | Fix |
|---|---|---|
| Using car charger | Overcharge, damage | Use deep cycle-specific charger |
| Charging in extreme heat | Thermal runaway | Use temp-compensated charger |
| Skipping terminal cleaning | Slow charge, poor performance | Clean monthly with baking soda |
| Leaving on dumb charger | Overcharging, dry-out | Use smart or float charger |
| Mixing battery types | Imbalanced charging | Charge separately or use multi-bank |
Final Warning: Never use a regular battery charger on lithium deep cycles. It can bypass the BMS and create a fire hazard.
Key Takeaways for Deep Cycle Battery Charging
A deep cycle battery charger works by intelligently managing voltage and current across multiple stages: Bulk, Absorption, Float, and Equalization. Each phase serves a specific purpose in safely restoring and maintaining battery capacity. Smart, chemistry-specific chargers prevent damage, extend lifespan, and ensure reliable power for your RV, boat, or solar system.
Matching your charger to your battery type is critical. Flooded lead-acid, AGM, gel, and lithium each require different voltage settings and charging profiles. Using the wrong charger can cause permanent damage or safety hazards. Always use a charger designed specifically for deep cycle batteries, and for lithium, ensure it includes a dedicated LiFePO4 mode.
Proper charging practices extend battery life significantly. Select amperage at 10 to 20 percent of your battery is Ah rating, use temperature compensation in extreme climates, and maintain proper ventilation during charging. For flooded batteries, check water levels regularly and store at 70 to 100 percent charge. By following these guidelines, your deep cycle battery system will deliver years of reliable power.
Frequently Asked Questions About Deep Cycle Battery Chargers
What is the difference between a deep cycle charger and a regular battery charger?
A regular automotive charger delivers high current quickly to start engines, while a deep cycle charger provides controlled, multi-stage charging designed for batteries that discharge deeply and recharge slowly. Regular chargers can overcharge and damage deep cycle batteries.
Can I use a smart charger on all types of deep cycle batteries?
Yes, most smart chargers automatically detect battery type and apply the correct profile for flooded lead-acid, AGM, gel, and lithium LiFePO4. Always verify your charger supports your specific battery chemistry before use.
How long does it take to fully charge a deep cycle battery?
Charging time depends on battery capacity, depth of discharge, and charger amperage. A 100Ah battery at 50 percent discharge with a 10A charger takes approximately 5 to 7 hours. Lithium batteries charge faster, typically 1 to 3 hours.
Can solar panels charge deep cycle batteries directly?
No, solar panels require a charge controller between the panel and battery. Without regulation, panels can overcharge the battery. MPPT controllers are more efficient than PWM models and recommended for deep cycle systems.
Why does my battery get hot during charging?
Heat during charging can indicate high charging current, a faulty charger, or battery problems. Some warmth is normal during bulk charging, but excessive heat suggests the charger is incompatible or the battery is failing. Stop charging and investigate.
Should I disconnect my battery when charging?
For safety, always connect the charger to the battery before plugging into an outlet, and unplug the charger before disconnecting clamps. Follow the correct order: positive first when connecting, negative first when disconnecting.


