
You’ve turned the key, but nothing happens. A dead car battery is one of the most common vehicle issues, and while jump-starting gets you moving, it does not fully recharge the battery. That is where knowing how to connect a battery charger properly becomes essential. Whether you are maintaining a seasonal vehicle or reviving a drained battery, doing it right ensures safety, protects your car’s electronics, and extends battery life.
Modern cars contain sensitive systems, including Battery Management Systems that monitor charge levels and performance. Connecting a charger incorrectly can confuse these systems, cause sparks, or even damage the battery. This guide walks you through the correct, safe way to connect a battery charger step by step.
Safety First: Essential Precautions Before Charging
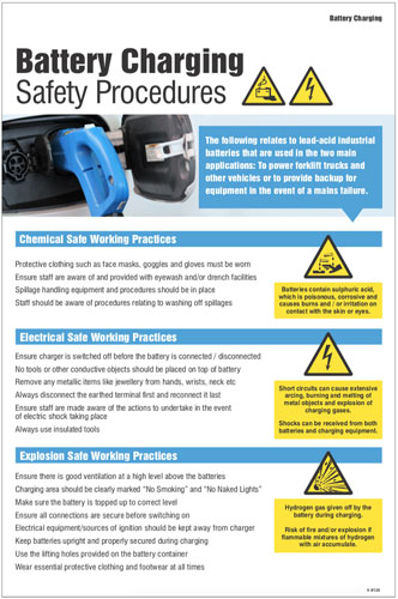
Before touching any cables, prioritize safety. A car battery can deliver high current and emit explosive hydrogen gas, especially when low or damaged. One spark in the wrong place can lead to serious injury.
Essential Safety Gear
Wear safety glasses to shield your eyes from acid splashes or sparks. Use rubber-insulated gloves to prevent accidental shocks. Remove rings, watches, or loose jewelry that could contact metal parts.
Environment and Vehicle Prep
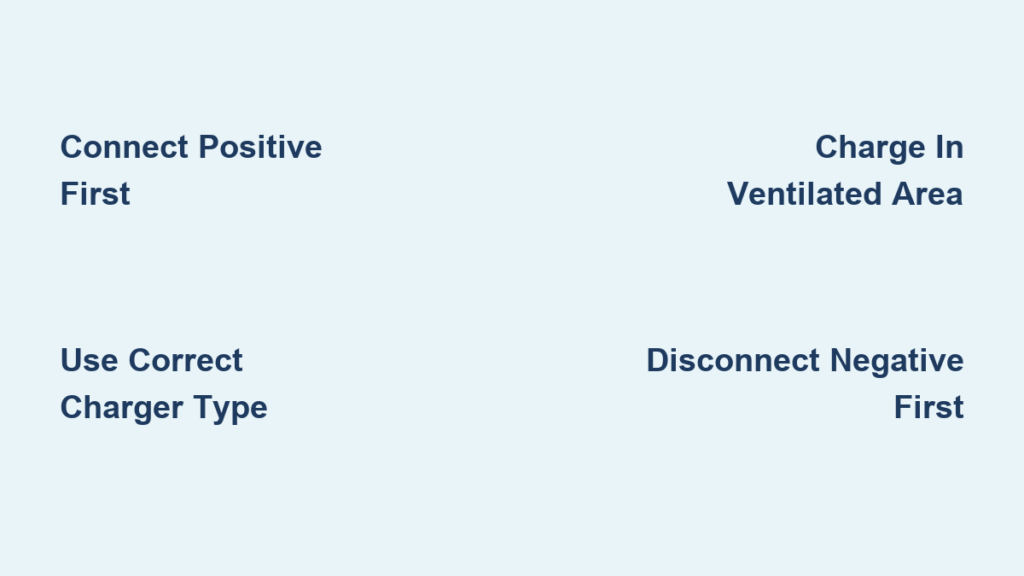
Park on level ground and engage the parking brake. Turn off the ignition and remove the key, or power down the vehicle completely. Ensure all accessories are off, including lights, radio, and climate control. Work in a well-ventilated area, especially when charging a lead-acid battery. Keep open flames, cigarettes, and sparks away from the battery.
Never charge a cracked, leaking, or swollen battery. Replace it instead, as charging could cause an explosion.
Identify Your Battery Type and Charger Compatibility
Not all batteries charge the same. Using the wrong charger can overheat the battery or reduce its lifespan. Matching the charger to your battery type is critical for safe, effective charging.
Common Battery Types
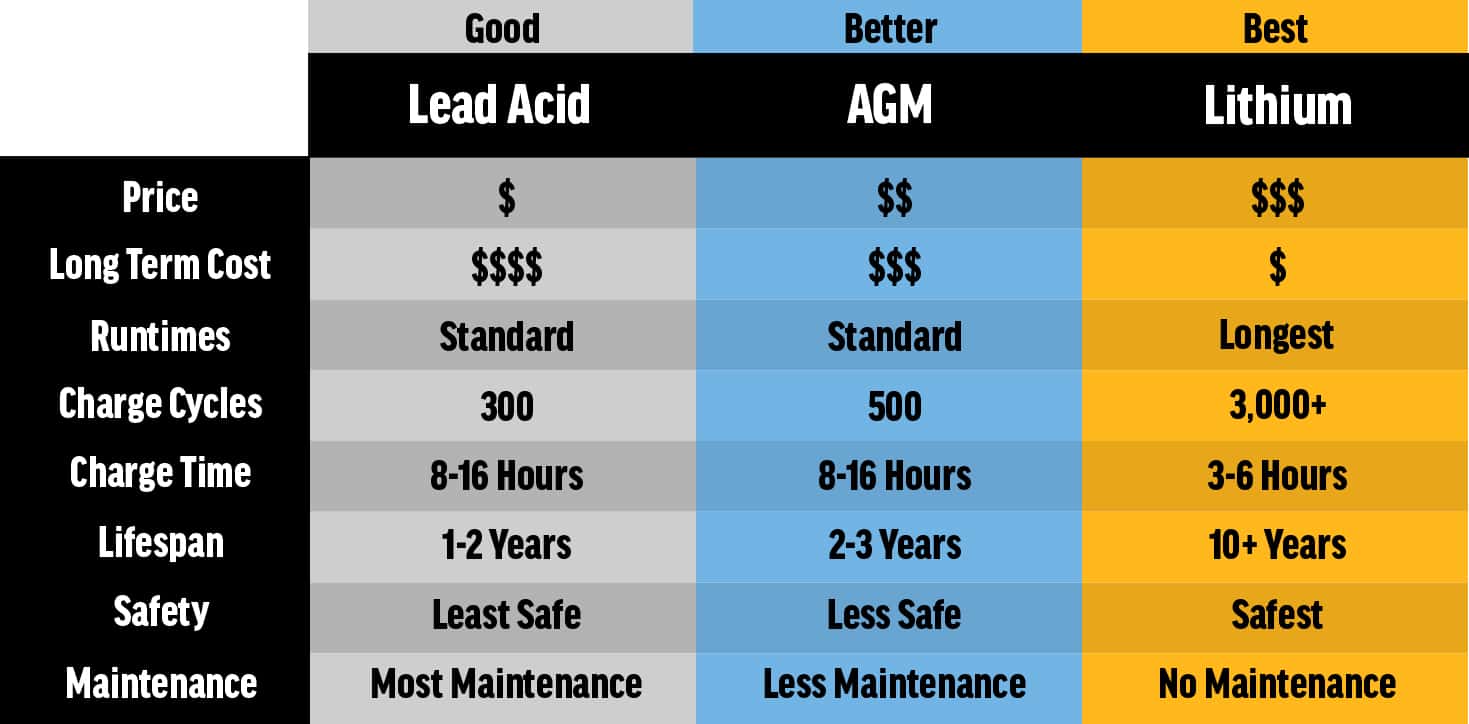
Lead-acid flooded batteries are standard in older vehicles and require maintenance. AGM batteries are found in modern cars, especially start-stop models, and need higher voltage control. EFB batteries are used in entry-level start-stop vehicles and are more durable than standard lead-acid. Lithium-ion batteries are rare in standard cars but common in motorcycles and require a lithium-specific charger.
Match Your Charger to the Battery
Use a smart charger labeled as compatible with your battery type. Top models like those from CTEK, NOCO, and Battery Tender automatically detect chemistry and adjust voltage accordingly. Check your charger settings for AGM mode, lithium options, or maintenance modes. If unsure, consult your vehicle owner manual or battery label.
Locate the Battery or Charging Points

Most batteries are under the hood, but some vehicles hide them in the trunk, under seats, or in fender wells. Finding the correct location is the first step in the connection process.
Finding the Right Spot
Open the hood and look for a black plastic case with red and black terminals. Some cars cover the battery with a protective tray that needs removal first. If you cannot locate it, check the owner manual, as many BMWs, Audis, and Volvos place batteries in the trunk.
Modern Vehicles: Use Dedicated Charging Terminals
Many newer cars have designated charging points under the hood. These points keep clamps away from the battery, reducing corrosion. They also help the Battery Management System detect charging and prevent system errors after charging.
To locate these points, look for a red plastic cap labeled with a plus sign near the fuse box. Find a metal grounding point for the negative clamp.
Clean and Inspect Battery Terminals
Dirty or corroded terminals block current flow and prevent proper charging. Taking time to clean them ensures efficient energy transfer.
How to Clean Terminals
Disconnect any existing cables, starting with the negative terminal first. Mix baking soda and water using one tablespoon per cup. Apply the solution with a wire brush to both terminals and scrub until shiny metal appears. Wipe dry with a clean cloth. Apply a thin coat of dielectric grease after cleaning to slow future corrosion.
Check for Damage
Look for white or green crust indicating corrosion, cracks in the case, or bulging sides. If the battery case is cracked or leaking acid, do not charge it. Replace the battery instead.
Choose the Right Connection Method
There are four safe ways to connect a battery charger. Pick the one that fits your vehicle and needs.
Connect via Battery Clamps
This method works with portable chargers and is ideal for occasional use. Attach the red clamp to the positive terminal, which is usually red-covered or marked with a plus sign. Attach the black clamp to a clean, unpainted metal surface on the chassis or engine block, not the negative terminal.
Connecting negative to the chassis reduces spark risk near the battery where hydrogen gas may collect. CTEK and Genius chargers recommend this method for safer operation.
Use Dedicated Charging Terminals
For vehicles with built-in charging points, plug the red clamp into the designated positive terminal under the red cap. Attach the black clamp to a marked ground point or bare metal chassis. This method prevents BMS communication errors and keeps acid away from clamps.
Plug Into 12-Volt Socket
This method only works if your vehicle powers the socket with the ignition off. The vehicle must support always-on 12V outlet power, and the charger must be designed for socket charging. Insert the charger plug into the 12V socket. The charger connects automatically with no clamps needed. This method offers slow charging best suited for maintenance rather than full recharging.
Install Permanent Eyelet Terminals
Ideal for vehicles stored long-term or with hard-to-reach batteries. Install eyelet connectors on battery posts and secure them with nuts or bolts. Connect the charger via a quick-disconnect harness. This advantage eliminates repeated clamp handling and reduces corrosion.
Step-by-Step Connection Procedure
Follow this universal sequence to avoid sparks and damage.
Connection Order
Turn off the vehicle and remove the key. Unplug the charger from the wall. Attach the red positive clamp first to the battery terminal or charging point. Attach the black negative clamp second to the chassis ground or negative terminal. Plug the charger into the outlet. Turn on the charger if it is not automatic. Select the battery type if the charger requires manual selection.
The golden rule is to connect positive first, then negative. Disconnect in reverse order, negative first, then positive. This prevents accidental short circuits if the positive clamp touches metal during removal.
Set the Correct Charging Mode
Smart chargers do most of the work automatically, but manual settings require attention for optimal results.
Automatic vs Manual Chargers
Smart chargers detect battery type and apply the right voltage automatically. Just connect and go. Manual chargers require you to select voltage and amp rate.
Recommended Charging Rates
Trickle charging at 1-2 amps works best for long-term storage and maintenance. Standard charging at 5 amps suits overnight recharges. Fast charging at 10 amps or higher provides a quick boost but should not be used frequently.
Using 2-5 amps for 8-12 hours safely recharges a dead battery without stress.
Monitor the Charging Process
Once connected, let the charger do its job while keeping an eye on progress.
What Smart Chargers Do
Smart chargers use multi-stage charging that progresses through bulk, absorption, and float maintenance phases. They automatically shut off when the battery is full. Some offer recondition mode for sulfated batteries. Others include reverse polarity alarms if clamps are swapped.
The CTEK CS ONE has polarity-free clamps that will not power up if connected incorrectly.
Charging Time Estimates
A fully dead battery at 2 amps takes 18-24 hours to fully charge. A half-discharged battery at 5 amps takes 6-8 hours. Low charge at 10 amps takes 3-5 hours. Maintenance top-up at 1.5 amps takes 1-3 hours.
AGM batteries take longer due to controlled charging profiles.
Safely Disconnect the Charger
Removing the charger incorrectly can cause sparks or shorts. Follow the proper removal sequence.
Disconnection Order
Turn off the charger first. Unplug from the wall second. Remove the black negative clamp third. Remove the red positive clamp fourth. Close the hood and double-check that all tools are clear.
Removing negative first prevents accidental short circuits if the positive clamp touches metal while still connected.
Troubleshoot Common Charging Issues
Even with proper procedures, problems can occur. Here is how to fix them quickly.
Charger Won’t Start
The battery voltage may be too low below 9 volts. Use boost mode or let trickle charge for 30 minutes before normal charging.
Red Error Light or Beeping
Reversed polarity, poor connection, or incompatible battery may be the cause. Swap clamps, clean terminals, and verify battery type settings.
Sparking When Connecting
The charger was plugged in during connection. Always connect with the charger unplugged and off.
Battery Won’t Hold Charge
Internal failure, sulfation, or parasitic drain may be the issue. Test with a multimeter or load tester. Replace the battery if it tests below 12.4 volts after a full charge.
Charger Shuts Off Immediately
Reverse polarity protection has activated. Double-check clamp positions, ensuring red goes to positive and black goes to negative or ground.
Handle Modern Vehicles with Care
Newer cars rely on Battery Management Systems that track battery health and charging cycles. Proper connection protects these sensitive systems.
BMS-Friendly Charging Tips
Use dedicated charging points when available. Avoid direct negative terminal connection unless necessary. After replacing a battery, some vehicles require battery registration via a scan tool.
Start-Stop Vehicles
These vehicles use AGM or EFB batteries that need special care. Use only AGM-compatible chargers. Avoid fast charging as AGM requires controlled voltage between 14.4 and 14.8 volts. Never use a standard charger on long-term maintenance.
Maintain Your Battery for Long Life
A little care prevents dead batteries and extends battery life significantly.
Best Maintenance Practices
Charge every two months if the car sits unused. Use a smart charger with float mode during winter. Keep terminals clean and tight. Minimize parasitic drain from dashcams and trackers. Recharge immediately after a jump-start.
Keep a portable smart charger in your garage. It can save you from a no-start morning.
Frequently Asked Questions About Connecting a Battery Charger
Can I connect a battery charger while the car is running?
No, you should always turn off the vehicle and remove the key before connecting a charger. Connecting to a running car can cause voltage spikes that damage sensitive electronics and the charger itself.
Does it matter which order I connect the clamps?
Yes, it matters greatly. Always connect the positive clamp first, then the negative clamp. When disconnecting, remove the negative clamp first, then the positive. This prevents sparks and accidental short circuits.
Can I use any charger for my car battery?
No, you must match the charger to your battery type. AGM batteries need AGM-compatible chargers. Lithium batteries require lithium-specific chargers. Using the wrong charger can damage the battery or pose a fire risk.
Is it safe to charge a battery in the car?
Yes, it is generally safe to charge a battery while it is still installed in the vehicle. Just ensure the vehicle is off, the area is well-ventilated, and you follow proper connection procedures. Avoid charging near open flames or in enclosed spaces.
How long does it take to charge a dead car battery?
It depends on the charger amperage and battery condition. A fully dead battery at 2 amps takes 18-24 hours. At 5 amps, it takes 6-8 hours. At 10 amps, it takes 3-5 hours. Overnight charging at 2-5 amps is the safest approach.
Can I leave a smart charger on overnight?
Yes, smart chargers are designed for overnight use. They feature automatic shut-off and maintenance modes that prevent overcharging. However, always follow the manufacturer instructions and ensure the charger is in a well-ventilated area.
Key Takeaways for Connecting Your Battery Charger
Knowing how to connect a battery charger correctly is not just about reviving a dead battery. It protects your vehicle electronics, ensures safety, and gets the most life from your battery. Always connect positive first and disconnect negative first. Use a smart charger matched to your battery type, whether it is lead-acid, AGM, or lithium. Wear protective gear and work in a well-ventilated area. For modern vehicles, use dedicated charging points when available to keep the Battery Management System happy. By following these steps, you will charge smarter, avoid common mistakes, and keep your car ready to go when you need it.


