
Imagine your car won’t start on a cold morning. The lights flicker, the engine groans, and you realize the battery is dead. Your first instinct is to grab the battery charger, but before plugging it in, remember that improper use can lead to sparks, explosions, or permanent damage. Hydrogen gas from the battery, electrical faults, or incorrect connections can turn a simple fix into a hazardous situation.
This guide focuses on how to operate battery charger safely, using proven procedures from trusted automotive sources. You’ll learn the right way to prepare, connect, charge, and disconnect step by step, while avoiding common dangers like reverse polarity, overcharging, and hydrogen ignition.
Prepare Your Equipment and Workspace
Choose the Right Charger for Your Battery
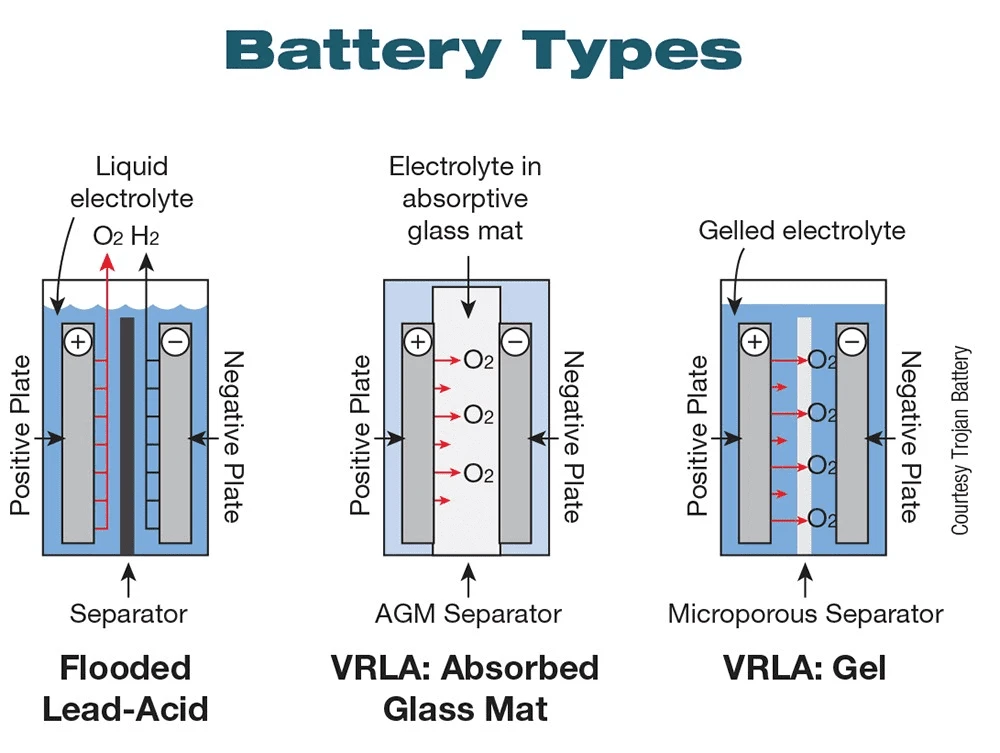
Not all chargers work for all batteries. Using the wrong type risks overheating, reduced lifespan, or even explosion. Match your charger to your battery chemistry.
• Flooded Lead-Acid: Use a smart or trickle charger
• AGM (Absorbent Glass Mat): Smart charger with AGM mode only
• Gel: Charger with gel-specific setting
• Lithium-Ion: Lithium-compatible smart charger
Never use a standard charger on AGM or gel batteries, as it can overcharge them due to incorrect voltage regulation.
Select the Correct Charger Type
• Smart Chargers: Auto-detect battery condition, adjust output, and stop when full. Include safety features like reverse polarity protection and spark-proof clamps. Best for home use.
• Trickle Chargers: Deliver 1 to 2 amps. Ideal for seasonal vehicles like RVs or lawnmowers. Must be manually disconnected unless in float mode.
• Portable Jump Chargers: Compact units with USB ports and air compressors. Great for emergencies but not for full recharges.
Set Up a Safe Charging Environment
• Work in a well-ventilated area because batteries release flammable hydrogen gas
• Keep away from open flames, sparks, or smoking
• Avoid damp or wet locations where there’s risk of electrocution
• Use a grounded outlet or outdoor-rated extension cord (14-gauge minimum)
• Wear safety goggles and rubber-insulated gloves
• Remove jewelry and secure loose clothing
Ensure the vehicle is off, the parking brake is engaged, and all electronics (radio, lights, HVAC) are turned off before beginning.
Inspect Battery and Connect Charger Safely

Check the Battery Before Charging
Before connecting the charger, inspect the battery for damage.
• Check for cracks, leaks, bulging, or sulfur smell (rotten egg odor). If present, do not charge—replace the battery instead.
• Locate terminals: red (+) for positive, black (-) for negative
• Clean corroded terminals with a wire brush and baking soda solution (1 tablespoon per cup of water), then rinse and dry thoroughly
A clean terminal ensures better conductivity and reduces spark risk during charging.
Connect Clamps in the Correct Order
Always connect clamps with the charger off and unplugged. Connecting while the charger is live creates sparks, which are dangerous near hydrogen gas.
- Attach the red clamp to the positive terminal (+) first — clip securely onto the red-covered or marked terminal
- Attach the black clamp to the negative terminal (-) second — if the negative terminal is corroded, connect to an unpainted metal bolt or bracket on the engine block, away from the battery
Place the charger as far from the battery as the cables allow to reduce exposure to gas. Ensure clamps are tight and not touching other metal parts.
Set Charger Parameters and Start Charging
Configure Correct Charging Settings
Before powering on, set the charger correctly.
• Confirm voltage (12V for most cars, 6V for older motorcycles)
• Select battery type (flooded, AGM, gel, lithium)
• Choose amperage based on your situation:
– 1 to 3 amps: Slow, safe charge. Best for deeply discharged batteries
– 5 to 10 amps: Standard charge. Completes in 2 to 6 hours
– Above 10 amps: Fast charge only for emergencies. Increases heat and wear
For a dead battery, use 1 to 3 amps overnight to avoid stressing internal cells.
Power On and Monitor the Process
Plug the charger into a grounded outlet, then turn it on. Watch the indicator lights.
• Red light: Charging in progress
• Green light: Fully charged or in float mode
Smart chargers go through three phases: bulk (high current to reach about 80%), absorption (slower charge to 90 to 95%), and float (maintains full charge safely). Non-smart chargers lack auto-shutoff, so never leave them unattended.
Estimate Charging Time Accurately
Charging duration depends on battery size, state of charge, and charger output.
| Battery Voltage | Charger Output | Time to Full Charge |
|---|---|---|
| Below 11.85V | 5 amps | About 12 hours |
| Below 11.85V | 10 amps | About 6 hours |
| 12.0 to 12.4V | 2 amps (trickle) | 8 to 12 hours |
| Fully dead | 1 to 3 amps | 12 to 24 hours |
Charge a completely dead battery at low amperage overnight for safest recovery. High-amp charging may seem faster but risks overheating, gassing, and shortened battery life.
Disconnect the Charger Safely
Once the charger shows full (green light or auto-shutoff), disconnect in reverse order.
- Turn off the charger
- Unplug from power
- Remove the black (negative) clamp first
- Remove the red (positive) clamp second
Removing the red clamp first can cause a short circuit if it touches any grounded metal. After disconnecting, recheck that all tools are clear, replace terminal covers, and close the hood carefully.
Test battery voltage with a voltmeter after charging. A full charge reads 12.6V or higher.
Follow Key Safety Rules
Wear Proper Protective Gear
• Safety goggles to prevent acid splash or spark injury
• Insulated gloves to protect against electrical shock
• Steel-toed boots to shield feet if the battery ruptures
Avoid Environmental Hazards
• Never charge in enclosed, unventilated spaces
• Keep away from gasoline, pilot lights, or sparks
• Do not charge a frozen battery—thaw it first (risk of explosion)
• Never charge a leaking or damaged battery
Never leave a non-smart charger connected indefinitely. Only smart chargers with float mode are safe for long-term use.
Use the Right Cables and Outlets
• Use a grounded extension cord rated for outdoor use
• Avoid daisy-chaining multiple cords
• Check for frayed wires or damaged plugs
Test Battery Health After Charging
Wait 1 to 2 hours after charging to let the surface charge dissipate, then test with a digital voltmeter.
• 12.6V or above: Healthy
• 12.4V: About 75% charged
• Below 12.0V: Weak or failing
For deeper diagnosis, use a load tester or conductance tester. Check alternator output (should be 13.5 to 14.5V when the engine runs). Perform a parasitic draw test if the battery drains quickly.
If the battery won’t hold charge after multiple attempts, likely causes include internal short, sulfation, or dead cell. Replace the battery because continued charging won’t fix it. Visit AutoZone, O’Reilly, or Meineke for free battery and charging system testing.
Troubleshoot Common Charging Problems
Charger Won’t Turn On
• Check outlet power
• Try a different cord
• Inspect for blown fuse in charger or garage panel
No Charging Light
• Recheck clamp connections
• Verify battery type and voltage settings
• Test battery (may be too dead to accept charge)
Battery Gets Hot During Charging
Stop immediately. Overheating means overcharging, wrong voltage setting, or internal short. Let it cool, inspect, and replace if damaged.
Green Light Appears Too Fast
• Charger may be faulty
• Battery cannot accept charge (likely failed internally)
Test with a voltmeter or load tester.
Sparks When Connecting
Caused by connecting with the charger live or reverse polarity (red to negative). Always connect with the charger off and unplugged.
Know the Difference Between Charging and Jump-Starting
| Aspect | Jump-Starting | Charging |
|---|---|---|
| Purpose | Start engine temporarily | Fully restore battery energy |
| Duration | Minutes | Hours to overnight |
| Battery Recovery | Minimal | Complete recharge |
| Alternator Role | Recharges while driving | Not involved |
| Risk of Damage | High if cables reversed | Low if done correctly |
| Long-Term Solution | No | Yes |
Relying on the alternator to recharge a dead battery overworks it and shortens its life. Always follow a jump-start with a full charge.
Get Professional Help When Needed
For recurring issues, seek expert assistance.
• Interstate Batteries: Expert advice and testing at InterstateBatteries.com
• Meineke Car Care Center: Diagnoses alternator and parasitic drain
• AutoZone, O’Reilly, Advance Auto Parts: Free battery testing and charging system checks
Final Safety Checklist
Before charging, verify each of these items.
• Battery is clean, undamaged, not frozen
• Charger matches battery type
• Workspace is dry and ventilated
• Charger is unplugged before connecting
• Clamps connected: red first, black second
• Amperage set correctly
• Charger monitored (especially non-smart models)
• Disconnected: black first, red second
• Voltage tested post-charge
• Tools stored safely
Frequently Asked Questions About Battery Charger Safety
Can I use any charger for my car battery?
No. You must match the charger to your battery chemistry. Using a standard charger on AGM or gel batteries can cause overheating or explosion. Always use a smart charger with the appropriate mode for your battery type.
What happens if I connect the clamps in the wrong order?
Connecting red to negative and black to positive (reverse polarity) causes immediate sparking, which can ignite hydrogen gas from the battery. Always connect red to positive first, black to negative second.
How long should I charge a dead car battery?
A completely dead battery charged at 1 to 3 amps takes 12 to 24 hours (overnight). Using higher amperage speeds up the process but increases the risk of overheating and permanent damage.
Is it safe to leave a battery charger overnight?
Only if using a smart charger with float mode. Non-smart chargers lack auto-shutoff and can overcharge the battery, leading to overheating or explosion. Monitor non-smart chargers until fully charged.
Can I charge a battery in the rain?
No. Charging in wet conditions risks electrocution. Always charge in a dry, well-ventilated area like a garage with the door open or outdoors under cover.
What should I do if the battery gets hot while charging?
Stop charging immediately. A hot battery indicates overcharging, wrong voltage setting, or internal damage. Let it cool, inspect for leaks or bulges, and replace if necessary.
Key Takeaways for Safe Battery Charger Operation
Always connect the red (positive) clamp first and disconnect the black (negative) clamp first—this prevents short circuits and sparks. Use smart chargers for safety and battery longevity, and charge dead batteries slowly at 1 to 3 amps to avoid damaging internal cells. Never charge a leaking, cracked, or frozen battery, and test battery health after charging to determine if replacement is needed. By following these safety-first procedures, you can confidently operate your battery charger while protecting yourself, your vehicle, and your equipment.


