
Building a solar power inverter lets you convert sunlight into usable electricity for lights, phones, laptops, and even home appliances. Whether you’re creating a small science project or designing a full off-grid system, the core idea remains the same: transform DC power from solar panels into AC power that runs everyday devices. This guide walks you through every step, from calculating energy needs to assembling circuits, connecting components, and ensuring safety.
You dont need special solar-only inverters. Any standard inverter circuit works when properly integrated with solar input. But success depends on careful planning, correct component pairing, and attention to detail. With the right approach, you can create a functional, efficient solar inverter system that powers your life off-grid or cuts your energy bills at home.
Plan Your Solar Inverter System
Before buying parts, determine what your system must deliver. A well-planned setup avoids underperformance and wasted money.
Calculate Daily Energy Needs
Start by measuring how much power you use each day. Check your electricity bill for monthly kWh usage, then divide by 30 to get average daily consumption. For example, 900 kWh per month divided by 30 equals 30 kWh per day.
Now estimate peak sun hours in your area. Sunny regions typically receive 5 to 6 hours per day, while cloudy areas get 3 to 4 hours. Use this formula to size your system: Required System Size equals Daily kWh divided by Sun Hours. For 30 kWh per day with 5 sun hours, you would need a 6 kW system.
This calculation tells you exactly how many solar panels, battery capacity, and inverter wattage to prepare for your build.
Choose the Right System Type
Pick a configuration based on your needs and grid access.
Off-Grid Systems
Fully independent of utility power, these systems require batteries to store energy for night use. They work ideal for cabins, RVs, or emergency backup situations.
Grid-Tied Systems
Connected to the utility grid, these systems allow excess solar power to feed back through net metering. You will need a dual meter to track import and export, and this option proves most cost-effective for homes with stable grid access.
Hybrid Systems
These combine grid connection and battery storage to keep critical loads running during outages while maximizing self-consumption of solar energy.
Always check local regulations before connecting to the grid. Permits and inspections are often required.
Select the Correct Components
Every solar inverter system relies on key parts working together seamlessly. Using quality components prevents efficiency loss and extends system lifespan.
Core Components and Their Roles
The essential components include solar panels that convert sunlight to DC, charge controllers that prevent battery overcharge, batteries that store energy, inverters that convert DC to AC, buck or boost converters that adjust voltage levels, and wiring with fuses for safe connections.
Use weatherproof enclosures rated IP65 or higher and cable glands to protect electronics from moisture and dust. Match panel voltage to battery and inverter specifications for optimal performance.
Build the Inverter Circuit
You can construct inverters using ICs, transistors, or pre-built modules, depending on your skill level and power needs.
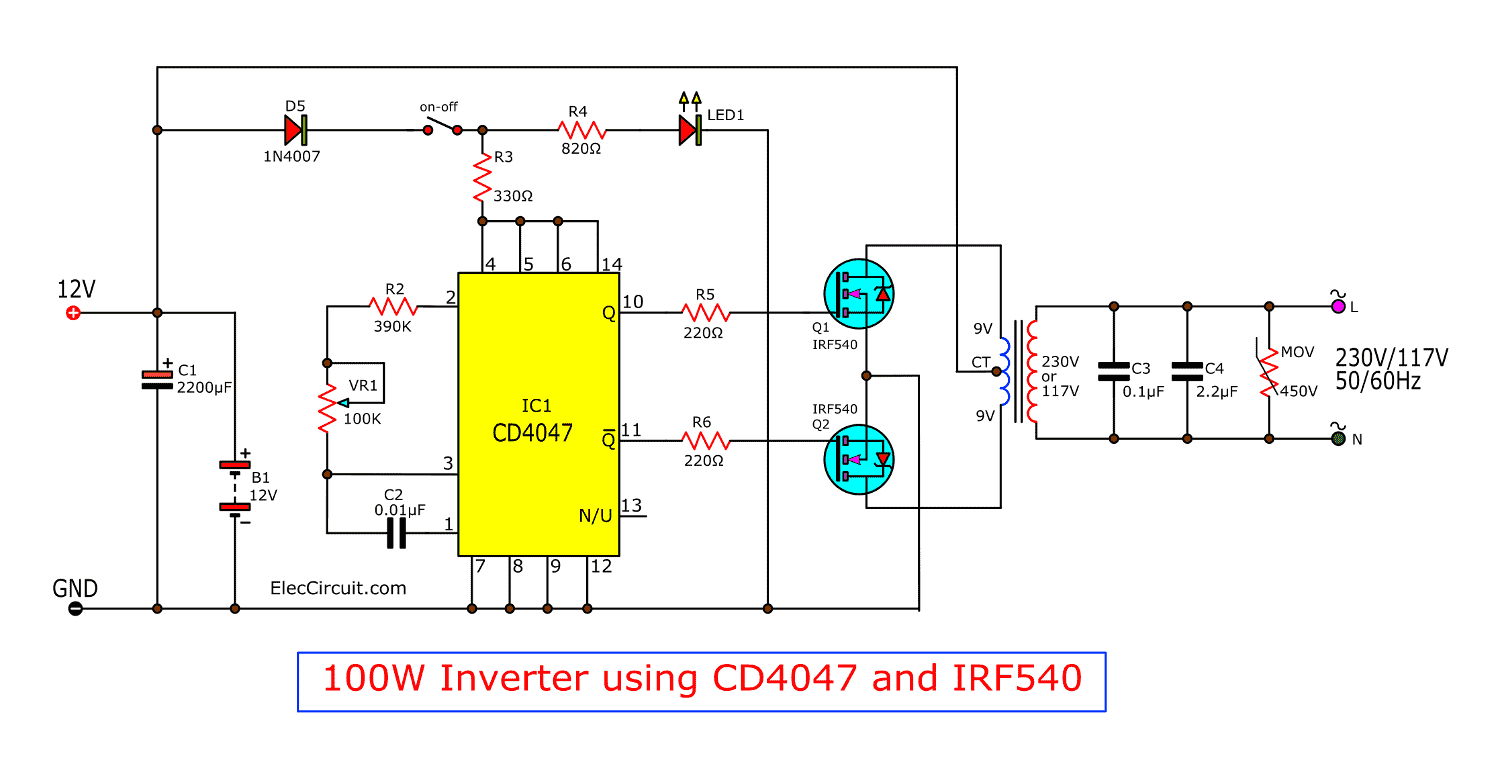
Use IC 4047 for 50/60 Hz Square Wave
The IC 4047 works well for DIY builders needing a stable oscillator. It generates 50 Hz for EU or 60 Hz for US specifications, drives MOSFETs or transistors in push-pull mode, feeds signal to transformer primary, and outputs 120V or 230V AC after step-up.
Assembly Steps
- Connect IC 4047 per datasheet in astable multivibrator mode.
- Set frequency with resistor and capacitor, such as 100kΩ plus 0.1µF.
- Output pins drive N-channel MOSFETs like IRFZ44N.
- MOSFETs switch current through center-tapped transformer from 12V to 230V.
Add PWM control via a potentiometer to maintain constant output voltage despite solar fluctuations. This design supports up to 500W with proper heat sinks and wiring.
Try IC 555 for Low-Power Inverters
For small projects under 100W, the 555 timer IC offers simplicity and effectiveness. Configure the 555 in astable mode, set output frequency to 100Hz using two pulses per cycle, drive two transistors alternately via flip-flop logic, and let the transformer convert pulsed DC to AC.
This approach works best for LED lights, phone charging, or fans rather than heavy appliances.
Build with 2N3055 Transistors
The 2N3055 BJT transistor handles higher currents in push-pull configurations. Pair two 2N3055 transistors with driver transistors like BC547, use a center-tapped transformer, add base resistors around 1kΩ to limit current, and install large heat sinks because these transistors generate significant heat.
This configuration delivers 200 to 300W output with correct cooling and battery support. These transistors remain popular among hobbyists due to availability and durability.
Fix Voltage Mismatches with Buck Converters
Solar panels often produce higher voltage than inverters accept. A buck converter solves this problem efficiently.
Why You Need It
Consider this common mismatch scenario. A solar panel producing 60V at 5A equals 300W, but an inverter needing 12V input at 25A also equals 300W. You cannot connect them directly because the voltage is too high.
The solution is stepping down 60V to 12V using a buck converter, which preserves power while adjusting voltage levels.
Design a 300W Buck Converter
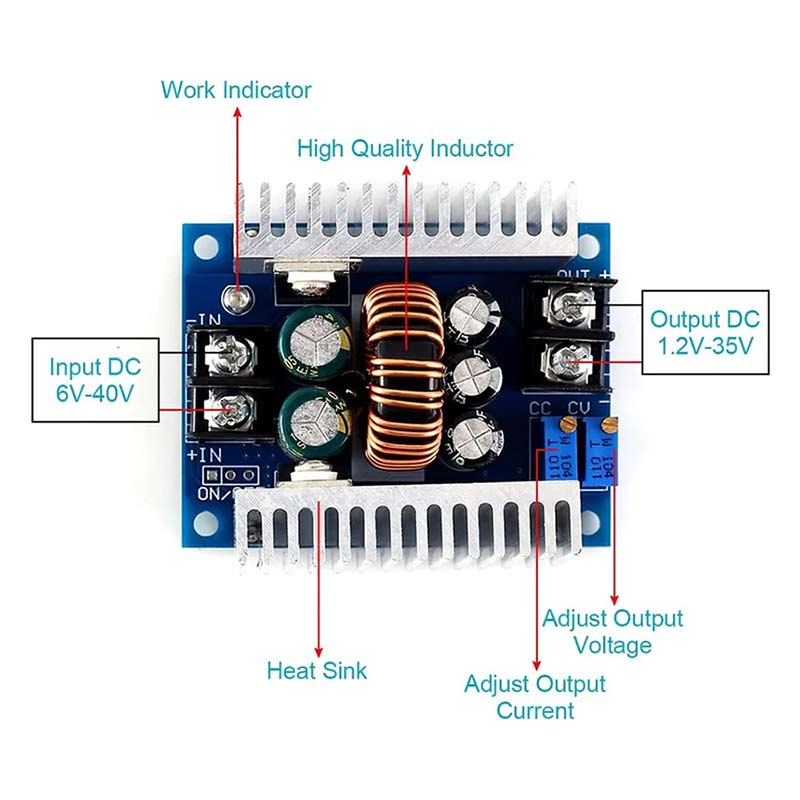
This design handles input of 32V, output of 12V at 25A, switching frequency of 20kHz, ripple current of 1.5A, and output ripple under 20mV.
Key Components
The inductor requires 16 SWG copper wire wound for the required inductance. The capacitor needs at least 100µF low ESR electrolytic, calculated using the formula C equals ripple current divided by eight times frequency times ripple voltage, resulting in approximately 94µF.
Feedback resistors R8 and R9 should be 10kΩ fixed plus 10kΩ potentiometer to adjust output. Current sense resistor R13 needs 0.04Ω at 25W rating, providing 1V threshold for overcurrent shutdown.
This protects the inverter from drawing more than 25A and prevents damage from excessive current draw.
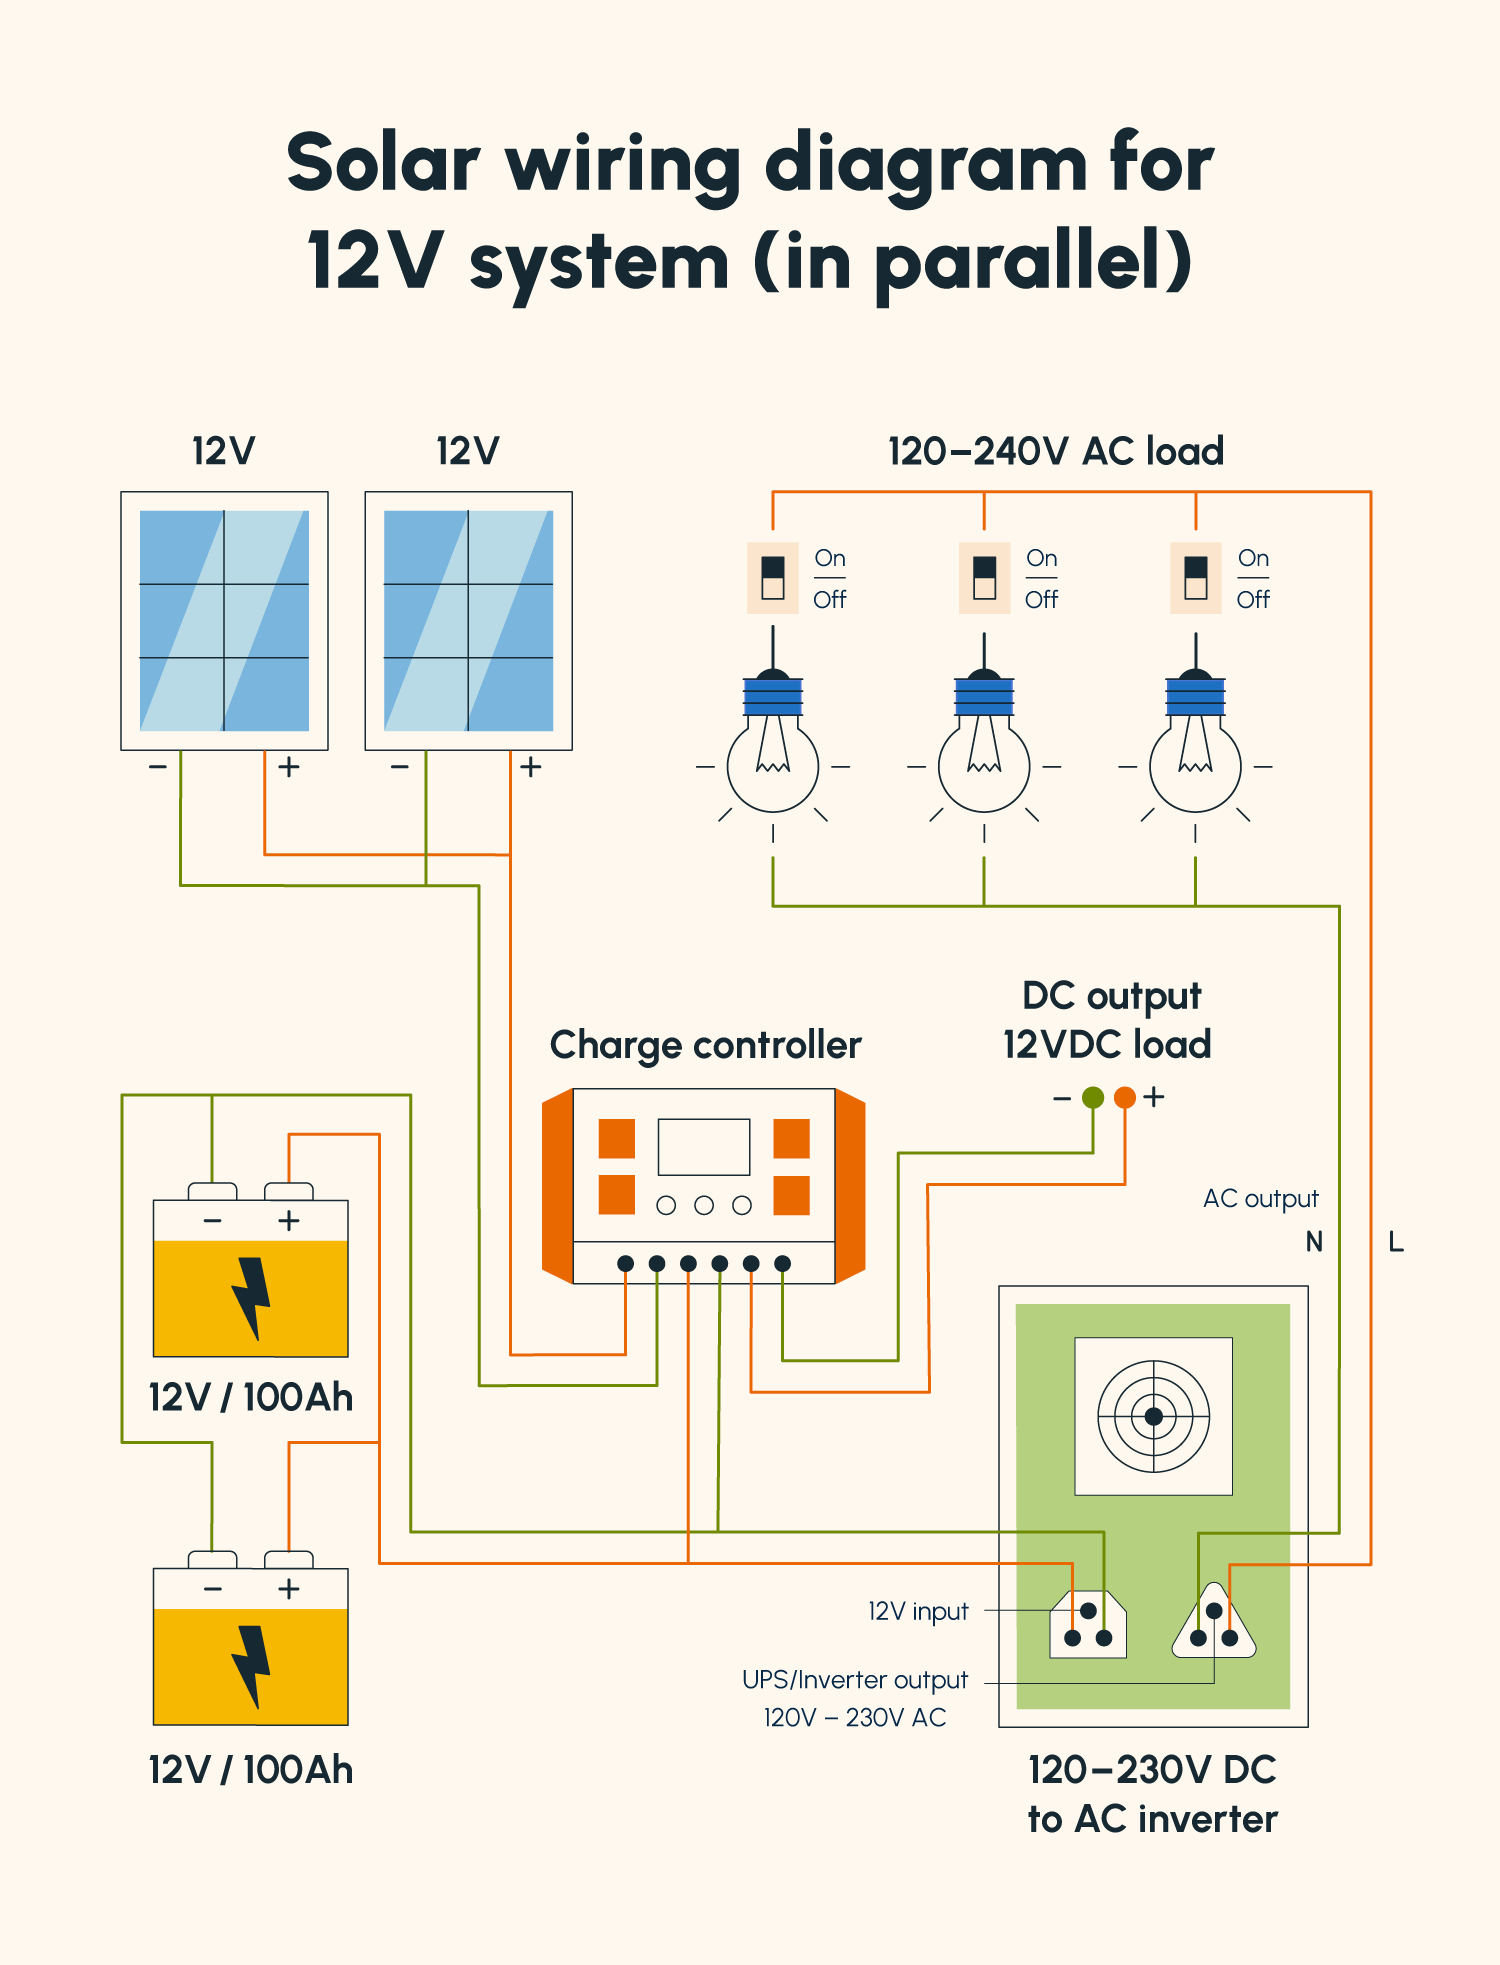
Assemble a Working Solar Inverter
Now integrate all components into a complete, functional system ready for testing and use.
Wire a Portable 12V Solar Inverter
This setup works ideal for camping or emergency backup situations.
Parts Needed
You will need a 100W solar panel, 12V lead-acid battery, charge controller (PWM or MPPT), boost converter raising 12V to 310V DC, 230V AC inverter module, and a weatherproof box with cable glands.
Step-by-Step Wiring
- Connect panel positive to controller positive and negative to negative. This ensures safe battery charging.
- Connect controller to battery with direct connection so the battery stores energy for night use.
- Connect battery to boost converter, which raises 12V DC to approximately 310V DC for inverter input.
- Connect boost converter to inverter module, which produces 230V AC output to your AC socket.
- Enclose all components inside an IP65-rated box, using cable glands for all wires and labeling terminals clearly.
- Test the system by placing the panel in sunlight, verifying charging via controller LED, measuring AC output with a multimeter around 230V, and plugging in a lamp or phone charger.
This setup powers laptops, LED bulbs, and small electronics reliably.
Add Automatic Day/Night Switching
Use a relay to switch automatically between solar and battery power based on light conditions.
Components Required
You need an LDR light sensor, transistor T3 like BC547, 12V SPDT relay, preset resistor P1 to set light threshold, and diode D2 to prevent reverse current.
How It Works
During daytime, light hits the LDR creating low resistance, transistor T3 conducts, relay turns on, solar powers the inverter via normally open contact, and battery charges through diode D2.
At night, the LDR goes dark with high resistance, transistor T3 turns off, relay disconnects, and battery powers the inverter via normally closed contact. The relay disconnects when panel voltage drops below 13V, preventing deep discharge.
This automatic system handles loads up to 60W and works best for educational demonstrations.
Skip the Charge Controller? Not Recommended
Some simple builds connect panels directly to battery and inverter, but this approach carries significant risks.
Risks Involved
Overcharging occurs if the panel exceeds 15V for a 12V system, reducing battery lifespan and possibly causing thermal runaway in lead-acid batteries.
A charge controller is only acceptable if the panel is undersized, such as 15W for a 12V battery, used intermittently, or the system is monitored manually. Always use a charge controller in permanent installations.
Install Panels and Connect the System
Proper installation ensures maximum efficiency and safe operation of your solar inverter.
Mount Solar Panels Correctly
Roof Installation
Face panels south in the northern hemisphere or north in the southern hemisphere. Set tilt angle between 18° and 36° for optimal exposure. Secure with brackets and rails, and avoid shading from trees or vents.
Ground Mounts
Conduct a soil survey first, pour concrete footings for stability, set metal piers, install rails, then mount panels. Allow adequate space for cleaning and maintenance access.
Microinverters attach directly behind each panel, making them ideal for shaded roofs.
Wire Panels in Series or Parallel
Choose based on distance and voltage needs.
Series Connection
Connect positive to negative across panels. This adds voltage, for example two 12V panels become 24V, and reduces current to minimize wire loss over long runs.
Parallel Connection
Connect positive to positive and negative to negative. This adds current, such as two 5A panels becoming 10A, and works better for high-power short-distance setups.
Never mix different panel types in one string.
Power On and Test the System
Final checks prevent damage and ensure reliable performance from your solar inverter.
Connect Components in Order
Follow this sequence: solar panel to charge controller, charge controller to battery, battery to inverter, then inverter to AC load panel or outlet. Wait for the controller to show charging before powering the inverter.
Check Display and Output
Modern inverters show real-time energy production, battery charge level, and load usage in watts. Test with low-power devices first like a phone charger or LED bulb, then try heavier loads like fans or microwaves.
Avoid surge-heavy appliances like refrigerators or pumps unless your inverter supports startup spikes.
Connect to the Grid (Optional)
For bill savings and net metering, you can connect your system to the utility grid.
Requirements
You need a grid-compliant inverter that shuts off during outages, a dual meter to track import and export, utility approval and inspection, and proper permits filed before connection.
Skipping legal steps may result in fines or forced disconnection.
Maintain Your Solar Inverter System
Long-term reliability depends on regular care and attention.
Clean Panels Every 6 Months
Dust, bird droppings, and snow reduce output by up to 30%. Wash panels with water and a soft cloth, avoiding abrasive cleaners.
Inspect Wiring and Connections
Check regularly for corrosion on terminals, cracked insulation, loose screws, and overheating signs. Tighten connections and replace damaged wires immediately.
Monitor Battery Health
For lead-acid batteries, check electrolyte levels monthly and top up with distilled water if needed. Keep vents clear because hydrogen gas is explosive. For lithium batteries, use the built-in BMS and avoid full discharge.
Manage Electrical Loads
Stay below the inverter’s rated capacity, use soft-start circuits for motors, and spread out high-wattage device usage. Expect 10 to 20% efficiency loss across conversion, wiring, and regulation.
Avoid Common DIY Mistakes
Even experienced builders make avoidable errors that can damage components or create safety hazards.
Reversed Polarity
Connecting positive to negative destroys charge controllers and batteries instantly. Double-check all wires before powering on.
Undersized Wiring
Thin wires overheat and cause fires. Use correct gauge such as 10 AWG for 10 to 20A or 6 AWG for 50A and above.
No Fuses or Breakers
Always install a DC fuse between panel and controller, an AC breaker between inverter and outlet, and rapid shutdown per NEC Article 690. Treat all solar wires as live even on cloudy days.
Poor Ventilation
Inverters and batteries generate heat during operation. Mount in shaded, well-ventilated areas to prevent overheating and extend component lifespan.
Start Small, Then Scale Up
Begin with a simple 50 to 100W prototype to learn the fundamentals before expanding to larger systems.
Example Beginner Project
A basic setup includes a 50W panel, 12V 35Ah battery, 10A PWM controller, 300W pure sine wave inverter, and enclosure in a plastic project box. This powers a desk lamp, fan, or router reliably.
Once your prototype runs stably, expand to larger systems. Success comes from learning by doing rather than achieving perfect results on the first attempt.
Frequently Asked Questions About Making a Solar Power Inverter
Can I use a regular inverter with solar panels?
Yes, any standard inverter circuit works when properly integrated with solar input. You do not need special solar-only inverters. The key is matching voltages correctly between your panel, battery, and inverter using appropriate converters or controllers.
What size inverter do I need for my solar system?
Your inverter size should match or slightly exceed your daily energy needs. Calculate your daily kWh usage, divide by peak sun hours, and choose an inverter rated for that system size plus a 20% buffer for surge capacity.
Do I always need a charge controller?
For permanent installations, always use a charge controller. It prevents battery overcharging and extends battery life significantly. You can skip it only for temporary, undersized, or intermittently used systems.
Can I connect solar panels directly to an inverter?
No, solar panels produce DC while inverters need specific DC input voltage. You must connect panels through a charge controller to a battery, then from battery to inverter. Direct connection risks damaging components.
How much power can a DIY solar inverter handle?
DIY inverters using IC 4047 with MOSFETs handle up to 500W with proper cooling. Simple 555-based circuits work for under 100W. Transistor-based designs like 2N3055 push-pull configurations reach 200 to 300W.
What happens if I reverse the polarity connections?
Reversed polarity instantly destroys charge controllers, batteries, and inverters. Always double-check positive and negative connections before powering any circuit. Use multimeter verification before initial power-on.
Key Takeaways for Building Your Solar Power Inverter
Building a solar power inverter is achievable with basic electronics knowledge, careful planning, and strict safety practices. From simple relay-switched demonstrators to full home backup systems, each project teaches valuable skills about power conversion and renewable energy.
Match voltages carefully between panels, batteries, and inverters using buck or boost converters when needed. Use quality components including a proper charge controller, appropriate wiring gauges, and weatherproof enclosures. Follow electrical codes, obtain necessary permits for grid connection, and test thoroughly before relying on your system.
With this guide, you now have everything needed to turn sunlight into reliable AC power anywhere, anytime. Start with a small prototype, learn the fundamentals, then scale up to meet your energy needs.


