
Imagine you’re on a remote job site, miles from the grid, and need to power your tools, charge your phone, or run a refrigerator in your truck. A properly installed power inverter turns your vehicle into a mobile power station, reliable and ready when you are. But a poor installation can lead to equipment damage, battery drain, or even fire. This guide walks you through how to install a power inverter in a truck safely and effectively.
You’ll learn how to choose the right inverter, wire it correctly, protect your battery, and avoid common mistakes. Whether you’re powering a table saw, a medical device, or a weekend camping setup, this guide gives you the exact steps to get it done right the first time.
Choose the Right Inverter for Your Truck

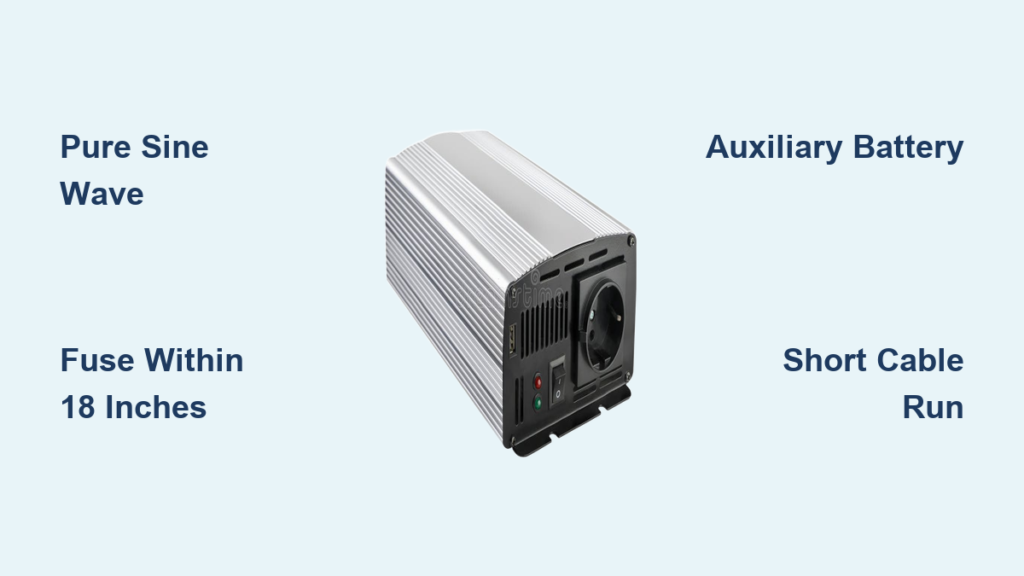
Pick Pure Sine Wave for Full Compatibility
Always go with a pure sine wave inverter unless you’re only running basic resistive loads like heaters or incandescent bulbs. Modified sine wave inverters may seem cheaper, but they can damage sensitive electronics like laptop chargers, battery chargers, and medical devices.
SCR or TRIAC based circuits, common in power tool chargers, require a smooth sine wave to function correctly. A modified sine wave can prevent these circuits from turning off properly, potentially destroying both the charger and the inverter. For tools, refrigerators, microwaves, or any professional use, pure sine wave is nonnegotiable.
Size the Inverter for Surge Loads
Do not just match the inverter to your device’s rated wattage. Account for startup surges. Motors, compressors, and freezers can draw 3 to 7 times their running power at startup.
For example, a 1000W rice cooker with a 5x surge needs 5000W peak capacity. Most inverters deliver about 2x surge power, so you need a 2500W continuous inverter to handle it. Use this rule:
Minimum Inverter Size equals Peak Load divided by 2, multiplied by 1.25. Add a 25 percent safety margin to avoid overheating.
| Inverter Size | Best For |
|---|---|
| 1000 to 1500W | Phone charging, coffee pots, small TVs |
| 2000 to 2500W | Refrigerators, microwaves, MIG welders |
| 3000W plus | Table saws, floor sanders, multiple heavy tools |
Select the Proper Battery Setup
Use an Auxiliary Battery to Avoid Stranding
Never power a high wattage inverter directly from your starting battery unless you have an automatic cutoff system. A single forgotten load can leave you stranded.
Instead, install a dual battery system. The primary battery starts the engine. The auxiliary house battery powers the inverter. This keeps your starting power safe and gives you dedicated runtime.
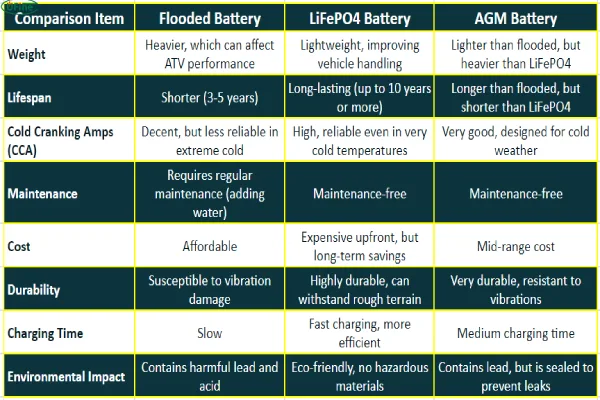
Choose Lithium or AGM for Deep Cycling
Avoid standard flooded lead acid batteries for inverter use. They are not designed for deep discharges and wear out quickly.
Better options include AGM batteries such as Optima Yellow Top, which are vibration resistant, spill proof, and good for cold climates. Lithium Iron Phosphate, also known as LiFePO4, is lightweight, has a long lifespan of 2000 plus cycles, and is efficient, though more expensive. LiFePO4 is ideal for long term off grid use, especially in overlanding or disaster response trucks.
Charge the Auxiliary Battery Correctly
Use one of these methods to keep your auxiliary battery charged.
A battery isolator or solenoid charges the auxiliary battery when the engine runs. This is simple and affordable. A DC-DC charger regulates voltage and is essential for lithium batteries. Solar integration adds off grid capability. Combine a charge controller with solar panels for full solar inverter systems.
Plan the Wiring and Cable Routing

Use Heavy Gauge Wire to Prevent Overheating
Undersized wire is the number one cause of inverter failure and fire risk. Use thick copper cable based on your inverter’s wattage.
| Inverter Power | Minimum Wire Gauge | Fuse Size |
|---|---|---|
| 1000 to 1500W | #2 to #1 AWG | 150A |
| 2000W | 1 AWG | 200A |
| 3000W | 1/0 AWG | 300 to 400A |
Use welding cable. It is more flexible, conducts better, and costs about 40 percent less than standard battery cable.
Run the Shortest Possible Cable
Every extra foot increases resistance and power loss. Voltage drop reduces inverter efficiency and can trigger low voltage shutdowns.
Mount the inverter as close to the battery as practical. Under the front passenger seat or near the battery if protected is ideal.
Route Cables Safely
Follow these rules when routing your cables.
Avoid heat sources such as exhaust, engine block, and catalytic converters. Avoid moving parts including driveshaft, suspension, and steering components. Avoid sharp edges and use grommets and loom for protection. Never run cables through door jambs because of the risk of pinching and chafing.
Use corrugated loom that is 1 inch in diameter to shield cables. Secure every 12 to 18 inches with zip ties.
Pass Through Firewall Safely
Best practice is to reuse an existing grommet hole such as one from trailer wiring or shore power.
The steps are as follows. First, cut off the old plug. Second, pull new cables through. Third, reinstall grommet with seal. Fourth, seal with silicone if exposed to water.
If drilling a new hole, use a metal drill bit and install a rubber grommet. Never leave bare wire exposed. Failure to protect wires at pass throughs can cause shorts and fires.
Install Circuit Protection
Fuse Within 18 Inches of Battery
This is nonnegotiable. Install an inline fuse or breaker on the positive cable within 18 inches of the battery terminal.
Why? To stop a short circuit before it melts the cable or starts a fire.
Use an ANL fuse with holder, a Class T fuse, or a hydraulic magnetic circuit breaker which is resettable and preferred.
Fuse rating should match the inverter’s maximum draw. A 1500W inverter draws about 125A, so use a 150A fuse. A 2000W inverter draws about 167A, so use a 200A fuse.
Mount the Inverter Securely
Pick a Ventilated, Accessible Spot
Inverters generate heat, especially under load. Most have internal fans, but they need airflow.
Best locations include under the rear seat, which is protected and has good airflow via floor vents. Under the front passenger seat gives a shorter cable run, but check legroom. In the truck bed inside a toolbox keeps the cabin clean, but use a waterproof enclosure. Avoid the engine bay because heat and vibration shorten the lifespan.
Secure and Ground the Unit
Follow these steps to mount the inverter securely.
Mount horizontally with self-tapping metal screws into the frame. Use rubber washers to dampen vibration. Leave space around vents and do not block them. Ground the inverter case to the frame with a separate wire. Scrape paint off the mounting point for bare metal contact. This ensures fault current trips the breaker.
Make Solid Electrical Connections
Prepare Terminals Properly
Most inverters use screw terminals. Stranded wire must be prepared correctly.
Strip about one half inch of insulation. Twist strands gently to prevent fraying. Insert fully into the terminal and tighten securely. Never use solid wire connectors because they will not grip stranded cable.
Crimp and Solder Lugs for Reliability
For permanent, high current connections, use #1 heavy-duty copper lugs. Crimp with a professional tool and solder for added strength.
The soldering method involves fluxing the wire, sliding heat shrink back, crimping the lug, heating it, and filling with solder. Let it cool naturally. Never quench with water because it causes cracks.
Double Check Polarity
Red equals positive, black equals negative. Reversing polarity destroys inverters instantly.
Mark positive cables with red zip ties or red heat shrink. Use quick connect terminals for safety.
Prevent Battery Drain
Add a Remote On/Off Switch
Mount a switch in the cab so you can turn the inverter off without crawling under the seat.
Even better, tie it to an ignition sensed relay such as a Ram upfitter switch so it turns off when the truck shuts down.
Install a Low Voltage Disconnect
An LVD shuts off the inverter when battery voltage drops too low, such as 11.5V, preventing deep discharge.
This is essential for lithium batteries, which can be damaged by over discharge, for systems connected to the starting battery, and for unattended operation.
Test and Verify the System
Run a Pre-Power Checklist
Before reconnecting the battery, confirm all connections are tight. Verify polarity. Ensure the fuse is installed. Check for exposed wires or pinch points. Confirm the inverter is grounded.
Power Up Safely
Follow these steps to power up safely.
Reconnect the battery negative terminal. Turn on the inverter manually or via remote. Test with a low draw device such as a phone charger. Gradually increase load with a drill, microwave, or freezer.
Measure Output and Monitor Heat
Use a multimeter to check AC output. It should read about 120V.
Monitor inverter temperature during first use. Normal operating range is up to 85 to 90C. If it shuts down, check ventilation, cable length, and loose connections.
Follow Best Practices for Long-Term Reliability
Use Welding Cable for Better Performance
Welding cable is more flexible, conducts better, and costs less. Buy it from welding supply shops or car audio installers.
Reuse Existing Grommets and Mounting Points
This saves time and keeps the install clean. Pre-cut and terminate cables before routing.
Inspect Annually
Check cable insulation for chafing. Check terminal tightness. Check for corrosion on battery posts. Check grommet seals.
Real-World Installation Examples
Fire Truck Application
AB Fire Tech Ltd. in Canada uses a Samlex NTX-3000S-12, a 3000W pure sine inverter, for charging Holmatro rescue tools. The system uses direct battery connection with heavy cabling. Reliability in extreme conditions is the key.
Disaster Response Truck
Flat Out Auto in Georgia uses a PST-2000-12, a 2000W pure sine inverter, in a disaster response truck. The system uses an auxiliary battery with charging. The goal is power under pressure.
Personal Truck Setup
One user installed a 2500W inverter in a Toyota Tacoma with an Optima Yellow Top battery and 4 AWG welding cable. The system runs a table saw, MIG welder, and chest freezer. The user reported it has enough power to charge tool batteries and run a table saw.
Frequently Asked Questions About Installing a Power Inverter in a Truck
What size inverter do I need for my truck?
Choose an inverter size based on your peak load plus a 25 percent safety margin. For small appliances and phone charging, 1000 to 1500W works. For refrigerators, microwaves, and power tools, 2000 to 2500W is better. For heavy duty tools like table saws and floor sanders, 3000W or more is needed.
Can I install the inverter directly to my truck battery?
You can, but it is risky. If the inverter is left on, it can drain your starting battery and leave you stranded. Use an auxiliary battery with a dual battery system, or install a low voltage disconnect and cutoff switch to protect your starting battery.
What type of battery is best for powering an inverter?
AGM batteries such as Optima Yellow Top are vibration resistant and spill proof. Lithium Iron Phosphate batteries offer the longest lifespan, over 2000 cycles, and are lightweight. Both are suitable for deep cycling. Avoid standard flooded lead acid batteries.
How close should the inverter be to the battery?
Mount the inverter as close to the battery as practical, ideally within 6 feet. Every extra foot of cable increases resistance and power loss. Under the front passenger seat or under the rear seat are good locations.
Do I need to fuse the inverter connection?
Yes, absolutely. Install an inline fuse or breaker on the positive cable within 18 inches of the battery terminal. This prevents fire if a short circuit occurs. Fuse rating should match the inverter’s maximum draw.
Can I run the inverter while the truck is off?
Yes, if you have a dedicated auxiliary battery. If connected to the starting battery, running the inverter with the engine off risks draining the battery. Use a low voltage disconnect to prevent over discharge.
Key Takeaways for Installing Your Truck Inverter
Installing a power inverter in a truck is a game changer for mobile work and off grid living. But safety and precision matter above all else.
The most critical points to remember are these. Always choose a pure sine wave inverter for compatibility with all your tools and electronics. Use the correct wire gauge based on your inverter size, and always install a fuse within 18 inches of the battery. Mount the inverter in a well ventilated location and keep cable runs as short as possible. Use a dual battery system or install a low voltage disconnect to prevent getting stranded with a dead starting battery.
Follow these steps, use the right components, wire it correctly, and you will have reliable power for years. Whether you are an electrician, first responder, or weekend warrior, a well installed inverter keeps you powered, productive, and safe.


