
If your car won’t start after sitting for weeks, or your motorcycle battery dies every spring, a Vector battery charger could be the solution. Designed for 6V and 12V lead-acid batteries in cars, trucks, motorcycles, and more, these smart chargers deliver automated, safe, and efficient charging. Whether you’re reviving a dead battery or maintaining one in storage, knowing how to use a Vector battery charger properly ensures your vehicle starts when you need it most.
This guide walks you through every step of using a Vector battery charger, including correct connections, interpreting indicator lights, activating boost mode, running diagnostics, and avoiding common mistakes. You’ll learn not just how to plug it in, but how to use it like a pro to extend battery life and prevent future failures.
Inspect Battery Before Charging
Before connecting any charger, visually examine the battery. Look for cracks, leaks, or bulging case walls. Do not charge damaged batteries. For flooded lead-acid types, remove caps and confirm the electrolyte covers the internal plates. Top up with distilled water if needed, but never overfill.
Use a multimeter or the charger’s display to check voltage. A reading of 12.6V or higher means fully charged, 12.4V indicates 75% charged, 12.2V means 50% charged, and below 12.0V means deeply discharged. A severely depleted battery below 10V might not accept a charge unless revived with reconditioning mode.
Clean corroded terminals before charging. Mix baking soda and water, apply with a brush, then scrub terminals with a wire brush. Wipe dry and apply dielectric grease afterward to prevent future buildup.
Connect Charger Safely to Battery
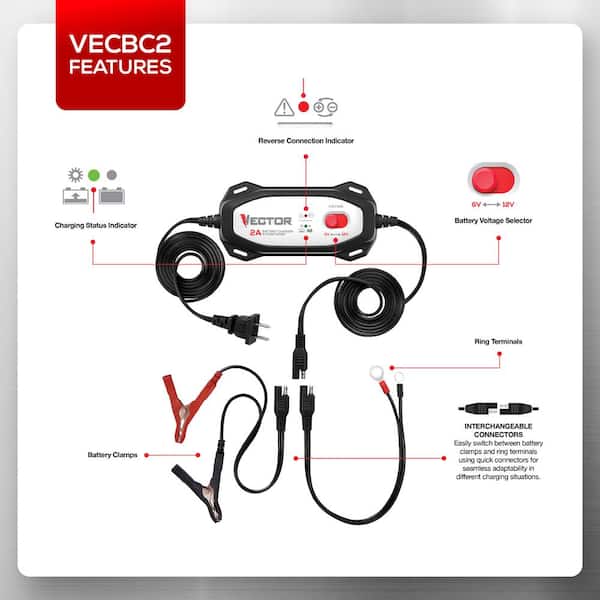
Set the voltage switch correctly before connecting. Most Vector models support both 6V and 12V batteries. Set to 12V for cars, trucks, SUVs, jet skis, and ATVs. Set to 6V for older motorcycles, lawn mowers, and vintage vehicles. Auto-detect models sense voltage automatically.
Follow this sequence to prevent sparks near the battery.
- Red clamp to positive terminal first.
- Black clamp to clean metal ground on the engine block or chassis, not the negative battery post.
Grounding away from the battery reduces the risk of igniting hydrogen gas emitted during charging. If your charger beeps and shows a reverse polarity warning, disconnect immediately. You likely have the clamps reversed.
Some models include a 12-foot quick-connect cable. Permanently attach the harness to the battery and route it to the front of the vehicle. Later, simply plug in the charger without opening the hood each time.
Start Charging Process Correctly
Plug the charger into a grounded 120V outlet. Turn it on or wait for auto-start on smart models. Wait for confirmation on the display.
LCD models show battery voltage, charge stage, and status icons. LED models display blinking red for charging and solid green for full. On smart models, the system runs a self-check verifying polarity and assessing battery condition before selecting the appropriate charging mode.
If the screen shows “Check Battery” or “Failed,” the battery may be shorted or beyond recovery. Do not proceed with charging.
Understand Charging Stages

The bulk charge stage delivers maximum current to rebuild voltage quickly. A deeply discharged battery may draw over 16A initially. This first stage restores approximately 50% charge in the first 30 minutes.
The absorption charge stage gradually tapers current as voltage peaks at 14.4 to 14.7V. The charge indicator advances from 50% to about 85%. This stage takes roughly 1 hour 15 minutes to reach 85% charge.
Float mode activates once the battery is full. The charger reduces output to 1.5 to 2A and holds voltage at 13.2 to 13.8V. This prevents overcharging and sulfation during long-term storage. It is safe to leave connected indefinitely.
Use Boost Mode for Dead Batteries
When a battery cannot crank the engine, boost mode delivers 50 or more amps for up to 60 seconds.
- Ensure charger is connected and powered.
- Press the Boost button.
- Try starting the engine during or right after boost.
If the engine does not start, wait 5 minutes before retrying to prevent overheating. Attempt up to 3 times total. Success signs include strong engine cranking and system voltage rising above 14V, indicating the alternator is working.
Do not use boost mode on frozen or damaged batteries.
Run Reconditioning Cycle for Sulfated Batteries

Reconditioning mode breaks down sulfate crystals that build up on battery plates during prolonged discharge.
- Connect charger normally.
- Press the Recondition button.
- The charger sends pulsed current to break down sulfate crystals.
- The cycle runs 24 hours continuously.
Repeat up to 5 times if needed. Afterward, test battery performance. This mode works best for batteries stored discharged for months. If no improvement occurs after 5 cycles, replace the battery.
Test Alternator and Load Performance
To diagnose charging system issues, run the alternator check test.
- Start the engine and let it idle.
- Turn off headlights, radio, and A/C.
- Access Alternator Check mode on the charger.
- Read the result. A checkmark means the alternator is working. A warning triangle indicates a faulty alternator or wiring problem.
To test battery strength under load, perform a load test.
- Turn on headlights, radio, and heater.
- Run the Load Test function.
- Observe the result. A checkmark means the battery is strong. A warning triangle indicates a failing battery.
Run these tests after jump-starts or slow cranking to help decide if replacement is needed.
Disconnect Charger Properly
Always disconnect in reverse order to minimize spark risk.
- Unplug from wall outlet first.
- Remove black negative clamp.
- Remove red positive clamp.
Never yank cables. Pull from the clamp, not the wire.
After disconnecting, try starting the vehicle. The engine should crank quickly and fire within 1 to 2 seconds. If it struggles, reconnect and charge longer, run another reconditioning cycle, or check alternator function.
Avoid Common Mistakes
Do not ground the black clamp to painted or rusty metal. The clamp must connect to bare, unpainted metal. Rust or paint creates resistance, leading to poor charging or false error signals.
Never charge a frozen battery. Thaw completely before charging. Charging a frozen battery can cause it to crack or explode.
Do not skip the manual. Settings vary between models. Some require pressing Charge to start while others auto-start.
Avoid using Vector chargers on incompatible batteries. These chargers work with AGM, gel, and flooded lead-acid batteries only. Do not use on lithium-ion or calcium batteries unless specified.
Choose the Right Model
The 15A smart charger suits emergency jump-starts, diagnosing charging system issues, reviving deeply discharged batteries, and multi-vehicle households. It features an LCD display with charge percentage, reconditioning, load test, and alternator check. It achieves a full charge in approximately 2 hours.
The 1.5A maintenance charger works best for long-term storage, lawn tractors, snowmobiles, and ATVs. It can remain connected for months thanks to float mode. It features a 12-foot quick-connect cable and compact design. This model has no diagnostics but is perfect for keeping small engines ready.
Final Thoughts on Using Vector Battery Chargers
Knowing how to use a Vector battery charger correctly ensures safety, efficiency, and long battery life. Always inspect the battery before charging, connect clamps in the proper sequence, and understand the three charging stages. Use boost mode for dead batteries and run reconditioning cycles for sulfated batteries showing reduced performance.
Pair your charger with terminal protector spray to maximize battery life. Perform annual alternator and load tests as part of regular vehicle maintenance. Store the charger in a dry location and inspect cables before each use.
Whether you’re charging a dead car battery or preserving a motorcycle over winter, the right model and method give you peace of mind. Your vehicle will start when you need it most.
Frequently Asked Questions About Vector Battery Chargers
Can I use a Vector battery charger on a lithium-ion battery?
No. Vector chargers are designed for lead-acid batteries only, including AGM, gel, and flooded types. Using them on lithium-ion batteries may damage both the battery and the charger.
How long can I leave a Vector charger connected to a battery?
In float mode, Vector chargers can remain connected indefinitely. This is safe for vehicles in long-term storage, as float mode maintains optimal voltage without overcharging.
What does it mean when the charger displays “Check Battery”?
This indicates the battery may be shorted, severely damaged, or beyond recovery. Try running the reconditioning cycle. If the message persists after multiple attempts, replace the battery.
Can I use boost mode on a frozen battery?
No. Never use boost mode on a frozen or damaged battery. Thaw a frozen battery completely before attempting any charging or boosting.
How do I know if my alternator is working properly?
Use the alternator check function on smart models. With the engine running and accessories off, the display shows a checkmark for a working alternator or a warning triangle for a faulty alternator or wiring issue.


