

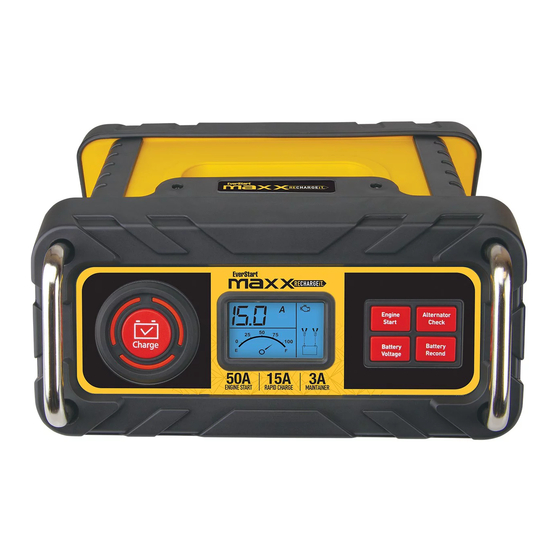
If your car won’t start after sitting too long or you’re preparing your boat for summer, the EverStart Maxx battery charger can help, but only if used correctly. This smart, multi-function charger (models like BC50BE, Maxx50, and Max 15A) does more than just recharge dead batteries. It can diagnose charging system issues, recondition weak batteries, and maintain 12V lead-acid or select lithium-ion batteries, all at a budget-friendly price. However, many users struggle because they expect it to jump-start like a portable power pack, or they miss critical setup steps. The truth is, it is not a standalone jump starter. It must be plugged in, and it needs at least a 2-volt signal from the battery to begin charging. In this guide, you will learn exactly how to use every feature safely and effectively, avoid common mistakes, interpret the LCD display, and get the most out of your EverStart Maxx charger.
Connect Clamps in Correct Order
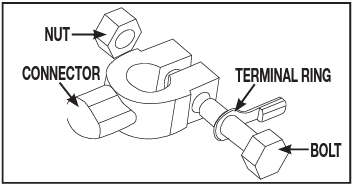
Proper connection prevents sparks, damage, and false alarms. Always follow this sequence to ensure safe operation and accurate charging.
Attach Red First, Then Black
- Plug the charger into a 120V outlet before connecting to the battery.
- Clip the red clamp to the battery’s positive (+) terminal.
- Clip the black clamp to the negative (-) terminal or a clean, unpainted metal surface on the engine block.
Grounding to the chassis reduces explosion risk by keeping sparks away from the battery, which can emit flammable hydrogen gas. Never reverse the clamps. Doing so triggers the reverse polarity alarm, which is a loud beep with a flashing warning icon. Disconnect immediately and correct the connections.
Check for Corrosion and Clean if Needed
White or green crust on terminals indicates corrosion. Mix baking soda and water, then scrub with a wire brush. Ensure clamps bite into clean metal because poor contact causes slow charging or no response. Pro tip: Tighten clamps firmly. Loose connections lead to inaccurate voltage readings and interrupted charging.
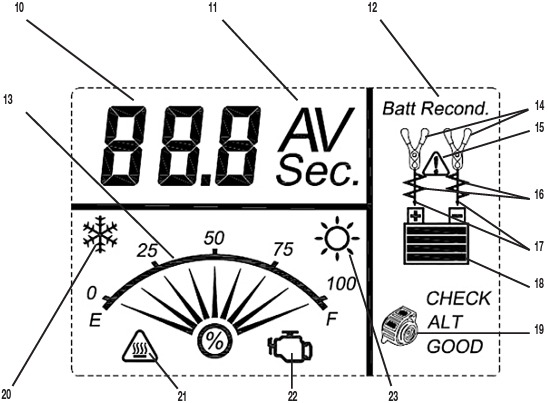
Power On and Read the LCD Display
Once connected, the charger powers on automatically and shows key data on its digital interface.
Understand What the Screen Shows
The LCD displays several important metrics. Voltage shows current battery voltage, such as 12.1V for a partially discharged battery. Amps shows charging current, which starts high and then tapers down. Icons indicate the battery level, mode (Charge, Recondition, Engine Start), and warnings. Timer appears during Engine Start or Recondition mode.
If the battery reads above 10.5V, it starts normal charging. Below 10.5V, it may enter Recondition mode automatically.
No Display? Check These First
Is the outlet working? Test with another device. Is the power cord damaged? Are clamps poorly connected? Never operate in wet or damp conditions. The unit must stay dry to function properly.
Select Charging Mode Properly
The EverStart Maxx offers multiple modes, and knowing when to use each is key to getting the best results.
Charge Mode: For Routine Recharging
How to activate: Press the Charge button. What it does: Delivers up to 50A surge, then reduces as the battery fills. Duration: 2 to 12 hours, depending on discharge level. Completion: LCD shows 100%, then switches to trickle charge at approximately 3A.
Charge mode is safe to leave connected for weeks. It is ideal for winter storage or infrequently used vehicles.
Recondition Mode: Fix Sulfated Batteries
When to use: Battery struggles to hold charge or has been deeply discharged. How to activate: Press Battery Recondition. Process: 24-hour pulsed charge cycle to break down sulfate crystals. Success sign: Returns to normal charging after 24 hours.
If it stays in reconditioning beyond 5 days, the battery is likely beyond recovery. Pro tip: Use monthly on stored batteries to extend life by 12 to 18 months.
Use Engine Start Feature Correctly
This is not a jump starter. It boosts the existing battery, but it requires the battery to have some charge remaining.
How to Activate Engine Start
Ensure clamps are secure. Press the Engine Start button. A 40-second countdown appears. After countdown, try starting the vehicle.
Battery must have at least 2V to engage. Completely dead batteries will not respond.
Limitations to Know
Only one attempt per cycle. Wait 2 minutes before retrying. It does not draw power from another battery. It uses internal circuitry to boost output. Success depends on battery health. If two attempts fail, consider external jump-starting.
Many users expect instant starts. The reality is that it helps weak batteries, not failed ones.
Run Alternator Check for Diagnostics
Find out if your car’s charging system is working properly with this built-in diagnostic feature.
How to Perform Alternator Check
Ensure the battery is charged. Press the Alternator Check button. The charger simulates a load and measures output voltage.
Interpret the Results
Normal alternator function shows 13.8 to 14.7V. Below 13.5V indicates a weak or failing alternator. Above 15V risks overcharging and battery damage.
This test is useful for diagnosing repeated battery drain or electrical issues. Pro tip: Run this test if your battery dies shortly after charging.
Charge Lithium-Ion Batteries (If Supported)
Some models support lithium-ion, but only if set correctly. Not all EverStart Maxx units support lithium, so check your model first.
Confirm Your Model Supports Lithium
Look for a Lithium/Lead Acid button on the front of your unit.
Set Mode Before Connecting
Press the lithium button before connecting the clamps. The LED may not light, so there is no visual confirmation. Connect clamps to the battery. Verify voltage. 14 to 15V indicates lithium mode.
If you switch modes while powered, you risk electrical stress. Turn off the charger first.
What Happens If You Use Wrong Mode
Using lithium mode on a lead-acid battery produces slightly overvolted output at approximately 15V, but it is generally safe. Using lead-acid mode on a lithium battery undercharges or fails to charge the battery.
After disconnecting, most models revert to lead-acid mode automatically.
Disconnect in Reverse Order
Safety does not end when charging is done. Follow proper disconnection sequence every time.
Follow This Sequence
Turn off the charger with the power switch. Unplug from the wall. Remove black clamp first, then red.
This prevents accidental short circuits. Never yank cords or disconnect under load.
Recognize and Respond to Alarms
The EverStart Maxx has built-in safety alerts. Do not ignore them.
Reverse Polarity Alarm
Trigger: Red clamp on negative, black on positive. Response: Disconnect immediately and reconnect correctly.
Overheat Alarm
Cause: High ambient temperature or blocked vents. Fix: Turn off, let cool, and ensure airflow.
Low/High Temp Warning
Issue: Too cold below 32F or too hot above 104F. Solution: Move to a moderate environment before use.
Persistent alarms may indicate faulty connections or battery failure.
Troubleshoot Common Issues
Even with correct use, problems arise. Here is how to fix them.
Charger Won’t Power On
Check outlet with another device. Inspect power cord for damage. Ensure unit is not in alarm lockout mode.
Stuck in Recondition Mode
Battery voltage may be too low below 2V. Internal cells could be damaged. Try charging a known-good battery to test the unit.
Engine Start Fails
Battery may be too weak, below usable threshold. Poor clamp contact could be the issue. Alternator or starter problem is also possible.
User reports show this feature is inconsistent. Do not rely on it in emergencies.
Maintain Charger for Longevity
A well-maintained charger lasts years. Take care of your investment.
Clean and Inspect Regularly
Wipe down housing with a dry cloth. Clean clamps with a wire brush if corroded. Check cables for fraying or cuts.
Store Properly
Keep in a dry, cool place. Avoid dropping the unit because internal electronics are sensitive. Do not cover during use. Ventilation prevents overheating.
With care, your EverStart Maxx can last 5 or more years.
Know What It Cannot Do
Avoid frustration by understanding its limits.
Not a Portable Jump Starter
Must be plugged into AC power. No internal battery means it cannot be used roadside without an outlet.
Won’t Revive Fully Dead Batteries
Needs at least 2V to initiate charge. Completely drained or shorted batteries will not respond.
Reconditioning Is Not Magic
Targets sulfation, not physical damage. Many users report no success with old batteries. One user charged for 12 or more hours with no result, while another charger did it in 3 hours.
Best Practices Summary
Maximize performance with these proven tips.
Use only on 12V lead-acid or compatible lithium batteries. Clean terminals before connecting. Press lithium button before connecting for Li-ion. Monitor first few minutes for alarms or errors. Use reconditioning monthly on stored batteries. Leave in maintenance mode during winter.
Smart charging adapts to battery needs. Fully charged? It drops to 1.5A to preserve health.
Final Tips for Success
The EverStart Maxx is a powerful, affordable tool if you use it right. It excels at maintaining batteries, diagnosing charging issues, and slowly reviving weak ones. But it is not a miracle worker. For best results, read the manual even if it seems brief. Keep your receipt because warranty support is limited. Pair with a jump starter for roadside emergencies.
At $42 to $65, it is a solid value for home garages, RV owners, and seasonal vehicle storage. Just manage your expectations. With the right setup and realistic goals, your EverStart Maxx can keep your batteries healthy for years.
Frequently Asked Questions About EverStart Maxx Battery Charger
Can I use the EverStart Maxx to jump-start my car?
No. The Engine Start function is not a true jump starter. It requires AC power and needs the battery to have at least 2V. It boosts weak batteries but cannot start a car with a dead battery. For roadside emergencies, you need a portable jump starter.
How long does it take to fully charge a car battery?
It depends on the discharge level and battery capacity. Most car batteries take 2 to 12 hours using Charge mode. The charger starts at high amperage and automatically reduces as the battery fills. Trickle charge engages automatically when complete.
Why does my charger stay in Recondition mode forever?
If the battery voltage is below 2V or the battery has physically damaged cells, the charger cannot recover it. Recondition mode targets sulfation, not mechanical failure. If it continues beyond 5 days, the battery is likely beyond saving.
Is the EverStart Maxx safe to leave connected overnight?
Yes. Once the battery reaches 100%, the charger switches to maintenance mode at approximately 3A trickle charge. It is designed for long-term use and will not overcharge. Many users leave it connected for weeks during winter storage.
Which batteries are compatible with the EverStart Maxx?
It works with 12V lead-acid batteries, including flooded, AGM, and gel types. Select models also support lithium-ion batteries, but you must press the lithium button before connecting. It does not work with 6V systems.
Key Takeaways for Using EverStart Maxx Charger
The EverStart Maxx is a smart, plug-in charger that requires AC power to operate. It is not a portable jump starter and cannot revive completely dead batteries below 2V. Use Charge mode for routine charging, Recondition mode monthly on stored batteries, and Alternator Check to diagnose charging system issues. Always connect red clamp first, disconnect black clamp first, and never ignore alarm warnings. With proper use and realistic expectations, this charger provides excellent value for maintaining your vehicle batteries.


