
Dead battery? No jumper cables, no other car. Just you and your stranded vehicle. That’s where an instant power battery charger comes in. Also known as a portable jump starter, this compact device delivers a powerful burst of energy to restart your car without help from another vehicle. Whether you’re stuck in a parking lot or miles from the nearest town, knowing how to use an instant power battery charger can get you back on the road in minutes.
This guide walks you through every step, from setup to safety, troubleshooting to maintenance, so you’re never left helpless again. You’ll learn how to connect clamps safely, avoid common mistakes, and choose the right model for your needs.
Prepare the Jump Starter Before Use
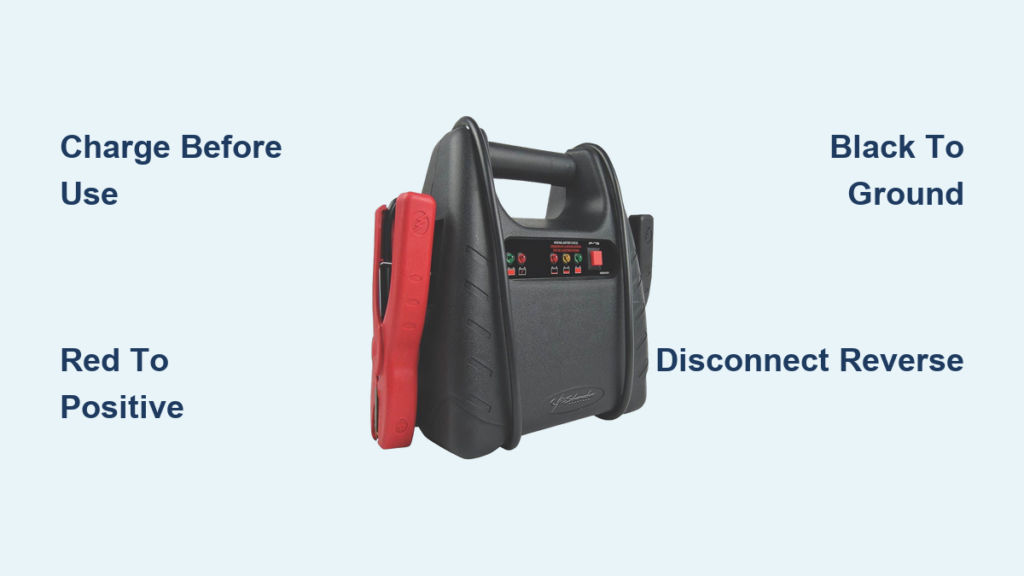
Charge Before First Use
Always fully charge your instant power battery charger before using it. Most units ship at partial charge, but optimal performance requires 100%. Use the included wall charger, car adapter, or USB-C cable depending on your model. A full charge typically takes 3 to 6 hours.
Check the LED indicators or digital display. Most show 4 to 5 solid lights when fully charged. If the lights blink red or stay off, plug it in and wait. Never assume it is ready.
Test Charge Level Monthly
Even when not in use, lithium-ion jump starters lose charge over time, up to 5 to 10% per month. To avoid surprises, recharge every 3 to 6 months. Store it indoors at room temperature, between 68 and 77 degrees Fahrenheit. Avoid leaving it in hot trunks or freezing glove compartments.
Set a calendar reminder every 90 days to check and top off your device. A dead jump starter is worse than no jump starter.
Follow Critical Safety Steps
Wear Protection and Remove Jewelry
Before touching any cables, put on safety glasses and gloves. Remove rings, watches, or bracelets that could accidentally contact metal and cause a short circuit or burns. Even a small spark near battery gases can lead to an explosion.
Inspect Battery and Device
Look at your car battery for cracks, leaks, or bulging. If you see corrosion, white or green crust, clean terminals with a wire brush and baking soda solution. Do not attempt to jump-start a frozen or damaged battery. This can cause rupture.
Also inspect the jump starter. Check for frayed wires, loose clamps, or dents. If the case is cracked, especially on lithium models, do not use it.
Power Off Until Connected
Never turn on the jump starter before connecting the clamps. Doing so risks voltage spikes that can damage your car’s electronics or the device itself. Wait until both clamps are securely attached.
Connect Clamps in Correct Order

Attach Red Clamp to Positive Terminal
First, clip the red clamp, marked with a plus sign, to the positive terminal of the dead battery. It is usually marked with a plus sign and may have a red cover. Make sure the clamp bites into clean, bare metal for a solid connection.
Avoid letting the clamp touch any other surface while connected.
Clip Black Clamp to Engine Ground
Next, attach the black clamp, marked with a minus sign, to a grounded metal point away from the battery. Good options include an unpainted bolt on the engine block, a metal strut, or a chassis bracket.
Never connect the black clamp directly to the negative battery terminal unless your model explicitly allows it. Batteries emit flammable hydrogen gas, and a spark near the terminal can cause an explosion.
Connecting negative to the battery increases explosion risk. Always ground to engine metal when possible.
Activate and Start the Engine
Turn On the Jump Starter
After both clamps are secure, press the power button to activate the unit. Some models beep or flash lights to confirm correct polarity. Others display battery voltage.
If you hear continuous beeping or see a red warning light, reverse polarity is likely. Switch the clamps immediately.
Crank the Engine for 3 to 5 Seconds
Turn the key or push the start button. Crank for no more than 3 to 5 seconds. If the engine does not start, wait 30 to 60 seconds before trying again. Ensure clamps are tight and connections are clean. Try a second or third attempt.
Most jump starters allow 3 to 5 start attempts on a full charge.
Some models have a boost button that delivers extra amperage for cold engines or larger vehicles. Press it before cranking if available.
Disconnect in Reverse Order
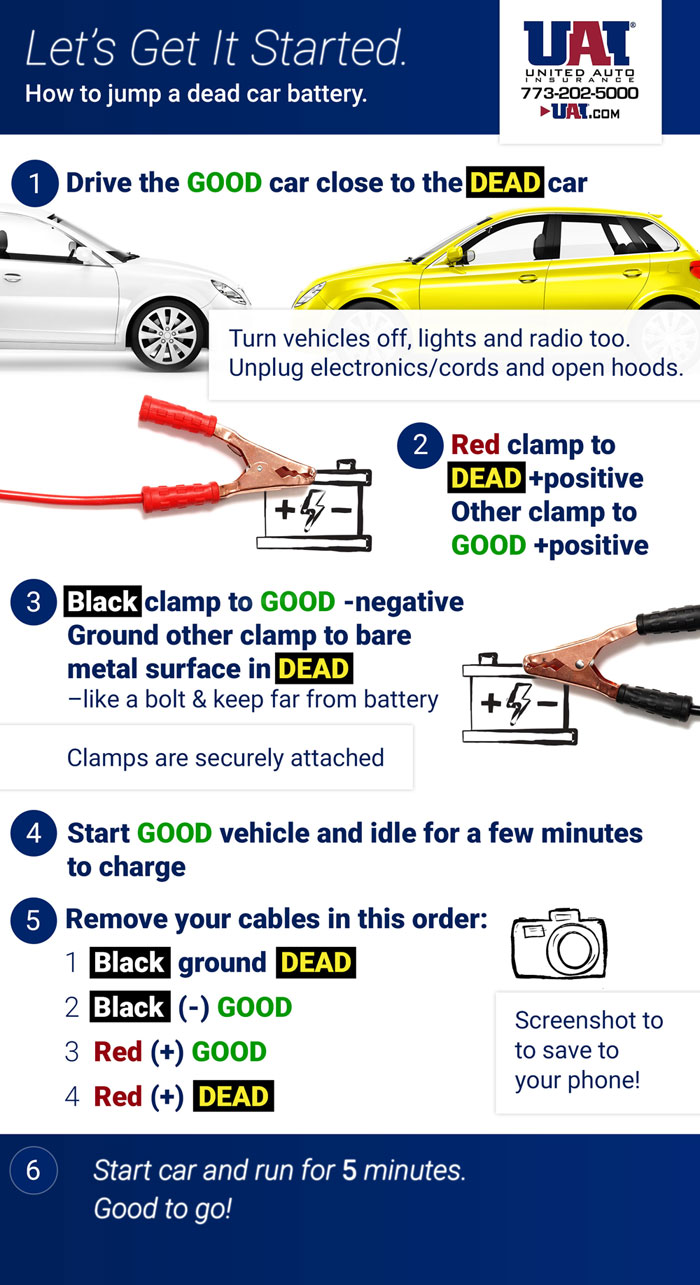
Remove Black Clamp First
Once the engine runs, turn off the jump starter if it has a switch. Then remove the black clamp from the ground point first. Remove the red clamp from the positive terminal second.
Keep clamps separated and avoid contact with each other or metal surfaces.
Always disconnect negative first, then positive. Reversing this order can cause dangerous sparks.
Store Cables Neatly
Wind the cables carefully and store them in a protective case. Tangled or pinched wires reduce lifespan and increase failure risk.
Recharge and Maintain the Unit
Recharge After Every Use
Even if the jump starter still shows charge, recharge it immediately after use. This ensures it is ready for the next emergency and prevents deep discharge, which degrades lithium-ion cells.
Use only the manufacturer-recommended charger. Fast chargers may reduce battery longevity over time.
Store Indoors at Stable Temperature
Avoid storing the device in extreme heat, like a summer trunk, or freezing cold. Temperatures below 32 degrees Fahrenheit can trigger low-temperature protection, disabling the unit.
If used in winter, warm the jump starter indoors before attempting another start.
Replace Every 3 to 5 Years
Lithium-ion batteries degrade over time. Even with proper care, most portable jump starters last 300 to 500 charge cycles. After 3 to 5 years, consider replacing it, especially if it fails to hold charge or struggles to start your vehicle.
Troubleshoot Common Problems
No Lights or Response
If the jump starter shows no signs of power, check if it is turned on. Plug it into a known-working outlet. Try a different charging cable.
If nothing works, the internal battery may be dead or damaged. Contact the manufacturer or replace the unit.
Beeping or Red Warning Light
This usually means reverse polarity, meaning the red clamp is on negative and black is on positive. Swap the clamps immediately. Modern units have protection circuits, but prolonged reversal can damage electronics.
Engine Cranks Slowly
Possible causes include low charge in the jump starter, poor clamp connections, or an extremely cold battery. Recharge the device, clean terminals, and warm the jump starter indoors before retrying.
Clamps Spark or Slip
Sparks happen when connections are loose or corroded. Clean battery terminals and ensure clamps are fully closed. Replace frayed cables.
If clamps slip frequently, invest in a model with stronger, locking jaws.
Device Gets Warm
Some warmth during use is normal. However, excessive heat means you are cranking too long or too often. Let the unit cool for 5 to 10 minutes between attempts.
Never leave it unattended while in use.
Know the Limits: Charger vs. Jump Starter
Jump Starter Is Not a Battery Charger
An instant power battery charger gives a quick burst to start the engine, but it does not recharge your car battery. That job belongs to your alternator while driving or a dedicated battery charger.
After a successful jump, drive for at least 30 minutes to allow the alternator to replenish the battery. For deeply discharged batteries, use a smart battery charger overnight.
When to Use Each Tool
Use a jump starter when you are stranded with a dead battery or when the battery is drained from lights. Use a battery charger for long-term storage maintenance or for reviving a sulfated battery with slow desulfation mode.
A jump starter gets you moving. A battery charger keeps you from getting stuck again.
Can It Start a Fully Dead Battery?
Yes, If It Is Just Discharged
Most portable jump starters can revive a battery drained by forgotten lights or short trips. They deliver 400 to 2000 peak amps, enough for most 12V vehicles.
No, If Battery Is Damaged
If the battery is old, sulfated, or has a shorted cell, no jump starter will help. Signs include no dashboard lights at all, a clicking sound when turning the key, or the jump starter fails to detect voltage.
In these cases, the battery needs replacement.
Let the jump starter sit connected for 1 to 2 minutes before starting. Some models send a small pre-charge that helps weak batteries accept the main burst.
Choose the Right Model for You

Entry-Level Models
Ideal for small cars and occasional use, these models cost $40 to $70 and offer 400 to 800 peak amps. They typically include a basic LED light and USB port for phone charging.
Best for city drivers and compact vehicles.
Mid-Range Models
These models cost $70 to $150 and balance power and utility. They offer 1000 or more peak amps, reverse polarity alerts, a bright LED work light with SOS mode, and multiple USB ports.
Best for SUVs, trucks, and winter use.
High-End Models
These all-in-one emergency kits cost $150 to $300 and include a built-in air compressor, 110V AC inverter to power laptops and mini-fridges, rugged waterproof casing, and fast charging in 2 to 3 hours.
Best for off-roaders, RV owners, and fleet vehicles.
Top Brands to Consider
NOCO offers premium safety features and compact design. CARKU provides award-winning performance tested in extreme cold. TACKLIFE delivers great value with strong customer support. GOOLOO features fast-charging models with bright displays.
CARKU was named 2025 Influential Automotive Brand, and its units are engineered for reliability in snow, heat, and remote conditions.
Real-World Tips from Users
Keep It in the Cabin
Store your jump starter in the glove box or under the seat, not the trunk. Cold reduces performance, and you will want quick access in rain or dark.
Test It Every Season
Try a practice jump once a season. Connect to your car with the engine off and verify lights and beeps work. It builds confidence and confirms readiness.
Use for More Than Cars
Many models can jump-start motorcycles, boats, lawnmowers, and ATVs. Check your device specs first.
Charge Phones in Emergencies
USB ports let you power phones, GPS, or dashcams during breakdowns. Keep a short charging cable in your emergency kit.
Final Checklist for Success
Fully charge before use. Wear safety gear. Connect red to positive, black to ground. Power on after clamping. Crank 3 to 5 seconds and wait 30 or more seconds between tries. Disconnect black first, then red. Recharge immediately after use. Test every 3 months.
A portable jump starter is a $100 tool that can save you $200 in towing fees and hours of waiting.
While it is not a permanent fix, it is the fastest way to regain independence when your battery fails. Just remember, after the jump, get your battery tested. A weak battery will fail again, and next time you might not be prepared.
Frequently Asked Questions About Instant Power Battery Chargers
Can I use a portable jump starter on any vehicle?
Most portable jump starters work on 12V vehicles, including cars, trucks, SUVs, and motorcycles. Some models support 6V or 24V systems. Check your device specifications before use.
How long does a portable jump starter last on a single charge?
Most units can jump-start a vehicle 10 to 20 times on a single full charge, depending on the model and battery capacity.
What happens if I connect the clamps incorrectly?
Modern jump starters have reverse polarity protection. If connected incorrectly, they will beep or show a red light. Swap the clamps immediately to avoid damage.
Can a jump starter recharge my car battery?
No. A jump starter provides enough power to start the engine but does not recharge the battery. Drive for at least 30 minutes after a jump so your alternator can replenish the battery.
Can I use my jump starter in the rain?
Most jump starters are designed for outdoor use, but keep the device dry when possible. Avoid submerging it in water and ensure connections are not in standing water.
Keep Your Instant Power Battery Charger Ready for Emergencies
Your instant power battery charger is only as good as its charge. Keep it ready by recharging it every 3 to 6 months, storing it indoors at stable temperatures, and testing it seasonally. Remember the critical connection sequence: red to positive first, black to ground second, then power on, crank, and disconnect in reverse order.
After any jump start, drive to have your car battery tested. A weak battery left unaddressed will leave you stranded again. With proper care and knowledge, your portable jump starter will serve you reliably for years to come.


