
You’ve got a dead Apple charger, a counterfeit suspicion, or just curiosity about what’s inside that sleek white cube. You’re not alone. Thousands of users and technicians have asked how to open Apple charger without breaking it. The truth? You can’t, not without destroying it. Apple designs its chargers to be sealed, tamper-resistant, and non-serviceable. But if you’re determined to open one for authenticity testing, repair attempt, or educational teardown, this guide gives you the exact steps, tools, risks, and what to expect inside.
Opening an Apple charger requires destructive disassembly, usually with a Dremel or precision rotary tool. Counterfeit chargers snap open easily; genuine ones don’t. That difficulty is by design and a key clue to spotting fakes. This guide covers every step safely and clearly, so you know exactly what you’re getting into before you cut.
Why Apple Chargers Are Designed to Be Sealed
Apple uses no screws, clips, or access points on modern chargers. The case is fused shut with industrial-strength adhesive and internal mechanical interlocks. This isn’t oversight, it’s intentional engineering.
Built-In Tamper Resistance
Apple intentionally designs its chargers to resist opening. The two plastic halves are bonded with strong industrial glue. Internal ridges and locking tabs prevent separation even if adhesive is weakened. There are no visible screws, snap-fit joints, or access points, unlike many third-party chargers. The sealed design also improves moisture and dust resistance for better durability.
This resistance serves as a built-in authenticity test. If your supposed Apple charger opens easily, it’s likely a counterfeit.
Tools Required to Open Apple Charger

Opening requires precision and safety gear. Use the right tools or risk injury or permanent damage to the internal components.
Essential Equipment
A rotary tool like a Dremel with fine cutting or grinding bit is the only practical option. You’ll also need a precision spudger or plastic pry tool to separate the halves after cutting. A vise or clamp secures the charger during cutting for controlled, safe operation. Safety gloves and eye protection are critical since plastic shavings fly fast during the process. A 10kΩ resistor allows safe discharge of capacitors before touching internal components.
A heat gun offers limited effectiveness since the adhesive doesn’t soften easily. A USB power meter helps test output before and after if attempting repair.
Step-by-Step: How to Open Apple Charger
Follow these steps carefully. One slip with the Dremel can destroy the PCB entirely.
Wait 24 Hours After Unplugging
Before touching anything, unplug the charger and wait at least 24 hours. Apple chargers store up to 340V DC in internal capacitors, enough to cause serious injury or death. Even when unplugged, the high-voltage side remains energized. Let it sit disconnected, or discharge capacitors using a 10kΩ resistor across the input terminals after opening but before touching anything.
Secure the Charger in a Vise
Place the charger in a vise or clamp, prongs-down, to keep it steady during cutting. Use soft jaws or cloth to avoid cracking the case prematurely. Keep pressure firm but gentle since over-tightening can split the plastic. This stability is critical for clean, controlled cuts.
Cut Along the Seam with a Dremel
The only way to open a genuine Apple charger is by cutting along the perimeter seam where the two halves meet. Use a fine grinding or cutting bit, starting at one corner and slowly tracing the outer edge. Make shallow, repeated passes and don’t force it. Rotate the charger as you go to maintain even depth. Expect 15 to 20 minutes of careful work to fully separate the case.
Pry Open the Halves
Once the cut is complete, use a plastic spudger or flathead screwdriver to gently pry the halves apart. Insert the tool at the cut line and apply even pressure around the edges. Some models have internal adhesive or plastic tabs, so be patient. Avoid metal tools near the PCB to prevent short circuits.
Check for Potting on High-Wattage Models
The 96W MacBook charger and some newer models use black epoxy or silicone potting to fill the interior. This protects components from heat and vibration but must be scraped away to access the PCB. Use a pick or dental tool carefully. Potting makes repair nearly impossible and teardown extremely messy.
Discharge Capacitors Before Touching Internals
Even after 24 hours, high-voltage capacitors may still hold charge. Before touching any internal parts, use a 10kΩ resistor to short the leads of large capacitors on the primary side. Never use a screwdriver since sparks can damage components or injure you. This step is non-negotiable for safety.
What You’ll Find Inside Different Models
Not all Apple chargers are the same internally. Here’s what to expect by model.
20W USB-C Charger
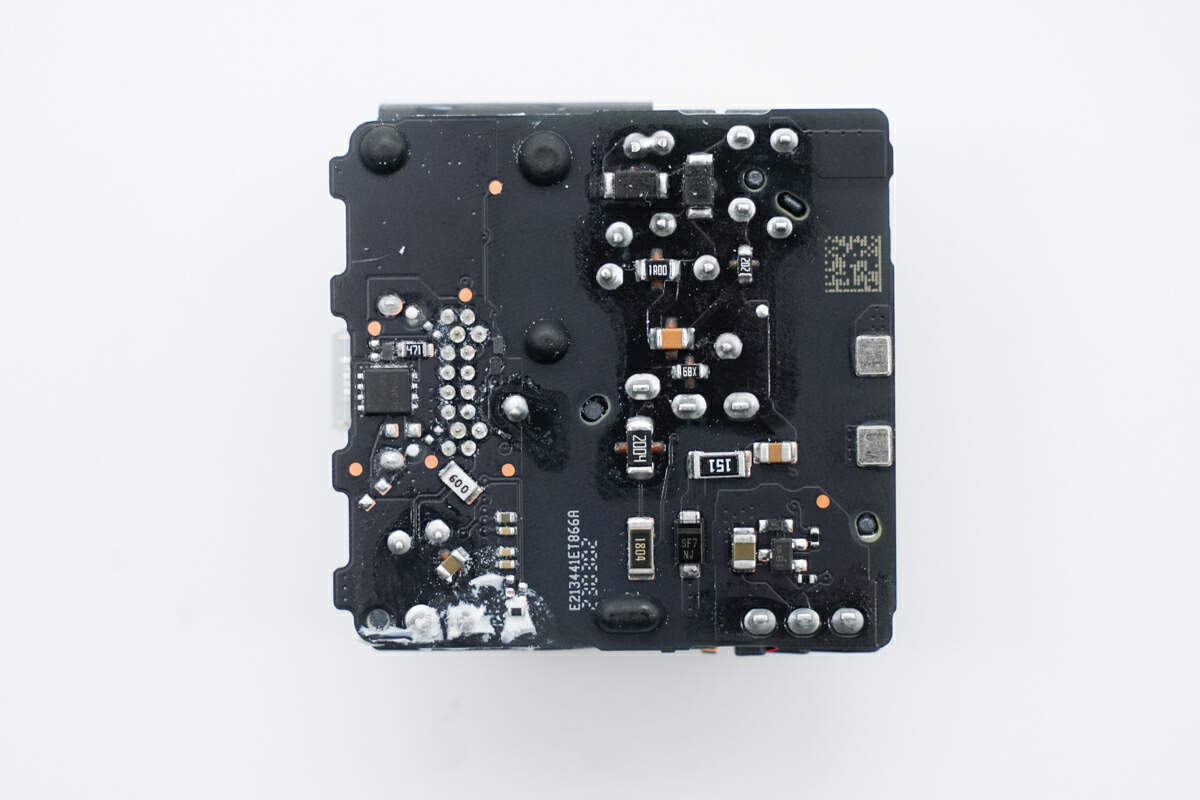
The most common modern iPhone charger uses a single-board design with a plastic frame. It delivers approximately 19.4W under load, close to rated output. The USB-C port is reinforced with a metal plate on the A2940 model. No potting means the PCB is accessible after opening.
5W USB-A Charger
The older model for iPhone 5 through 7 uses a two-board design with primary and secondary boards connected by wires. It uses an L6565 controller IC from STMicroelectronics and includes a resonant clamp circuit for efficiency. Early models had weak prongs replaced with reinforced metal flanges in later versions.
96W USB-C Charger
Designed for MacBook Pro and Air, this model has foldable prongs and a rectangular form factor for heat dissipation. Heavy potting compound fills the interior, and components are glued in place. This is the most difficult model to open or repair.
How to Spot a Fake by Opening

The ease of opening is the number one clue for identifying counterfeits.
Genuine vs. Counterfeit Differences
Genuine Apple chargers require a Dremel and 15 to 20 minutes to open; fakes snap open in seconds. Genuine units have dense, clean layouts with high-quality soldering; fakes are sparse with cold joints and extra space. Authentic chargers use Japanese capacitors from Nichicon or Nippon; fakes use generic or unbranded parts. The weight difference is significant: genuine 20W chargers weigh 58 to 59g while fakes often weigh 40 to 45g. Genuine USB-C ports are metal-reinforced and tight; fakes are wobbly and plastic-only.
Can You Repair an Opened Apple Charger?
Technically possible, but practically no.
Advanced Repair Options
You can clean corrosion with isopropyl alcohol, replace burnt capacitors, reflow solder joints, or fix a USB-C port short. But you’ll need SMD soldering skills, a microscope, and no official parts or schematics exist. The housing cannot be resealed, and safety certification is void upon opening. Apple does not support or repair opened chargers.
Non-Destructive Ways to Test Your Charger
Don’t want to destroy it? Test it safely instead.
Use a USB Power Meter
Devices like ChargerLAB POWER-Z KM001C or KT002 measure voltage, current, and power. They show supported protocols like PD 2.0 and DCP, and display PDOs. A genuine 20W charger shows 5V/3A and 9V/2.22A PDOs with manufacturer listed as Apple Inc.
Check on Mac
Connect to a Mac and go to Apple Menu, About This Mac, System Report, then Power. Look for manufacturer Apple Inc. and model identifier. Some clones still report as Apple, so this isn’t 100% reliable.
Safety Risks of Opening Apple Chargers
This isn’t a phone battery replacement. You’re dealing with lethal voltages.
Critical Hazards
Electric shock from charged capacitors can reach up to 340V DC. Fire risk exists if you short components. Plastic shavings can damage eyes or lungs. Safety certifications including UL and CE become voided. Never open a charger immediately after unplugging.
Frequently Asked Questions About Opening Apple Chargers
Can I open an Apple charger without destroying it?
No. Modern Apple chargers use adhesive-bonded cases with no screws or clips. Any opening method requires cutting and permanently damages the housing.
How long does it take to open an Apple charger?
Cutting around the entire seam takes approximately 15 to 20 minutes with a Dremel tool using slow, controlled passes.
What happens if I open my Apple charger?
The housing will be permanently destroyed and cannot be resealed. You’ll void any warranty and safety certifications, though the internal components may still be inspectable.
Is opening an Apple charger safe?
Only with proper safety precautions. Chargers contain high-voltage capacitors that can cause lethal shock. Wait 24 hours after unplugging or manually discharge capacitors using a 10kΩ resistor before touching internal components.
How can I tell if my Apple charger is genuine without opening it?
Check the weight. Genuine 20W models weigh 58 to 59g. Examine build quality and USB-C port tightness. Use a USB power meter to verify output matches specifications. Remember that genuine chargers are difficult to open while fakes typically come apart easily.
Can I repair my Apple charger after opening it?
While technically possible with advanced electronics skills, repair is impractical for most users. The housing cannot be resealed, no official parts exist, and safety certifications become void.
Key Takeaways for Opening Apple Chargers
Apple chargers are sealed with adhesive, no screws, no clips. Opening requires a Dremel and destroys the case permanently. Genuine chargers are hard to open; fakes are easy. Internals use premium parts including Japanese capacitors, custom ICs, and robust isolation. Repair is possible but not practical for most users. Always discharge capacitors before touching internals. Use a USB power meter for non-destructive testing instead.
The Apple 20W charger is a marvel of miniaturized engineering, not meant to be opened but worth understanding. Its sealed design isn’t a flaw. It’s a feature. If you need to verify authenticity, check weight, output, and build quality first. If you’re trying to fix a broken charger, buy a new one instead. It’s cheaper and safer.


