
You’ve probably experienced this: your power bank claims 10,000mAh capacity but can barely charge your phone once. The frustrating truth is that advertised power bank capacity rarely matches real-world performance. Learning how to check power bank capacity with a multimeter reveals the actual energy available, helping you verify if you’re getting what you paid for or if it’s time to replace a failing unit. This guide walks you through the precise method to measure your power bank’s true capacity safely and accurately.
Unlike smartphone batteries, power banks use lithium-ion cells rated at 3.7V, while their USB ports output at 5V. This voltage conversion creates significant energy loss that manufacturers rarely disclose. When you use a multimeter to check power bank capacity, you cut through marketing claims to discover the real deliverable energy—critical information for travelers, photographers, and anyone who relies on portable power when outlets aren’t available.
Essential Safety and Tool Checklist for Power Bank Testing

Before you attempt to check power bank capacity with a multimeter, gather these specific tools and implement safety protocols. Lithium-ion batteries can overheat or catch fire if mishandled during testing, so never skip these preparatory steps.
Must-Have Safety Gear for Capacity Testing
Work in a well-ventilated, dry area away from flammable materials and keep these safety essentials within reach: safety glasses to protect your eyes from potential sparks, a Class ABC fire extinguisher rated for electrical and chemical fires, and a non-conductive work surface like wood or rubber matting. Verify your power bank shows no physical damage—bulging cases, leaking electrolyte, or unusual odors mean stop testing immediately and dispose of the unit properly. Never test unattended, and keep children and pets away from your testing area.
Required Tools for Accurate Capacity Measurement
Your multimeter must have DC voltage measurement down to millivolt precision and DC current measurement capabilities up to at least 3A. Look for these specific features:
* Digital Multimeter with 10A current port and auto-ranging capability
* Electronic Load—either a 2-4 ohm, 10W+ power resistor or dedicated programmable load
* USB Power Meter that displays real-time mAh and Wh consumption
* Jumper Wires with Alligator Clips for secure connections
* Temperature Probe to monitor battery heat during testing
Critical Safety Note: Always use fused multimeter leads when measuring current. Inserting the probe into the wrong port can create a direct short circuit, potentially causing battery failure.
Measuring Voltage and Voltage Sag to Diagnose Power Bank Health
Voltage measurements provide your first clue about a power bank’s condition before you begin the full capacity test. This quick diagnostic reveals whether the unit is worth testing further or already failing.
Testing Open-Circuit Voltage After Full Charge
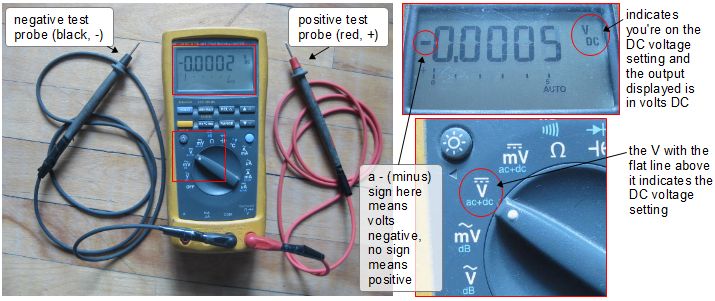
Set your multimeter to DC voltage mode and connect the probes to your power bank’s USB output: red to positive (usually center pin), black to ground. A fully charged power bank should read between 4.95V and 5.25V with no load attached. Readings below 4.8V indicate the battery isn’t fully charged or has significant self-discharge—a red flag for aging cells. If you measure above 5.3V, stop testing immediately as this suggests faulty voltage regulation that could damage connected devices.
Assessing Voltage Drop Under Standard Load
Apply a 1A load using your resistor or electronic load and remeasure the voltage. A healthy power bank maintains output within 0.2V of its open-circuit reading. For example, if your open-circuit voltage was 5.1V, it should stay above 4.9V under load. Voltage sag exceeding 0.5V indicates high internal resistance—common in aging units or cheaply made power banks. This sag directly impacts real-world performance, causing devices to disconnect during charging or charge extremely slowly.
Step-by-Step Process to Measure Power Bank Capacity with Multimeter
Now you’re ready to perform the actual capacity test. This procedure takes 3-8 hours depending on your power bank size but delivers the most accurate results when you properly check power bank capacity with a multimeter.
Setting Up Your Multimeter Test Circuit Correctly
Follow these precise connection steps to avoid damaging equipment:
1. Connect the USB power meter between the power bank and electronic load
2. Set your multimeter to 10A DC current mode and insert probes into correct ports
3. Create the measurement break: Connect red probe to USB meter output positive, black probe to load positive
4. Apply constant current load (1A for banks under 5,000mAh, 2A for larger units)
5. Start timing immediately after completing the circuit
Critical Connection Tip: Double-check all polarities before applying power. Reversed connections can destroy your multimeter’s fuse or damage the power bank’s circuitry.
Calculating Actual Capacity from Your Measurements
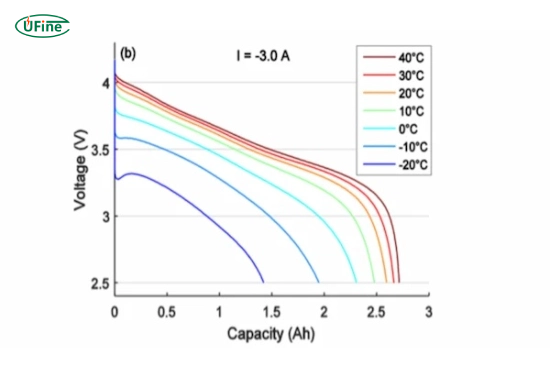
As the test runs, monitor three key parameters: output voltage (should stay above 4.5V), current (should remain stable), and temperature (shouldn’t exceed 45°C). When the power bank shuts off (voltage drops below 4.2V), note the elapsed time and check your USB power meter for total mAh delivered. Calculate true capacity using this formula:
True Capacity (at 3.7V) = Measured mAh × (5V ÷ 3.7V) × 0.85
The 0.85 factor accounts for typical 85% conversion efficiency. For example, if your test shows 6,000mAh delivered at 5V, the actual battery capacity equals 6,000 × (5/3.7) × 0.85 = approximately 6,892mAh at 3.7V—the specification manufacturers use in their advertising.
Advanced Troubleshooting: Interpreting Your Multimeter Results
Your measurements reveal more than just capacity numbers—they indicate the underlying health of your power bank’s components and circuitry.
Decoding Voltage Sag and Internal Resistance Issues
Calculate internal resistance using your voltage sag measurements: R = (Open-Circuit V – Loaded V) ÷ Current. Healthy power banks show resistance below 100mΩ. Readings above 200mΩ indicate aging cells or poor internal connections, explaining why your device keeps disconnecting during charging. If voltage drops more than 1V under load, the power bank has significant degradation and won’t deliver reliable performance in real-world use.
Diagnosing Common Capacity Test Failures
When your multimeter readings show unexpectedly low capacity, consider these specific failure modes:
* Rapid voltage collapse after initial use → failing battery cells needing replacement
* Current fluctuations during test → protection circuit malfunction
* High temperature rise (>20°C above ambient) → poor thermal design or failing components
* Capacity below 80% of rating → normal end-of-life degradation for lithium batteries
Expert Note: Power banks typically lose 20% capacity after 300 charge cycles. If your unit delivers less than 80% of its rated capacity, it’s reached end-of-life and should be recycled.
Safety and Maintenance Tips to Maximize Power Bank Lifespan
Prevent premature capacity loss with these field-tested maintenance practices that keep your power bank delivering maximum performance between capacity tests.
Store power banks at 50% charge in cool, dry places—never fully charged or completely drained for extended periods. Avoid temperature extremes; lithium batteries degrade rapidly above 45°C or below 0°C. When traveling by air, keep power banks in carry-on luggage where temperature is controlled, and never check them in baggage. For long-term storage, recharge to 50% every 3 months to prevent deep discharge damage.
Critical Maintenance Warning: If your power bank feels warm during normal use or shows visible swelling, stop using it immediately. These indicate serious safety hazards that require proper disposal at a battery recycling center—never throw lithium batteries in regular trash.
By mastering how to check power bank capacity with a multimeter, you transform from a passive consumer into an informed user who understands exactly what you’re getting from portable power devices. This knowledge helps you verify marketing claims, identify failing units before they leave you stranded, and make smarter purchasing decisions for your next power bank. Remember that even quality units lose capacity over time—regular testing every 6 months helps you stay ahead of unexpected power shortages when you need portable energy most.


