
You turn the key, but nothing happens. No crank, no click, just silence. A dead car battery is one of the most common vehicle issues, and having a portable charger on hand can save you time, money, and frustration. Unlike jump-starting with another car, using a portable battery charger safely restores your battery’s full charge over time, helping extend its lifespan and prevent future failures.
This guide walks you through every step of charging a car battery with a portable charger, from selecting the right device and observing critical safety rules to troubleshooting common problems and knowing when it’s time to replace the battery. Whether your battery is weak from winter weather or drained after leaving the lights on, you’ll learn how to bring it back to life correctly and safely.
Prepare Safety Gear and Equipment
Before touching any cables, prioritize safety. A car battery stores enough energy to cause sparks, fires, or even explosions if mishandled.
Essential Safety Steps
Always wear safety glasses and gloves to protect against acid splashes and sparks. Remove rings, watches, and bracelets because metal objects can conduct electricity and cause burns if they contact live terminals.
Work in a well-ventilated area. Batteries emit hydrogen gas, especially when charging, which is highly flammable. Keep your face away from the battery when connecting or disconnecting clamps.
Ensure the vehicle is off, the key is out, and the parking brake is engaged. Place the portable charger away from the battery as far as the cables allow. This reduces the risk of sparks reaching the battery.
Turn the charger off and unplug it before connecting to the battery. Never connect or disconnect clamps while the unit is powered.
Confirm Battery Type and Voltage
Not all batteries are the same. Using the wrong charger settings can damage your battery or vehicle electronics.
Match Charger to Battery Specifications
Most modern vehicles use a 12-volt lead-acid battery, but some older models use 6-volt systems. Check your owner’s manual or look for markings on the battery case.
Identify the battery type. Common types include flooded lead-acid, AGM which requires specific charging voltage, gel which is sensitive to overcharging, and lithium-ion which is rare in standard cars and needs a compatible charger.
Use a smart charger that automatically detects battery type and adjusts voltage accordingly. If your charger is manual, select the correct setting before proceeding.
Locate and Inspect Battery Terminals
Clear access to clean, undamaged terminals is essential for a safe and effective charge.
Identify Positive and Negative Posts
The positive terminal is marked POS or has a red cover. The negative terminal is marked NEG and usually has a black cover.
Remove plastic caps if present. If terminals are corroded, clean them with a mixture of baking soda and water using a wire brush. Rinse with clean water and dry thoroughly.
Poor connections due to corrosion are a leading cause of failed charging attempts.
Pro Tip: If the battery is in a tight compartment or near fuel lines, consider connecting the negative clamp to a clean, unpainted metal part of the engine block or chassis instead of the terminal itself.
Connect Charger with Correct Polarity

Connecting the clamps in the wrong order or with reversed polarity can destroy your vehicle’s electrical system or cause a battery explosion.
Follow the Right Connection Sequence
Turn the charger off. Attach the red positive clamp to the positive battery terminal. Attach the black negative clamp to the negative battery terminal or to a solid metal ground point on the engine block or frame.
Never connect the negative clamp to fuel lines, carburetors, or thin body panels.
Always connect positive first, negative second. This minimizes the risk of short-circuiting during setup.
Handle Special Cases
Some older vehicles and unique setups require different connection methods.
Charge Positive-Ground Vehicles Safely
Classic cars sometimes use positive-ground systems, where the positive terminal is connected to the chassis. For these vehicles, connect the black negative clamp to the ungrounded negative post. Connect the red positive clamp to a grounded metal part of the frame.
Always confirm your vehicle’s system type in the owner’s manual before connecting.
Charge a Removed Battery
If the battery is removed from the vehicle, place it on a non-conductive surface like wood or rubber. Connect the red clamp directly to the positive post. Use a 6-gauge insulated cable to link the negative post to the black clamp. Make the final connection away from the battery to avoid igniting gases.
Do not face the battery when making the last connection.
Set Charging Mode and Amperage

Choosing the right charge rate ensures a safe, effective recharge without damaging the battery.
Select the Best Charge Rate
For best results and battery longevity, use 1 to 3 amps whenever possible. A deeply discharged battery should be charged overnight at low amperage.
Higher amperage options include 6 to 12 amps for moderate depletion which completes in 2 to 6 hours, and 30 amps or more for emergency use only. This increases heat and plate stress.
Choose the Right Charging Mode
Modern smart chargers offer multiple modes. Automatic mode detects battery condition and adjusts stages. Desulfation mode helps revive old batteries with sulfate buildup. Maintenance or float mode keeps battery topped off during storage.
Set your charger to automatic mode if available. It prevents overcharging and optimizes recovery.
Power On and Monitor the Process
Once connected and configured, it is time to start charging.
Start Charging Safely
Plug the charger into a grounded AC outlet. Turn the unit on.
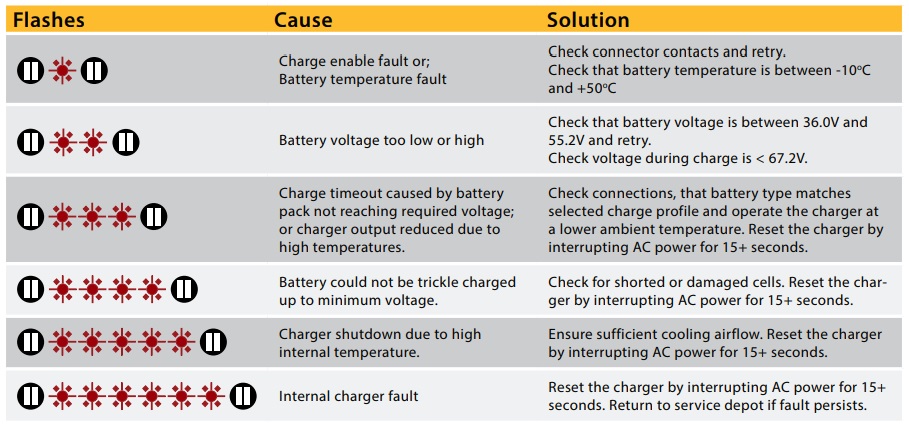
Watch the indicator lights or display. Flashing red or green means charging in progress. Solid green means fully charged. An error code or beeping indicates reverse polarity, poor connection, or fault.
Let the charger run uninterrupted. Do not touch the clamps while energized.
Warning: Charging time varies based on battery size, discharge level, temperature, and cable quality. A typical 12-volt 50Ah battery takes 8 to 12 hours at 1 amp, 4 to 6 hours at 3 amps, or 1 to 2 hours at 12 amps.
Disconnect in Reverse Order
After charging is complete, remove the clamps safely.
Follow the Correct Removal Sequence
Turn the charger off. Unplug it from the AC outlet. Remove the black negative clamp first. Remove the red positive clamp second.
Taking them off in reverse order prevents accidental short circuits.
Store the charger in a cool, dry place. Recharge the unit itself if it is a jump starter with an internal battery.
Troubleshoot Common Charging Problems
Even with proper steps, issues can arise. Here is how to fix them.
Charger Will Not Turn On
Check if the portable unit is fully charged. Plug the jump starter or charger into a wall outlet for 4 to 6 hours. Some units will not recharge immediately after heavy use, so allow 30 minutes to cool down first.
Sparking or No Indicator Light
Loose connection, corrosion, or reverse polarity may be the cause. Clean terminals thoroughly. Double-check clamp positions. Ensure clamps are firmly attached.
Engine Starts Once, Then Dies
The battery likely is not holding charge. Fully recharge with a portable charger. Test voltage after charging. Below 12.4V means weak, and below 12.0V means likely needs replacement. Check alternator output which should be 13.8 to 14.4V when running.
Jump Starter Fails to Start Engine
Check if the jump starter is fully charged. Verify clamps are making solid contact. Check if the battery is too cold, as below 32°F reduces effectiveness. Determine if the model has a boost mode and activate it before starting.
Some units send a 10 to 20 amp charge for 30 seconds before attempting a start. This primes weak batteries.
Charger Shuts Off During Use
Overheating or overload protection may be the cause. Let the unit rest for 30 minutes, then retry. Avoid using in extreme heat or cold.
Can You Charge a Dead Battery?
A completely dead battery may still be recoverable, but not always.
When Charging Works
Charging works when the battery is discharged but functional, when voltage is above 5V, and when there is no physical damage like swelling or leaks.
A smart charger can slowly restore charge, especially in desulfation mode.
When Charging Will Not Work
Charging will not work if the battery has an internal short or open cell, if voltage is below 5V, if the case is swollen or leaking, or if the electrolyte is frozen.
Never charge a frozen battery. It can explode. Thaw it slowly indoors first.
If the charger shows no load or fails to initiate charging after cleaning and checking connections, the battery may be beyond repair.
Test and Maintain After Charging
Charging is not the final step. You must verify the battery holds a charge and support long-term health.
Post-Charge Steps
Start the engine after disconnecting the charger. Let it idle for 15 to 20 minutes. This allows the alternator to stabilize the electrical system. Drive for at least 30 minutes to ensure full recharging. Test the battery at an auto parts store. They offer free load and CCA tests.
Extend Battery Life
Recharge monthly if the car sits unused. Use a battery maintainer during storage. Clean terminals every three months. Inspect cables for fraying or corrosion.
Choose the Right Portable Charger
Not all devices are equal. Pick one that fits your needs.
Recommended Models
The NOCO Genius 1 is a smart charger with 1 amp output. It is AGM and lithium compatible, features desulfation, and is compact. The Battery Tender 3-Amp delivers 3 amps with auto shutoff and simple operation. The Sun Energise Solar Charger averages 1.5 amps and works great for RVs, boats, and seasonal vehicles.
The NOCO Genius 1 is a top choice for its safety, compatibility, and ability to revive sulfated batteries.
Avoid Common Mistakes
Even experienced users make errors. Stay alert to these pitfalls.
Frequent Errors to Avoid
Do not connect negative to painted metal. Use a clean, bare metal ground point instead. Do not leave charger on high amp mode overnight. This risks overcharging. Use smart or low-amp settings. Do not forget to turn off charger before connecting. Sparks or damage are possible. Do not use a jump starter as a replacement for a charger. It starts the car but does not fully recharge the battery.
A jump start is not a fix. Always follow up with a full charge.
Know When to Replace the Battery
Sometimes, no amount of charging will help.
Replace If
Replace the battery if it is over 3 to 5 years old, if you have needed repeated jump-starts, if the case is swollen or leaking acid, if voltage stays below 12.4V after a full charge, or if it fails a load test.
A failing battery will continue to leave you stranded, even after a successful charge.
Key Takeaways for Charging Your Car Battery
Charging a car battery with a portable charger is a simple, effective way to restore power safely. By following the correct steps, prioritizing safety, using the right settings, and maintaining your battery, you can avoid costly tow trucks and extend your battery’s life.
Remember that slow charging saves batteries. Always use low amperage when possible and charge overnight for deeply discharged batteries. Full testing confirms health, so visit an auto parts store for a load test after charging.
Keep your charger charged, your terminals clean, and your car ready to go. If your battery is over five years old, shows signs of swelling, or fails to hold a charge after a full recharge, replacement is the only reliable solution.
Frequently Asked Questions About Charging a Car Battery
How long does it take to charge a car battery with a portable charger?
Charging time depends on the amperage and battery condition. At 1 amp, a typical 12V battery takes 8 to 12 hours. At 3 amps, it takes 4 to 6 hours. At 12 amps, it takes 1 to 2 hours. Always charge overnight at low amperage for deeply discharged batteries.
Can I use a portable jump starter to charge my battery?
A portable jump starter is designed to start the engine, not fully charge the battery. After jump-starting, the battery will be discharged and needs a proper battery charger to reach full capacity. Using only a jump starter repeatedly will shorten battery life.
Is it safe to charge a battery while it is still in the car?
Yes, it is safe to charge a battery while it remains in the vehicle. Ensure the charger is turned off before connecting clamps. Keep the charger away from the battery as far as the cables allow. Work in a well-ventilated area to prevent hydrogen gas buildup.
What does it mean if the charger shows an error code?
An error code usually indicates reverse polarity, poor connection, or a fault. Check that the red clamp is on positive and black is on negative or ground. Clean the terminals and ensure clamps are securely attached. Refer to your charger manual for specific error meanings.
Can I overcharge my car battery with a portable charger?
Yes, overcharging is possible if using a non-smart charger on high amperage for extended periods. This can damage the battery by causing overheating and electrolyte loss. Use a smart charger with automatic shutoff or set a timer when using manual chargers.
Why will my battery not hold a charge after charging?
A battery that will not hold a charge likely has internal damage, severe sulfation, or is simply too old. Test the battery voltage after charging. Below 12.4V indicates a weak battery. Below 12.0V usually means replacement is necessary. Have the battery load-tested at an auto parts store.


