
Nothing beats the frustration of a dead phone battery when you’re miles from an outlet during a camping trip. Building your own solar power bank solves this problem while giving you complete control over capacity, charging speed, and durability. Unlike store-bought options, a DIY solar power bank lets you customize every component for your specific needs—whether you’re an outdoor enthusiast needing backup power or a hobbyist wanting to learn renewable energy systems. This guide shows you exactly how to build a safe, efficient solar power bank using proven techniques and essential safety measures that most tutorials overlook.
Choose Your Battery Configuration Based on Power Needs
Your battery selection determines how many devices you can charge and how long your power bank lasts between solar top-ups. Most DIY builders use 18650 lithium-ion cells due to their high energy density and availability, but you must configure them correctly for your specific requirements.
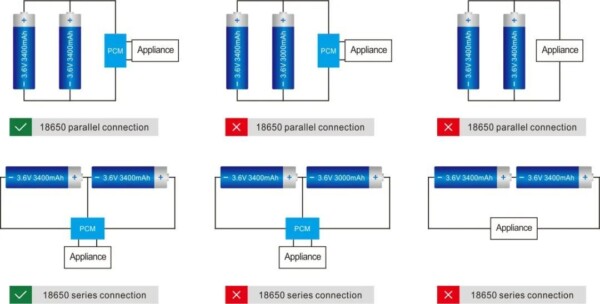
Determine Series vs. Parallel Cell Arrangement
The number of cells you connect in series (S) controls voltage, while parallel (P) connections increase capacity. For USB-powered devices requiring 5V output, a 2S configuration (two cells in series) provides 7.4V nominal voltage—ideal for stepping down to 5V with a buck converter. If you need higher capacity, add cells in parallel: a 2S2P setup (four total cells) doubles your mAh rating while maintaining the same voltage. Warning: Never mix different cell types or capacities in your pack, as this creates dangerous imbalances during charging.
Test and Match Salvaged 18650 Cells Safely
Many builders save costs by salvaging cells from old laptop batteries, but this requires careful testing. Use a battery tester to verify each cell’s capacity and internal resistance. Only combine cells with less than 10% capacity difference and similar internal resistance values. Discard any cells showing physical damage, voltage below 2.5V, or swelling—these pose serious fire hazards. For a reliable 10,000mAh power bank, you’ll need approximately four healthy 2500mAh 18650 cells in a 2S2P arrangement.
Match Your Solar Panel Wattage to Real Charging Expectations
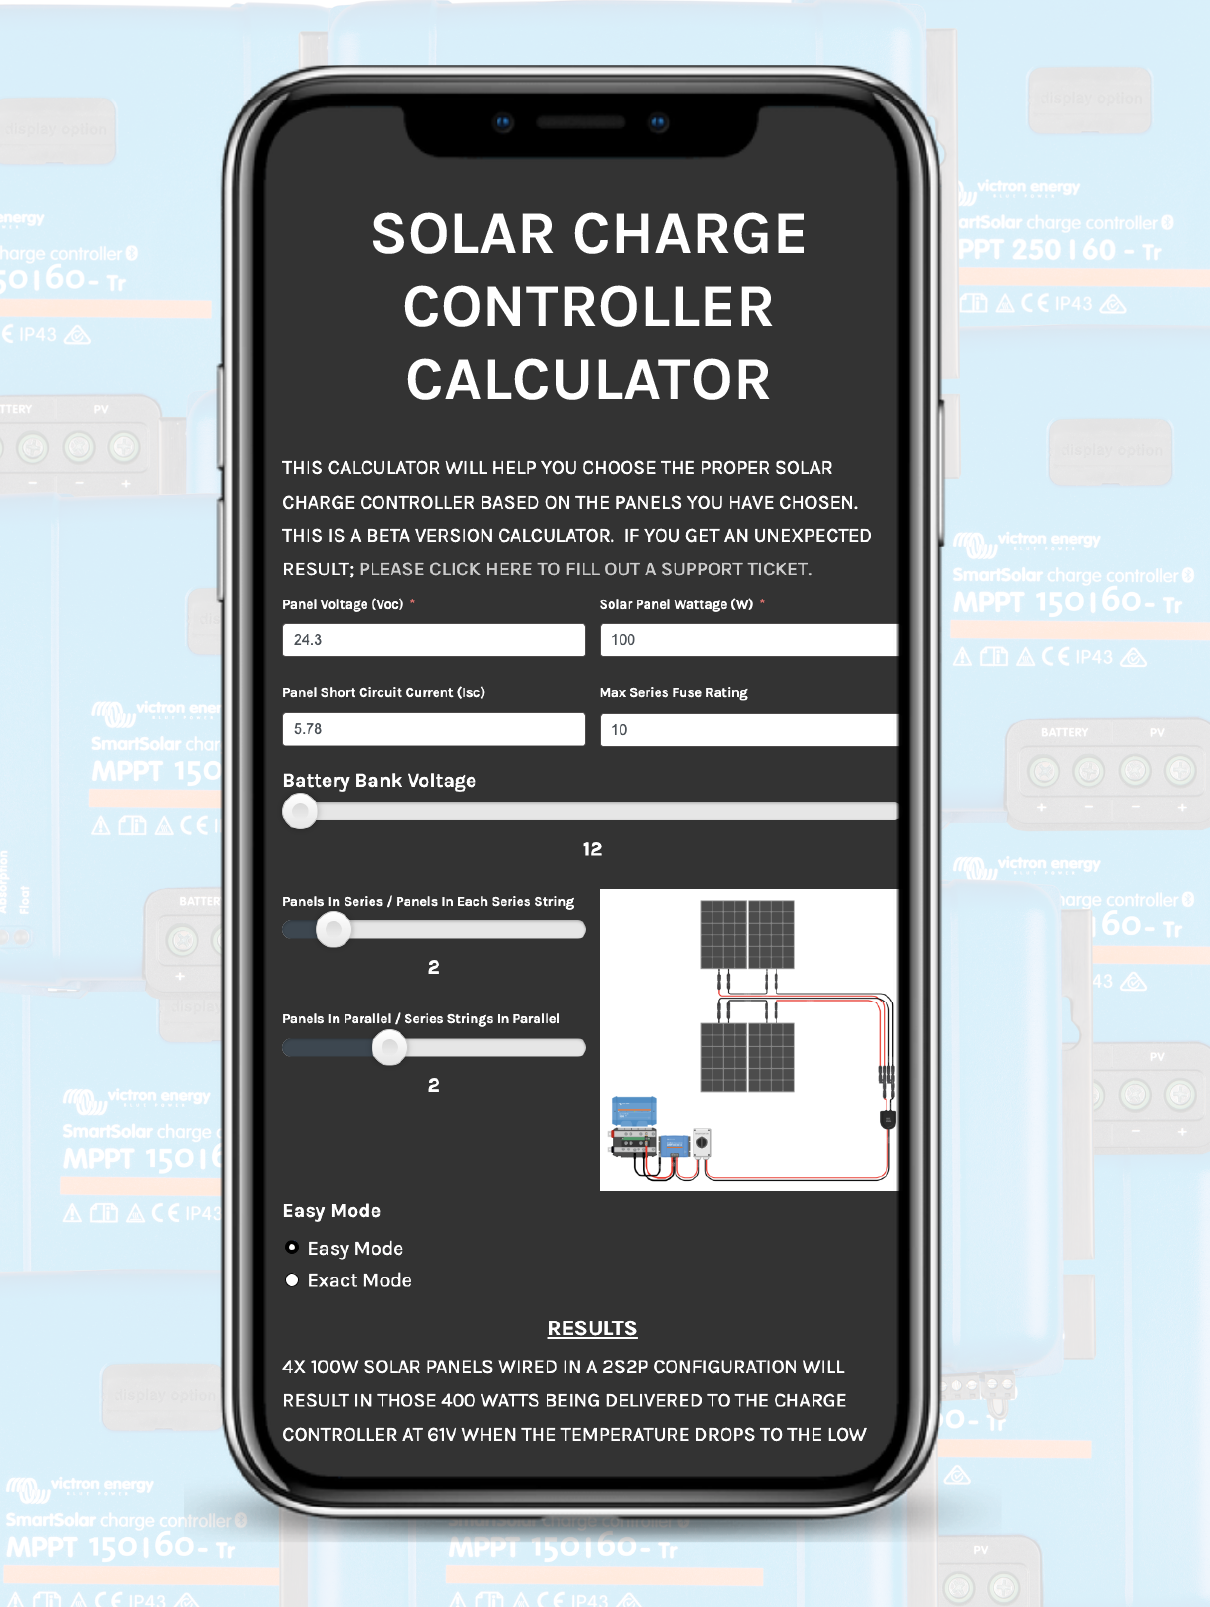
Selecting the right solar panel prevents frustration when your power bank charges slower than expected. Most beginners overestimate what small panels can deliver, leading to disappointment during actual use.
Calculate Required Panel Size for Your Capacity
A 10W solar panel serves as the practical minimum for charging a 10,000mAh (37Wh) power bank within a reasonable timeframe. Under ideal conditions, a 10W panel delivers about 5W of usable power after efficiency losses. This means charging a 37Wh battery requires approximately 7.5 hours of direct sunlight—realistically 15-30 hours considering variable weather and panel angle. Pro tip: For faster charging, choose a panel with 1.5-2x your battery’s watt-hour rating (e.g., 60W panel for a 37Wh battery), but balance this against portability needs.
Verify Voltage Compatibility Before Purchase
Your panel’s open-circuit voltage (V_oc) must exceed your battery’s maximum charging voltage. For a 2S Li-ion pack (8.4V max), select a panel with V_oc of 18-20V. Panels marketed as “12V” typically have 18-22V V_oc—perfect for 3S (11.1V) or 2S (7.4V) configurations. Avoid 5V panels for multi-cell builds, as they cannot properly charge higher-voltage battery packs even with a charge controller.
Install a Dedicated Charge Controller to Prevent Catastrophic Failure
Skipping a proper charge controller is the most dangerous mistake in DIY solar power banks. This component regulates power flow between your panel and battery, preventing fires caused by overcharging.
Select MPPT Over PWM for Maximum Efficiency
While PWM controllers cost less, MPPT (Maximum Power Point Tracking) controllers extract 15-30% more power from your solar panel, especially in cloudy conditions or when the panel isn’t perfectly angled. For a 10W panel charging a 7.4V battery, a 5A MPPT controller provides adequate headroom. Critical requirement: Ensure your controller specifically supports lithium-ion batteries with proper CC/CV (Constant Current/Constant Voltage) charging profiles—not all do.
Wire the Controller in the Correct Sequence
Connect components in this exact order to avoid damaging your system:
1. Connect the battery to the controller first
2. Then connect the solar panel
3. Finally connect your output converter
Reversing this sequence can destroy the controller’s electronics. Before permanent installation, test the controller with a multimeter to verify it outputs the correct charging voltage for your battery configuration.
Wire Your Buck or Boost Converter for Stable 5V USB Output
Your power bank is useless if it can’t deliver consistent 5V to your devices. The converter between your battery and USB port makes or breaks your charging reliability.
Choose Between Buck and Boost Based on Battery Voltage
For 2S (7.4V) or 3S (11.1V) battery packs, use a buck (step-down) converter to reduce voltage to 5V. For single-cell (3.7V) builds, you need a boost (step-up) converter. Select a module rated for at least 2A continuous output to handle modern smartphones—3A provides headroom for tablets. Before final assembly, adjust the converter’s output using a small screw while monitoring with a multimeter until it reads exactly 5.0-5.1V.
Implement Output Protection to Save Your Devices
Many cheap converter modules lack proper short-circuit protection. Add a 2.5A resettable fuse on the USB output line to prevent damage to your devices if a short occurs. For dual-port builds, use a converter with independent current limiting rather than splitting a single output, which causes both ports to fail if one shorts.
Integrate Essential Safety Protections for Lithium Batteries
Lithium batteries demand respect—improper handling causes fires. Your build must include multiple layers of protection that most commercial power banks omit.
Install a Proper BMS with Cell Balancing
A Battery Management System (BMS) is non-negotiable for multi-cell packs. For a 2S configuration, use a dedicated 2S BMS that:
– Cuts off charging at 4.25V per cell
– Prevents discharge below 2.5V per cell
– Balances cell voltages during charging
– Provides short-circuit protection
Solder the BMS directly to your battery pack before connecting anything else. Never skip this step—a single overcharged cell can trigger thermal runaway in the entire pack.
Add Secondary Safety Measures
Install an 8A fuse on the main positive battery lead as backup protection if the BMS fails. Include a Schottky diode between the solar panel and controller to prevent reverse discharge at night. Store your completed power bank in a non-conductive, flame-retardant enclosure with ventilation holes—never use a sealed metal case that could short terminals.
Assemble Components Using Proper Spot-Welding Techniques
How you connect your 18650 cells makes the difference between a reliable power bank and a ticking time bomb. Soldering directly to cells creates dangerous hot spots that compromise safety.
Why Spot-Welding Beats Soldering for 18650s
Lithium-ion cells have thin metal casings that conduct heat rapidly. Soldering often overheats internal components, damaging the cell’s protection circuit and creating weak points. Professional builders use nickel strip spot-welding for secure, low-resistance connections without heat damage. If you must solder, use a 100W iron with temperature control, work extremely quickly, and cool cells between connections—but spot-welding remains vastly safer.
Create a Secure Mechanical Structure
Cells must be held firmly to prevent movement that strains connections. Use a 3D-printed holder, laser-cut acrylic frame, or foam insert cut to size. Never rely solely on electrical tape—vibration during transport can loosen connections over time. Wrap the entire pack in insulating Kapton tape before installing in your enclosure.
Test Your Solar Power Bank Before Final Assembly
Skipping thorough testing causes most DIY power bank failures. Verify each subsystem works independently before combining them.
Conduct These Critical Pre-Use Tests
- Measure open-circuit voltage from your solar panel in direct sunlight (should match specifications)
- Verify the charge controller outputs correct charging voltage with no load
- Confirm the BMS activates protection at low voltage (simulate with a resistor)
- Check USB output maintains 5V under 1A load
A multimeter is essential for these tests—don’t assume components work correctly. Test for 24 hours with the battery partially discharged to catch intermittent issues before enclosing everything.
Optimize Charging Times for Real-World Sunlight Conditions
Understanding solar charging realities prevents frustration when your power bank doesn’t charge as fast as expected.
Manage Expectations for Portable Systems
A 10W panel won’t fully charge a 10,000mAh power bank in one sunny afternoon. Realistically, expect 20-40 hours of direct sunlight for a complete charge due to:
– Panel angle relative to the sun
– Weather conditions and seasonal variations
– Efficiency losses in wiring and components
– Battery charging inefficiencies
Use your solar power bank as a “trickle charger” that maintains charge during extended trips rather than expecting rapid top-ups.
Maintain Your DIY Power Bank for Maximum Longevity
Proper care extends your power bank’s life from months to years. Lithium batteries degrade fastest when stored at full or empty charge.
Follow These Essential Maintenance Practices
- Store at 50% charge in a cool, dry place when not in use
- Avoid leaving connected to solar panels for weeks unattended
- Check connections quarterly for corrosion or looseness
- Balance-charge your pack monthly using the BMS balancing function
Never leave your power bank charging unattended during initial test cycles—monitor temperature closely for the first few charges. If any component exceeds 50°C (122°F), discontinue use immediately.
Building your own solar power bank gives you reliable off-grid power while teaching valuable electronics skills. By selecting compatible components, implementing multiple safety layers, and understanding real-world charging limitations, you’ll create a custom power solution that outperforms commercial alternatives. Start with a small 5W panel and 5,000mAh battery to master the fundamentals before scaling up. With proper construction and maintenance, your DIY solar power bank will keep your devices charged through countless adventures.


