
Your phone dies at the worst possible moment—mid-hike, during a work emergency, or while traveling. Commercial power banks often lack the capacity or features you need, leaving you stranded. Building your own power bank at home solves this by creating a custom, high-capacity solution tailored to your devices. This project isn’t for complete beginners; it requires basic electronics experience like soldering or drone building. Crucially, you’ll learn how to build a power bank at home safely while avoiding lithium battery hazards. By the end, you’ll have a reliable charger with exactly the capacity, ports, and features you want—no compromises.
Why Your 18650 Power Bank Needs a 2S Configuration
Most DIY power banks use 18650 lithium-ion cells, but choosing between 1S (3.7V) and 2S (7.4V) configurations dramatically impacts performance. A 2S setup doubles your voltage, allowing you to use a buck converter instead of a boost converter. This matters because buck converters run cooler and more efficiently—especially under heavy loads like fast-charging phones. For example, a 2S2P pack (two parallel sets of two series cells) delivers 14.8Wh per cell versus 7.4Wh for 1S, extending runtime without increasing size. Always match your converter: use an MP1584EN buck module for 2S packs to step down to 5V. Never connect a 2S pack directly to a boost converter—it will fry instantly.
How to Calculate Your Exact Capacity Needs
Determine your required capacity by adding up your devices’ battery sizes. A typical smartphone needs 3,000mAh, while tablets require 7,000mAh+. For a power bank that fully charges two phones, aim for 10,000mAh. With Samsung 30Q 18650 cells (3,000mAh each), a 2S2P configuration gives you 6,000mAh at 7.4V (44.4Wh). Remember: actual usable capacity is 80% due to conversion losses. Always round up—better to have excess power than run dry mid-charge.
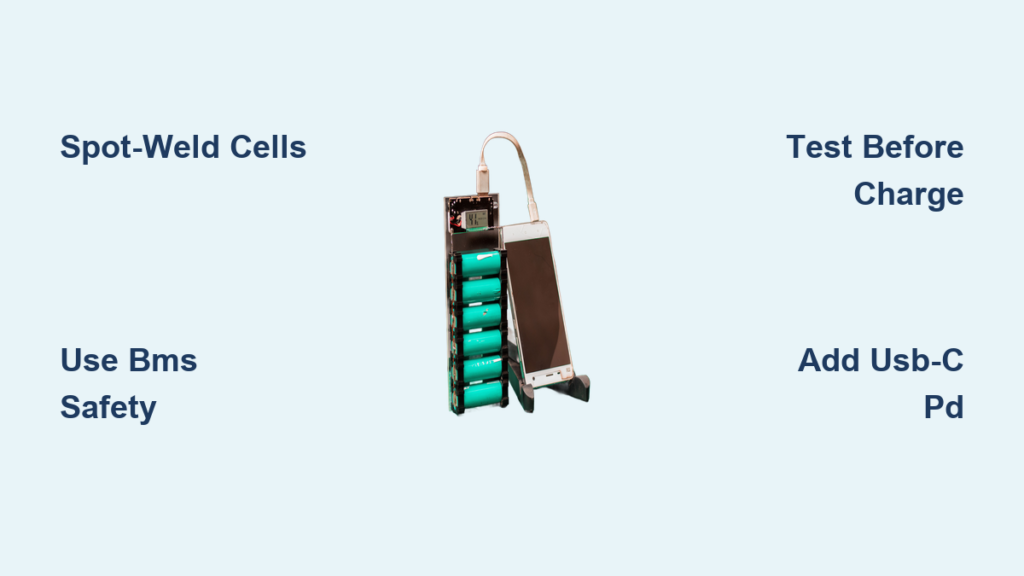
Spot-Welding 18650 Cells: The Only Safe Assembly Method

Soldering directly to 18650 cells is a guaranteed fire hazard. The intense heat damages internal seals, causing thermal runaway. You absolutely must use a capacitor-discharge spot welder with nickel strips. Here’s how to build a 2S2P pack safely:
- Test and match cells using a multimeter—only combine cells within 0.02V of each other.
- Arrange cells side-by-side for parallel connections, then stack for series.
- Spot-weld nickel strips across terminals in one quick pulse (0.01 seconds). Never apply heat repeatedly.
- Insulate immediately with Kapton tape over all connections—exposed metal causes shorts.
Skip this step, and your power bank becomes a fire risk. A $50 spot welder pays for itself in safety.
Why Salvaged Laptop Batteries Are Dangerous
Never harvest 18650s from old laptops. These cells are mismatched, degraded, and lack consistent capacity. During discharge, weaker cells over-stress, triggering BMS shutdowns or fires. Always buy new, high-drain cells (like Samsung 30Q or LG M50) from reputable vendors like 18650BatteryStore. Pay $5-$7 per cell—it’s non-negotiable for safety.
Wiring Your Power Bank’s Critical Safety Circuit

Your electrical path must include three non-negotiable safety layers: BMS, fusing, and converter isolation. Wire in this exact sequence:
Battery Pack → BMS → 10A Polyfuse → Toggle Switch → Buck Converter → USB Ports
The BMS is your lifeline—it prevents overcharging, over-discharging, and cell imbalance. For a 2S pack, use a 7.4V BMS with balance leads. Connect its P- terminal to the polyfuse (a resettable fuse that cuts power during shorts), then to your switch. Never omit the fuse; it stops USB port shorts from igniting the pack. Use 18AWG silicone wire for high-current paths—it handles heat better than PVC.
How to Avoid BMS Connection Errors
BMS wiring mistakes cause 90% of DIY failures. For a 2S pack:
– B- → Battery negative terminal
– B1 → Junction between Cell 1+ and Cell 2-
– B2 → Battery positive terminal
Double-check with a multimeter before powering on. Reversed connections instantly destroy BMS boards.
Testing Your Homemade Power Bank Before First Use
Never charge your new pack immediately. Perform these critical tests in a fire-safe area (like concrete outdoors):
- Converter validation: Power the buck converter via lab supply (set to 8.4V) with current limited to 0.5A. Verify 5.1V output at USB ports using a multimeter. Adjust the converter’s potentiometer if needed.
- BMS discharge test: Connect a 10Ω resistor across USB ports as a dummy load. Monitor cell voltages with a multimeter—BMS should cut off at 2.5V per cell.
- Short-circuit check: Briefly touch output wires together. The polyfuse must trip within 0.1 seconds.
If any test fails, disassemble and recheck wiring. Only after passing all tests should you attempt a first charge.
Fixing Common Power Bank Failures: No Output or Tripping BMS
When your DIY power bank dies unexpectedly, diagnose systematically:
Why Your Power Bank Shows No Output
- BMS low-voltage lockout: Connect the charger for 10 minutes—this often resets the BMS after deep discharge.
- Blown polyfuse: Check continuity with a multimeter. Replace if open.
- Loose balance leads: Resolder B1/B2 connections to the BMS—vibration loosens these critical wires.
Why the BMS Trips During Charging
Cell imbalance is the culprit 80% of the time. Measure individual cell voltages after charging stops:
– If voltages differ by >0.1V, your charger isn’t balancing properly.
– Solution: Use a balance charger (like ISDT Q8) that plugs into the BMS’s balance port. Never rely solely on the BMS for balancing during normal charging.
Adding USB-C Power Delivery to Charge Laptops

Transform your power bank into a laptop charger with a $5 USB-C PD trigger board (e.g., STUSB4500). Solder it between your buck converter and USB-C port:
- Connect PD board input to converter’s 5V output.
- Program the board for 20V output using an Arduino (follow manufacturer’s guide).
- Add a 3A polyfuse on the USB-C output line—laptops draw high current.
This upgrade lets you charge MacBook Airs or Dell XPS laptops anywhere. Always test with a USB power meter first—incorrect voltage can fry devices.
Final Assembly: Securing Components in a Ventilated Case
Your enclosure prevents physical damage and contains fires. Use these rules:
- Material: 3D-print with PETG (not PLA)—it withstands higher heat.
- Ventilation: Drill 5mm holes on opposite sides for airflow. Never seal cells in an airtight box.
- Mounting: Secure the battery pack with silicone adhesive, not hot glue (which melts at 150°C). Position cells vertically to minimize movement.
- Final safety check: Before closing the case, verify no metal parts touch cell terminals using an insulation tester.
A well-secured pack survives drops and prevents internal shorts—the leading cause of DIY power bank fires.
Building a power bank at home gives you total control over capacity and features, but safety must dominate every step. Always spot-weld cells, use matched 18650s, and implement triple-layer protection (BMS + fuses + converters). Start with a simple 2S1P build before attempting USB-C PD or wireless charging. After assembly, perform monthly maintenance: check for swollen cells, clean ports with isopropyl alcohol, and fully discharge/recharge every 3 months to recalibrate the BMS. Your custom power bank isn’t just convenient—it’s a testament to smart engineering. When built right, it outperforms commercial options while keeping you safe from lithium hazards. Ready to start? Double-check your wiring, gather quality parts, and build with confidence.


