
If your Baseus power bank has stopped charging, won’t turn on, or shows visible bulging, you’re not alone. Despite their sleek design and fast-charging capabilities, Baseus power banks—like all lithium-ion devices—are prone to failure over time. The most common and dangerous issue is a swollen battery, which can lead to fire hazards if ignored. Other frequent problems include loose USB ports, unresponsive buttons, and complete power loss.
While Baseus doesn’t officially support user repairs, many of these issues can be safely fixed with the right tools and knowledge. This guide walks you through diagnosing and repairing a Baseus power bank—from identifying a swollen cell to replacing the battery, fixing broken ports, and deciding whether DIY repair is worth the risk. Whether you own a compact 10,000 mAh model or a high-wattage Blade 100W laptop charger, this step-by-step repair manual gives you everything you need to bring your device back to life—safely and effectively.
Swollen Battery: Symptoms, Causes, and Immediate Risks
How to Spot a Swollen Battery
A swollen battery is one of the clearest signs that your Baseus power bank needs immediate attention. Look for:
– Visible bulging in the center or edges of the case.
– The two halves of the casing separating slightly.
– The device no longer lying flat on a surface.
– A foul, acidic smell coming from the unit.
Even if the power bank still powers on and displays a charge level, physical deformation means the internal lithium-ion cells are degrading. This swelling occurs due to gas buildup inside the battery, a result of chemical breakdown.
🔴 Critical Warning: Never use a swollen power bank. A punctured or overheated swollen cell can ignite or explode.
Why Batteries Swell in Baseus Power Banks
Swelling is typically caused by:
– Overcharging due to faulty protection circuits.
– Exposure to heat, such as being left in a car or near direct sunlight.
– Poor-quality or counterfeit 18650 cells used in some models.
– One-time-use design with no thermal runaway protection.
✅ Pro Tip: If your power bank gets unusually hot during charging or discharges rapidly, stop using it. These are early signs of cell or circuit failure.
Safe Disassembly: Opening the Baseus Case Without Damage
Tools You’ll Need
To open your Baseus power bank safely:
– Heat gun or hair dryer (to soften adhesive)
– Plastic pry tools or spudgers
– Precision scalpel or hobby knife
– Thin sanded plastic cards
– Safety gloves and eye protection
⚠️ Never use metal screwdrivers near the battery—a puncture can cause instant thermal runaway.
Step-by-Step Case Opening
- Apply heat to the seam (60–80°C) for 30–60 seconds, rotating the device for even warming.
- Insert a scalpel into a corner seam. Tap gently with a hammer if needed to create a gap.
- Slide in plastic tools and work around the perimeter slowly—adhesive is extremely strong.
- Watch for stress marks. Whitening plastic means you’re applying too much pressure.
- Separate the halves carefully. Avoid yanking, which can tear internal wires or damage the PCB.
📌 Note: Most Baseus units use permanent adhesives. Reassembly will require new tape or sealant.
Battery Replacement: Step-by-Step Guide

Identifying and Removing the Old Battery
Inside, you’ll likely find 18650 or 21700 lithium-ion cells. Check voltage with a multimeter:
– 4.0 V or higher: Safe to handle.
– Below 3.0 V: Deeply discharged—replace immediately.
To remove:
1. Peel back adhesive strips or cut them with a plastic tool.
2. Lift the battery gently using thin spudgers.
3. Desolder wires:
– Remove negative (–) terminal first.
– Then desolder positive (+).
⚠️ Always disconnect negative first to prevent accidental short circuits.
Installing a New Battery Safely
Use high-quality branded cells (Samsung, LG, Panasonic). Match:
– Voltage: 3.7 V (single cell) or 7.4 V (2S).
– Capacity: Equal or higher mAh.
– NTC thermistor: Required for temperature protection.
Steps:
1. Attach NTC sensor to the new battery with adhesive.
2. Solder NTC wires to the control board.
3. Connect battery leads:
– Positive to positive, negative to negative.
– Use minimal heat to avoid PCB damage.
4. Secure with 3M VHB tape or conductive foam.
✅ Best Practice: Test the unit before sealing—check display, charging, and output.
Diagnosing and Fixing Circuit Issues
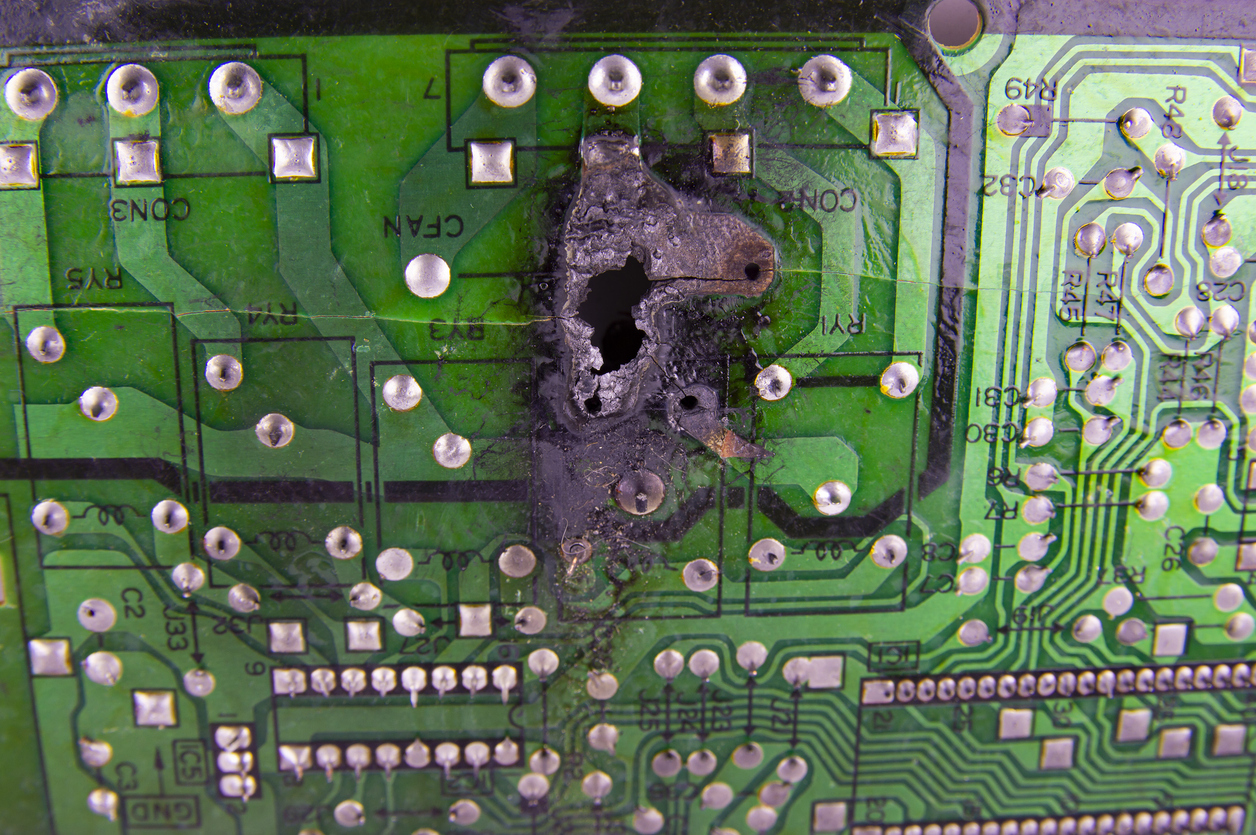
Visual PCB Inspection Tips
After opening, inspect the circuit board under bright light:
– Look for burn marks on ICs.
– Check for cracked solder joints, especially near USB ports.
– Examine capacitors—bulging or leaking means failure.
– Inspect traces for breaks, particularly around connectors.
Clean the board with 90%+ isopropyl alcohol to remove flux and prevent corrosion.
Testing Key Components
Use a multimeter to check:
– Diodes: Forward voltage drop should be 0.5–0.7 V.
– Capacitors: Visually inspect; use ESR meter if available.
– Protection ICs:
– DW01A – Overcharge/discharge protection.
– TP4056 – Charging management.
– Button circuit: Test continuity when pressed.
🔍 Troubleshooting Tip: If the power bank won’t turn on, check the microswitch and traces near the button.
Repairing USB Ports and Charging Issues
Fixing a Loose USB-A QC3.0 Port
A common failure is a wobbly USB-A port that stops delivering power. Symptoms:
– Port disconnects under cable pressure.
– No output despite other ports working.
– Quick Charge function lost.
Even if solder joints look intact, internal damage may exist.
Re-soldering the USB Port
- Remove the port by heating all pins evenly.
- Clean pads with alcohol and inspect for lifted traces.
- Pre-tin both pads and port pins.
- Realign and solder carefully.
⚠️ If it still doesn’t work, the QC controller IC may be damaged—this requires board-level repair or replacement.
Use USB-C as a Backup
If USB-A can’t be fixed:
– Use USB-C port for charging.
– Many models support QC3.0 via USB-C (9V/2A).
– Verify compatibility with your device.
✅ Workaround: This keeps your power bank functional without complex IC repair.
Professional Repair: When to Call Experts
Acme Revival Service for Baseus Blade 100W
For high-power models like the Baseus Blade 100W, professional repair is often safer. Acme Revival offers:
– Free diagnostic evaluation ($0 cost).
– Flat-rate repairs with 180-day warranty.
– Option to extend warranty to 1 year.
– Repairs include:
– Circuitry faults
– Broken screens
– Button failure
– Plastic housing damage
How to Submit a Claim
- Provide:
– Serial number
– Order number
– Photo of device
– Description of issue - Choose:
– Approve repair
– Decline and pay $35 for return
– Opt for parts buyout
✅ Advantage: They service devices even when Baseus no longer supports them.
Repair Difficulty by Model
| Model | Difficulty | Key Notes |
|---|---|---|
| Baseus 10,000 mAh | Medium | 18650 cells, DW01A/TP4056. Watch for fake capacity. |
| Baseus 33 (110 Whr) | High | Sensitive QC controller. Micro-damage common. |
| Baseus Adaman 140W | Very High | GaN circuitry, LCD screen. No public guides. |
| Baseus Blade 100W | Medium-High | Dense layout but repairable. Supported by Acme. |
📊 Decision Guide: If your model has a screen or GaN tech, consider professional help.
Safety Rules for Lithium-Ion Repairs
Fire Prevention Measures
- Never puncture, crush, or bend cells.
- Work in a well-ventilated area.
- Keep baking soda or Class D fire extinguisher nearby.
- Use insulated tools and anti-static wrist strap.
🔥 If a battery smokes, place it in a metal container and evacuate.
Handling Swollen Batteries
- Remove carefully using plastic tools.
- Place in a fireproof container.
- Do not charge or reuse.
- Dispose at a hazardous waste facility.
❌ Never throw lithium batteries in household trash.
Reassembly and Sealing Tips
Secure the Case After Repair
Original clips and adhesives are often destroyed. Reassembly options:
– 3M VHB double-sided tape – Strong, durable.
– Non-conductive silicone sealant – Flexible and water-resistant.
– External sleeve – If casing is cracked.
✅ Pro Tip: Test all functions before sealing.
Prevent Future Failures
- Avoid extreme temperatures.
- Use certified chargers.
- Don’t drop or over-discharge.
- Inspect every 6 months for swelling.
Where to Buy Replacement Parts
- 18650/21700 cells: AliExpress, Banggood, Digi-Key
- NTC sensors: eBay, iFixit, Mouser
- USB-C PD/QC3.0 ports: Electronics distributors
- Control boards: Search “2S power bank board” on AliExpress
✅ Best Practice: Buy branded cells for safety and longevity.
When to Repair vs. Replace
Repair If:
- Battery is swollen but PCB is good.
- USB port is loose and re-soldering is possible.
- You have basic soldering skills.
- Model is high-end (e.g., Blade 100W).
Replace If:
- PCB is burned or controller IC is damaged.
- Model has complex GaN circuitry (e.g., Adaman 140W).
- You’re uncomfortable with lithium batteries.
- Repair cost exceeds 60% of a new unit.
💡 Cost Tip: A new 10,000 mAh Baseus costs ~$30–$50. If repair takes hours, replacement may be smarter.
Final Recommendations
- Baseus power banks can be repaired, especially for battery and port issues.
- Swollen batteries must be replaced immediately—they’re a fire hazard.
- Use plastic tools and heat to open the case safely.
- Desolder negative first to avoid shorts.
- Match voltage and include NTC when replacing cells.
- Test before sealing—save time and frustration.
✅ Bottom Line: With proper safety steps, many Baseus units can be revived. But for high-power models or complex faults, professional repair is the safest choice.
Join online communities like YouTube, TikTok, or the Baguio-Benguet Electronics Technician Group on Facebook to share your repair story and learn from others. Your experience helps build a safer, more sustainable electronics repair culture.


