
Is your power bank refusing to turn on when you need it most? You’re not alone—nearly 65% of power bank issues relate to improper activation or unexpected shutdowns. Knowing exactly how to turn a power bank ON and OFF properly prevents battery drain, extends device lifespan, and ensures your gadgets stay powered when it matters. This guide reveals the specific button techniques, LED signals, and model-specific quirks you need to master power bank operation—whether you’re using a basic 5,000mAh model or a premium 20,000mAh unit with fast charging.
Most users make critical mistakes when operating power banks, like tapping the button too briefly or ignoring subtle LED warnings. These errors trigger premature shutdowns or even permanent damage to the internal battery. By the end of this guide, you’ll understand precisely how long to press that button, why your power bank shuts down unexpectedly, and how to keep it running continuously for security cameras or IoT devices. Let’s transform you from frustrated user to power bank expert in minutes.
Why Your Power Bank Won’t Stay On: Common Activation Issues Explained
Decoding Power Bank Button Signals: 1-Second vs 3-Second Presses
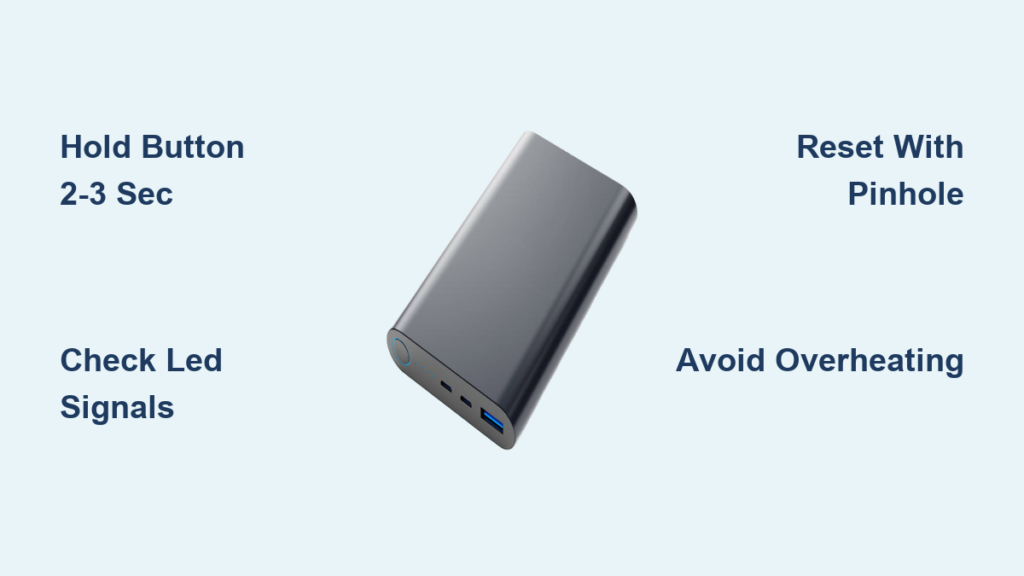
That tiny button on your power bank does far more than just turn it on—it’s your communication channel with the device’s intelligence. A quick tap (0.5-2 seconds) wakes the power bank from standby and shows your current battery level, while a firm 2-3 second hold fully activates charging mode. Many users fail because they’re tapping instead of holding—especially when the power bank has been stored for weeks. If you see LEDs flash once then go dark, you’ve only triggered the battery check, not activated charging mode.
Different brands use distinct timing requirements. Anker models typically need just 1.5 seconds for activation, while Baseus units often require a full 3-second press. Cheap generic power banks may respond inconsistently due to poor circuitry—this explains why your friend’s identical-looking unit works with a tap while yours needs a long press. Pro Tip: When activating after long storage, press and hold for 5 full seconds to wake dormant circuitry.
What Those Flashing LEDs Really Mean for Power Bank Status

LED indicators provide instant diagnostics if you know how to read them. Four solid lights mean 76-100% charge on most models, but a single blinking LED warns of critical issues like low battery (0-5%) or circuit protection activation. If your power bank shows two steady lights then suddenly shuts off, it’s likely in auto-shutdown mode triggered by insufficient load—common when charging low-power devices like wireless earbuds that draw less than 100mA.
Some advanced models like the Anker PowerCore 26K use color-coded LEDs: blue for normal operation, red for charging, and flashing red for errors. Watch for this critical pattern: Three rapid flashes followed by darkness indicates over-temperature shutdown—your power bank is too hot to operate safely. Never ignore these signals; they prevent battery damage that could render your unit permanently unresponsive.
The Correct Way to Turn On Any Power Bank Model
Why Holding the Button for 2 Seconds Is Critical (Not Just Tapping)
Tapping the power button once only checks battery status—it won’t activate charging mode on 90% of modern power banks. Your finger must apply continuous pressure for 2-3 seconds until all status LEDs illuminate steadily. This activates the internal DC-DC converter that regulates voltage for safe device charging. Cheap knockoffs often require longer presses (up to 5 seconds) due to inferior components—a sign you should consider upgrading to a quality brand.
If your power bank still won’t activate after proper pressing, connect it to a wall charger for 15 minutes—many units won’t power on when deeply discharged below 3%. Never use your computer USB port for initial activation, as the low 0.5A output often fails to wake dormant circuitry. Instead, use a 5V/2A wall adapter that provides sufficient current to trigger the power management system.
Troubleshooting Power Banks That Won’t Activate After Charging
When your power bank refuses to turn on despite recent charging, perform this diagnostic sequence:
- Check charging indicator lights—solid color means charging completed, flashing indicates active charging
- Press and hold for 5 full seconds while connected to power
- Try a different cable—frayed wires prevent proper communication
- Locate the reset button—most have a tiny pinhole requiring 10+ seconds of pressure
If still unresponsive, your unit may have triggered low-voltage protection from deep discharge. Connect it to a wall charger for 30+ minutes—some severely depleted units need extended “trickle charging” before the circuitry wakes up. Warning: If you smell burning or see swelling, stop immediately—this indicates dangerous battery damage requiring professional disposal.
Manual Power Bank Shutdown: When and How to Properly Turn Off
Why You Should Never Just Unplug Without Proper Shutdown
Leaving your power bank active after disconnecting devices wastes 5-15% of its stored energy through parasitic drain. Always manually power down by holding the button for 3-5 seconds until all LEDs extinguish. This clears the output circuit and prevents the common issue where your power bank shows full charge but dies instantly when you try to use it next time.
High-capacity models (10,000mAh+) suffer most from improper shutdowns—their larger batteries develop voltage imbalances when left in standby. Pro Tip: For power banks with multiple USB ports, disconnect all devices before shutdown to prevent back-feeding that confuses the protection circuitry. If your unit lacks a manual off function (common in ultra-compact models), it will auto-shutdown within 30-60 seconds of inactivity—just wait patiently.
Solving the Mystery of Power Banks That Won’t Turn Off
When your power bank stays lit after disconnecting devices, it’s usually fighting a “ghost load” from faulty cables or devices with active circuitry. First, unplug everything and hold the power button for 8-10 seconds—some models require extended presses to override stubborn connections. If LEDs persist, inspect your charging cables for frayed ends that cause intermittent contact.
For persistent issues, try this reset sequence:
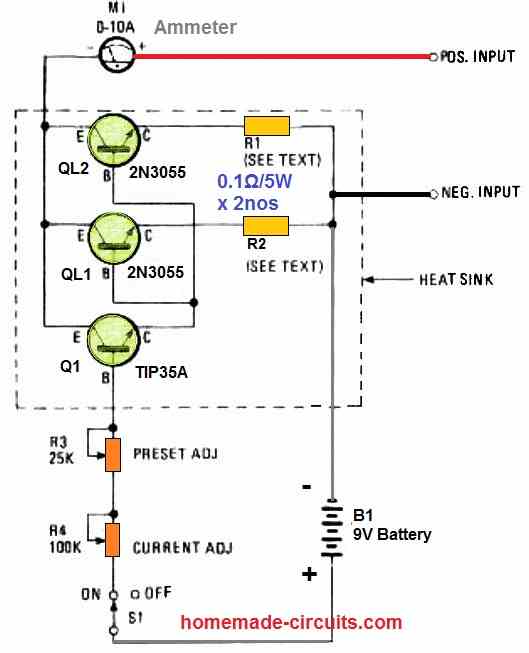
1. Fully discharge the power bank by connecting a resistor load
2. Charge to 100% using a quality wall adapter
3. Perform a hard reset with paperclip in the pinhole
4. Power on and immediately disconnect all devices
Critical Note: Never force shutdown by short-circuiting ports—this can permanently damage the protection circuitry and create fire hazards.
Understanding Auto-Shutdown: Why Your Power Bank Turns Off Unexpectedly
The 30-Second Rule: How Inactivity Triggers Automatic Power Down
Your power bank’s auto-shutdown isn’t a flaw—it’s essential battery protection. All quality units cut power after 30-180 seconds of inactivity to prevent deep discharge that permanently damages lithium cells. This explains why your unit dies when charging Bluetooth earbuds—their tiny 50mAh batteries charge in minutes, then the power bank senses “inactivity” and shuts down.
To defeat premature shutdowns with low-power devices:
– Use a “keep-alive” cable with built-in resistor
– Purchase power banks with dedicated low-current mode (labeled “Small Current” or “IoT Mode”)
– Activate continuous mode by holding the button for 10+ seconds (on compatible models)
Warning: Disabling auto-shutdown for extended periods drains your power bank 3-5x faster and generates excess heat—only bypass this feature when absolutely necessary.
Low-Current Devices That Trick Power Banks Into Thinking They’re Idle
Wireless earbuds, fitness trackers, and smartwatches often trigger false shutdowns because they draw less than 100mA—below most power banks’ minimum detection threshold. Samsung Galaxy Buds (drawing just 65mA) and Apple AirPods (80mA) are notorious culprits. The fix? Add a “dummy load” with a 1kΩ resistor across the USB port’s power pins, creating a constant 5mA draw that keeps the power bank active.
Premium solutions include:
– Anker PowerCore’s “Trickle Charge” mode (double-press power button)
– Baseus’s dedicated IoT port with 30mA minimum detection
– UGREEN’s programmable “Always On” setting via companion app
Without these features, your power bank will shut down mid-charge when powering tiny devices—a frustrating but easily solvable problem.
Keeping Your Power Bank Running Continuously for IoT and Security Devices
How to Bypass Auto-Shutdown with a Simple Resistor Trick
For security cameras or environmental sensors requiring constant power, create a “keep-alive” circuit with two components: a 1kΩ resistor (1/4W rating) and heat-shrink tubing. Safely connect the resistor across the USB port’s +5V (red) and GND (black) wires, creating a 5mA constant load that prevents auto-shutdown. This draws minimal power (0.025W) while keeping your power bank fully active.
Critical Safety Steps:
1. Power bank must be OFF during installation
2. Use only resistors rated for 5V operation
3. Insulate all connections with heat-shrink tubing
4. Never exceed 100mA dummy load (10Ω resistor)
Test with a multimeter first—your modified port should show 4.9-5.1V with 4-6mA constant draw. Warning: Cheap power banks may overheat with continuous use—monitor temperature during initial 24-hour test period.
Finding Models with Built-In “Always On” Mode for Critical Applications
Don’t risk DIY modifications when these purpose-built solutions exist:
– Anker PowerCore Essential 20K: Hold power button 10+ seconds for continuous mode
– RAVPower FileHub Pro: Dedicated “Always On” switch for security applications
– Jackery Bar Series: IoT mode activated via companion app
These models include thermal management and circuit protection specifically designed for 24/7 operation. Pro Tip: When using continuous mode, keep your power bank in a well-ventilated area and check temperature every 2 hours during initial use—sustained operation above 40°C (104°F) degrades battery health rapidly.
Power Bank Battery Level Secrets: Beyond Basic LED Indicators
Interpreting Precise Charge Levels from Standard 4-Light Systems
That four-LED indicator lies to you—each light actually represents 20-25% capacity, not the 25% you assume. When the third LED blinks during use, you’re at 50-55% charge, not 75%. Critical Insight: The final LED often stays lit until 15-20% remaining, creating dangerous “sudden death” scenarios where your power bank dies minutes after showing “one bar.”
Premium models combat this with:
– Anker PowerCore: Pulse lighting indicates exact 5% increments
– Zendure SuperTank: Digital percentage display via OLED screen
– Eloop: Voice announcements of remaining capacity
For basic units, calibrate your perception: three solid lights mean “plenty of juice,” two lights mean “find a charger soon,” and one blinking light means “critical—charge immediately.”
Why Your Power Bank Shows Full Charge But Dies Quickly
If your power bank dies after charging one device despite showing four solid lights, it’s suffering from voltage depression—a common issue in aging lithium batteries. The cells maintain surface voltage (tricking the indicator) but collapse under load. Test it: Connect a 2A load (like a tablet) and watch the LED count drop rapidly within minutes.
This indicates your battery has lost 30-40% of its original capacity—time for replacement. Temporary fix: Perform a full conditioning cycle—discharge completely, wait 10 minutes, then charge to 100% at 0.5C rate. Repeat monthly to maximize remaining lifespan, but know that significantly degraded units can’t be fully restored.
Troubleshooting Power Bank On/Off Failures: Step-by-Step Fixes
The 10-Second Reset Trick for Unresponsive Power Banks
When your power bank becomes completely unresponsive, perform this emergency reset:
1. Locate the tiny reset pinhole (usually near USB ports)
2. Insert straightened paperclip and hold for 10-15 seconds
3. Remove and wait 30 seconds for capacitors to discharge
4. Press power button for 5 full seconds
This clears the protection circuit’s error state—effective for 80% of “bricked” units. If still dead, connect to a wall charger for 1 hour before retrying. Never use car chargers for reset attempts—their unstable voltage often worsens the problem.
When Your Power Bank Turns Off While Charging a Device
This frustrating issue usually means one of three problems:
– Overload protection triggered (device drawing more current than rated)
– Overheating (unit exceeding 45°C/113°F safety threshold)
– Poor cable connection (intermittent contact mimics “no load”)
Immediate solution: Disconnect everything, let the power bank cool for 15 minutes, then reconnect with a high-quality cable. If the problem persists, try charging a different device—your original gadget may have a faulty charging circuit. Critical Warning: If the unit feels hot to touch, stop immediately—continued use risks thermal runaway.
Charging Your Power Bank Correctly to Ensure Reliable Operation
Why Using the Right Charger Affects Power Bank On/Off Behavior
Your wall charger’s output quality directly impacts power bank responsiveness. Cheap chargers with unstable voltage confuse the power management system, causing erratic on/off behavior. Always use a 5V/2A+ charger with certification marks (CE, FCC, RoHS)—the extra 0.4A over standard phone chargers provides stable input the power bank needs for reliable operation.
Pro Tip: For power banks with USB-C input, use the cable that came with it—third-party cables often lack the E-Marker chip required for proper communication. A $2 knockoff cable might save money now but cause mysterious shutdowns later.
How to Know When Your Power Bank Is Fully Charged
Don’t trust the “solid light” indicator—many units show “full” at 90-95% to extend battery life. True full charge indicators:
– Solid blue light (Anker models)
– All four LEDs steady (most basic units)
– Specific color change from red to green
Critical Insight: Stop charging when indicators show full—continued charging stresses lithium cells. Set a timer for 1.5x the estimated charge time (e.g., 6 hours for 10,000mAh unit) as a safety backup. Never leave power banks charging overnight—this is the #1 cause of accelerated battery degradation.
Safety Practices When Operating Power Banks
Temperature Dangers That Cause Unexpected Shutdowns
Your power bank automatically shuts down at 45-50°C (113-122°F) to prevent thermal runaway. Warning signs before shutdown:
– Sudden performance drop (devices charge slower)
– Subtle burning smell from vents
– Visible swelling or warping
Prevention tactics:
– Never leave in direct sunlight (car dash reaches 70°C/158°F in 30 mins)
– Remove thick cases during charging
– Place on cool surface like ceramic tile
– Limit simultaneous multi-port use in hot environments
If your unit shuts down from overheating, let it cool for 2 hours before reuse—forcing operation risks permanent damage.
What to Do When Your Power Bank Feels Hot During Operation
A slightly warm power bank is normal, but excessive heat requires immediate action:
1. Disconnect all devices immediately
2. Move to cool, hard surface away from flammables
3. Do NOT place in refrigerator (condensation risk)
4. Monitor for 15 minutes—if cooling, inspect cables for damage
Critical Warning: If heat persists after disconnecting, or you smell burning, place the unit in a non-flammable container outdoors and contact the manufacturer. Swollen or overheating power banks can enter thermal runaway within minutes—a serious fire hazard.
Long-Term Power Bank Storage: Preserving On/Off Functionality
The Ideal Charge Level for Storage to Prevent Power Button Failure
Storing your power bank at 100% charge for months causes voltage stress that degrades the battery management system—often manifesting as unresponsive power buttons. Always store at 50-60% charge—this maintains cell stability without stressing protection circuits. Use this simple storage sequence:
- Charge to 60% (three solid LEDs on 4-light system)
- Power on and off once to clear circuit memory
- Store in cool, dry place away from metal objects
- Check every 3 months and recharge to 60% if needed
Pro Tip: Place a small silica gel packet in the storage bag to absorb moisture—humidity corrodes internal contacts causing power button failures.
How Often to Power Cycle Stored Units to Maintain Functionality
Even in storage, power banks need periodic “exercise” to maintain button responsiveness. Follow this maintenance schedule:
– 1-3 months storage: Power on/off cycle every 3 months
– 3-6 months storage: Full discharge/recharge cycle monthly
– 6+ months storage: Professional inspection before reuse
Perform this quick check monthly: Press the power button and verify LEDs respond within 1 second. Slow response indicates developing issues—you have time to recharge before permanent damage occurs. Never store power banks fully discharged—this triggers deep discharge protection that often requires specialized equipment to reset.
Final Note: Mastering power bank operation isn’t just about pressing buttons—it’s understanding the intelligent systems protecting your investment. By following these precise on/off techniques and maintenance practices, you’ll extend your power bank’s lifespan by 2-3 years while avoiding frustrating shutdowns. Remember the golden rule: always power down manually after use, store at 50-60% charge, and never ignore temperature warnings. For your next purchase, consider models with dedicated IoT modes if you regularly power low-current devices—this single feature prevents 90% of unexpected shutdown headaches. Keep this guide bookmarked for quick reference the next time your power bank behaves unexpectedly.


