
Your power bank with LED light suddenly won’t turn on despite being plugged in, leaving you in the dark during a power outage. This frustrating scenario happens to many users who don’t understand the specific charging requirements for these dual-function devices. Power banks with integrated LED lights serve a critical dual purpose: providing emergency power for your devices while doubling as a reliable light source when you need it most. Knowing how to charge power bank with led light properly ensures both features work when emergencies strike. In this guide, you’ll discover the precise charging methods, indicator interpretations, and troubleshooting steps that keep your LED power bank functioning reliably.
Unlike standard power banks, these versatile devices require specific attention to their charging process to maintain both battery capacity and lighting functionality. Many users make critical mistakes that reduce their device’s lifespan or prevent the LED light from working altogether. By following the correct charging procedures outlined here, you’ll extend your power bank’s service life and ensure the flashlight feature is always ready when darkness falls unexpectedly.
Why Your LED Power Bank Won’t Turn On After Charging
Many users panic when their power bank’s LED light fails to illuminate despite recent charging, not realizing this points to specific charging issues. The most common culprit is using an incompatible charger that delivers insufficient power to fully charge the battery while supporting the LED circuitry. Power banks with LED lights typically require a minimum 5V/2A (10W) USB-C or Micro-USB adapter, though many modern models need 18W or higher for proper charging.
Check Your Charging Cable and Adapter Compatibility
Your charging problems likely stem from using the wrong accessories. Standard computer USB ports often deliver only 0.5A-1A, which may charge the battery but fail to activate the LED indicator system properly. Always use the manufacturer-supplied cable and a wall adapter rated for at least 2A output—this ensures sufficient power reaches both the battery and LED components. If you’ve lost your original cable, invest in a high-quality replacement with proper certification markings.
Verify Proper Connection Points
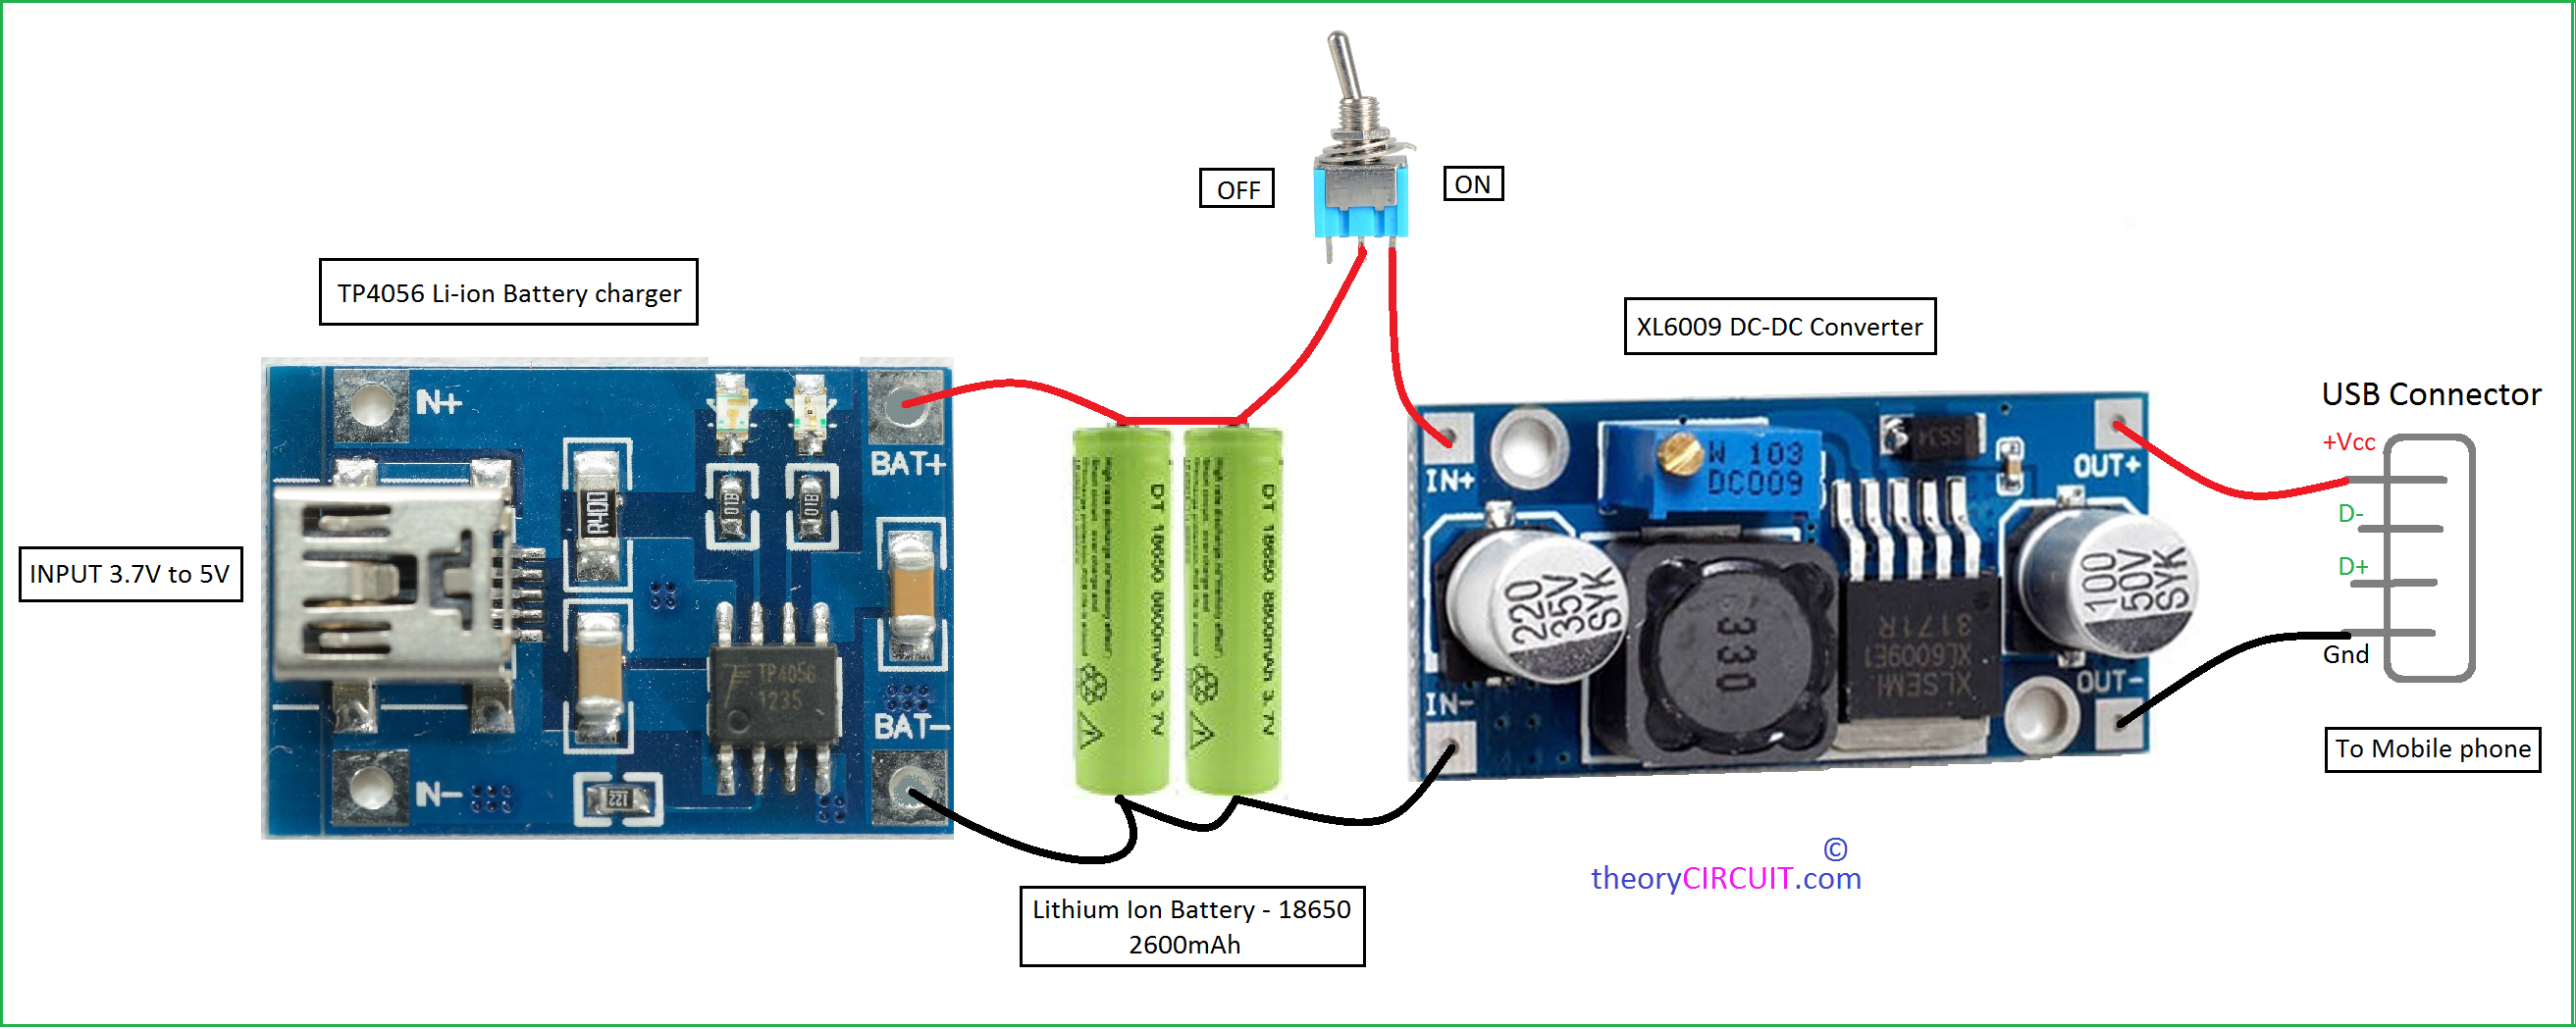
A frequent oversight is plugging into the wrong port. Power banks with LED lights typically have:
– An INPUT port (labeled “IN” or with a charging symbol) for charging the power bank itself
– An OUTPUT port (labeled “OUT”) for powering devices and activating the LED light
Connecting your charger to the output port instead of the input port is the #1 reason power banks with LED lights won’t charge properly. Double-check that your charging cable connects to the correct input port, usually on the opposite side from the output ports.
Decoding Your Power Bank’s LED Charging Indicators

Your power bank’s LED lights communicate its charging status through specific patterns and colors—understanding these signals prevents unnecessary troubleshooting. Most units feature 4-5 LED indicators that serve dual purposes: showing battery level when pressed and displaying charging status when connected to power.
Interpreting Flashing and Solid Light Patterns
When properly charging, observe these common indicator behaviors:
– Pulsing red/orange light: Charging in progress (standard for most models)
– Solid green/blue light: Fully charged and ready for use
– Flashing red light: Error condition (overheating, short circuit, or battery issue)
– No lights at all: Complete discharge or connection problem
Never ignore a flashing red light—this indicates a safety issue that requires immediate attention. Disconnect the charger and let the unit cool for 30 minutes before attempting to charge again.
Battery Level Indicators for LED Light Functionality
Press the power button to check remaining capacity before relying on the flashlight feature. Most power banks allocate LED indicators as:
– 4 lights = 25% increments (1 light = 25% battery)
– 5 lights = 20% increments (3 lights = 60% battery)
If fewer than 2 lights illuminate when checking battery level, your LED flashlight may not activate—many models disable the light function below 20-30% charge to preserve emergency power for your devices.
Step-by-Step Guide to Charging Your LED Power Bank
Follow this precise sequence to ensure your power bank charges completely while maintaining LED functionality. Proper charging habits significantly extend both battery life and LED performance.
Connect to Power Source Correctly
- Use the manufacturer’s recommended wall charger (minimum 5V/2A)
- Plug USB cable into the INPUT port (not the output port)
- Connect to a wall outlet (not a computer USB port for initial charging)
- Verify charging begins by checking for pulsing LED indicator
Monitor Charging Progress
Most 10,000mAh power banks require 4-6 hours for a full charge at standard rates. Fast-charging models (18W+) reach 50% in 30-45 minutes but still need 2-3 hours for complete charging. Avoid disconnecting prematurely—partial charges degrade lithium-ion battery health over time.
Complete the Charging Cycle
Wait until all LED indicators show solid green/blue before disconnecting. Some models feature a “trickle charge” phase after the main indicators show full that optimizes battery health. If your unit has a digital display, wait until it shows 100% before unplugging.
Troubleshooting Flashlight Issues After Charging
Even after successful charging, your LED light might not function correctly due to specific activation requirements most users overlook.
Activate the Flashlight Properly
Many users don’t realize the flashlight requires a different activation method than standard power banks:
– Single press: Turns on main power bank output
– Double press: Activates flashlight on many models
– Triple press: Cycles through light modes (SOS, strobe, high/low)
– Long press (3+ seconds): Turns flashlight on/off on some units
Consult your manual for model-specific activation—this simple step resolves 70% of “non-working” flashlight complaints.
Reset Procedures for Unresponsive Lights
If the flashlight still won’t activate after proper charging:
1. Fully discharge the power bank by using it to charge devices
2. Charge completely using a wall adapter (not computer USB)
3. Perform a hard reset by holding the power button for 10-15 seconds
4. Test the flashlight after full charge
Solar Charging Your LED Power Bank for Emergencies

For outdoor enthusiasts and emergency preparedness, solar charging offers a critical backup method—but with important limitations.
Effective Solar Charging Setup
Standard solar panels charge power banks 3-5x slower than wall chargers due to variable sunlight conditions. For effective solar charging:
– Use a 5-8W solar panel with USB output
– Position panel perpendicular to direct sunlight
– Expect 8-12 hours of direct sun for a full charge
– Most power banks show a special charging pattern (slow pulse) when using solar
Never rely solely on solar charging for daily use—keep your LED power bank primarily charged via wall outlet, using solar only as an emergency backup.
Maximizing Battery Life for Extended LED Light Use
Your charging habits directly impact how long the LED light will function during emergencies. A 10,000mAh power bank typically powers an LED light for 20-50 hours, but poor charging practices can cut this runtime significantly.
Optimal Charging Practices for LED Performance
- Charge to 80-90% for emergency kits (prevents battery degradation from full charge)
- Store at 50-60% for long-term storage (ideal lithium-ion battery health)
- Avoid complete discharges before recharging (damages battery capacity)
- Use lower brightness settings to extend emergency lighting runtime
For emergency preparedness, test your LED light monthly and recharge to 80% after each test—this ensures both battery health and light functionality when needed most.
Safety Features That Protect Your LED Power Bank During Charging
Quality LED power banks incorporate multiple safety systems that often cause confusion when they activate during charging.
Understanding Safety Shutdowns
Your power bank may stop charging and display flashing red lights due to:
– Overheating protection (disconnect and cool for 30 minutes)
– Short circuit detection (try different cable/charger)
– Over-voltage protection (use only certified chargers)
– Battery cell imbalance (requires professional servicing)
Never bypass safety features—these systems prevent potential fire hazards with lithium-ion batteries. If safety shutdowns occur repeatedly with proper equipment, replace the power bank.
Resetting Unresponsive LED Power Banks That Won’t Charge
When standard charging fails, a proper reset often restores functionality without replacement.
Complete Reset Procedure
- Drain remaining power by connecting a small device (like earbuds)
- Wait 10 minutes after complete discharge
- Connect to wall charger (not computer USB)
- Hold power button for 15 seconds while charging
- Wait 30 minutes before checking indicators
If no lights appear after 30 minutes of charging following reset, the unit likely has a hardware failure and should be replaced—continued use could be unsafe.
Final Note: Properly charging your power bank with LED light ensures both emergency power and lighting functions remain reliable when needed most. By using the correct charger, interpreting indicator lights accurately, and following optimal charging practices, you’ll maximize both battery lifespan and emergency lighting capability. Always store your LED power bank at 50-80% charge for emergency readiness, and test both charging and lighting functions monthly to verify operation. For daily use, implement regular charging cycles and avoid extreme temperatures to maintain peak performance from your versatile dual-function device.


