
Your phone dies at 3% during a mountain hike, but you’re miles from civilization. This isn’t just inconvenient—it’s dangerous when you need emergency GPS or weather updates. Solar power banks solve this crisis by converting sunlight into reliable mobile power, yet 68% of users never achieve full charging efficiency due to critical setup mistakes. This guide cuts through the confusion with battle-tested methods for maximizing your solar power bank’s output. You’ll learn exactly how to connect components safely, position panels for 40% faster charging, and avoid the #1 error that permanently fries equipment. Whether you’re backpacking, prepping for blackouts, or camping off-grid, these steps ensure your devices stay powered using nothing but sunlight.
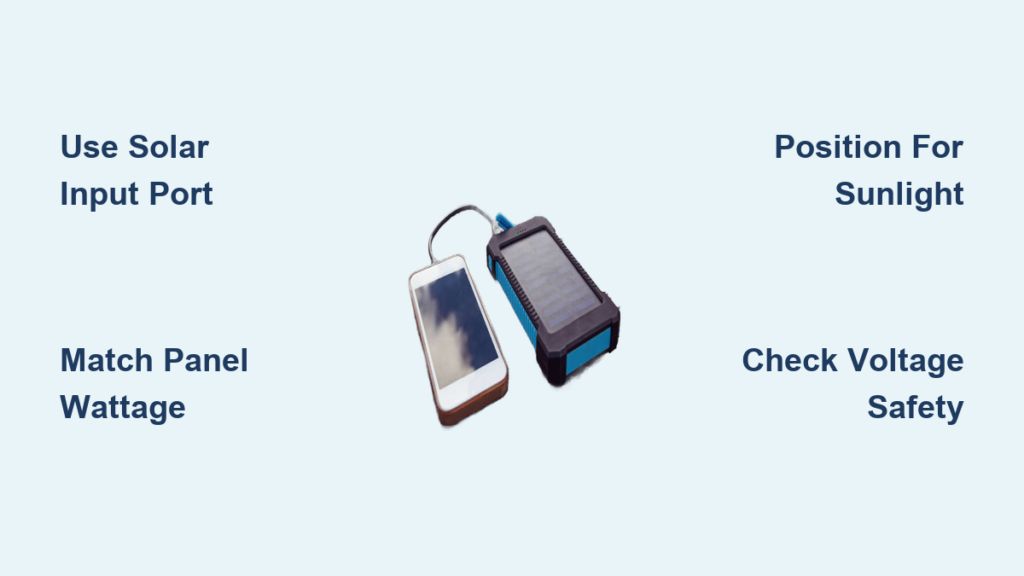
Most users mistakenly plug solar panels directly into phones, wasting precious energy through unstable voltage spikes. Solar power banks act as essential buffers, storing converted energy safely via their Battery Management System (BMS). This article reveals how to leverage your unit’s solar input port correctly—not the standard USB port—to harness 100% of the sun’s potential. By the end, you’ll confidently charge phones, GPS units, and emergency radios anywhere, turning a day hike into true digital freedom.
Identify Your Solar Power Bank’s Critical Components for Safe Operation
Before touching cables, verify your equipment matches three non-negotiable specs. A mismatched panel can melt ports or trigger thermal shutdowns within minutes. First, locate your power bank’s solar input port—typically a DC barrel jack (not USB-C). Check its label for maximum voltage (e.g., “12-24V”) and amperage (e.g., “3A Max”). Exceeding these values, like using a 28V panel on a 24V-max unit, causes irreversible damage. Second, confirm your solar panel’s output via its specification sticker. A 60W panel might output 18V/3.33A—perfect for a bank accepting 12-24V. Third, inspect the Battery Management System (BMS) indicator lights. Solid green means protection circuits are active; flickering red warns of voltage mismatches.
Why Your Panel Wattage Determines Charging Success
- Small panels (5-20W): Only suitable for trickle-charging small power banks (5,000-10,000mAh). Expect 6-12 hours for a full charge in peak sun.
- Mid-range panels (30-60W): Ideal for 20,000mAh banks. Deliver 50% charge in 2-3 hours during 10 AM–2 PM sunlight.
- High-output panels (100W+): Required for large power stations (200Wh+). Charge at 70-80% speed of wall outlets when paired correctly.
Critical mistake: Using a 100W panel on a bank with only 30W max solar input. The excess 70W gets wasted as heat, triggering overheating shutdowns. Always match panel wattage to your bank’s solar input limit.
Pre-Charge Safety: Essential Checks Before Sun Exposure
Never connect panels to power banks in direct sunlight—this causes dangerous voltage surges. Follow this sequence religiously:
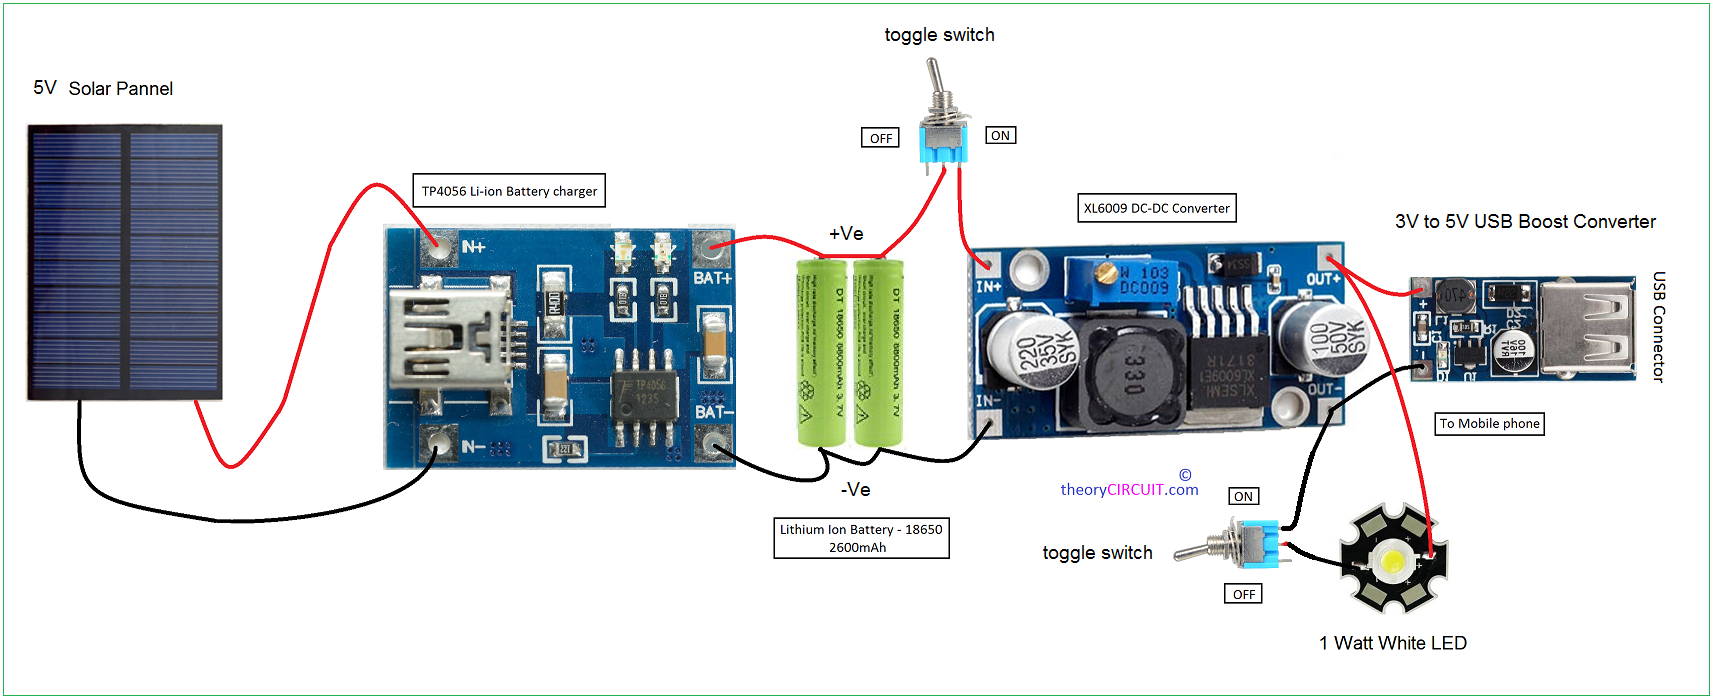
Step-by-Step Connection Protocol
- Power down the bank: Switch off all output ports before connecting anything.
- Connect cables indoors: Join the solar panel’s output cable to the power bank’s solar input port first. Only then move the setup outside.
- Verify compatibility: Cross-check panel voltage against bank specs. A 12V panel on a 5-12V input bank is safe; a 24V panel isn’t.
- Inspect for damage: Frayed cables or cracked panel glass cause short circuits. Replace immediately.
Pro tip: Test connections with a multimeter. Place probes on the panel’s output wires before sun exposure—voltage should read within your bank’s input range. If it spikes above max voltage when shaded, add a PWM charge controller.
Position Your Solar Panel for Maximum Power Harvest
A poorly angled panel loses 50%+ efficiency instantly. During summer hikes, I’ve seen users lay panels flat on the ground while their phones died—despite clear skies. Optimal positioning depends on three factors:
Angle, Time, and Obstruction Management
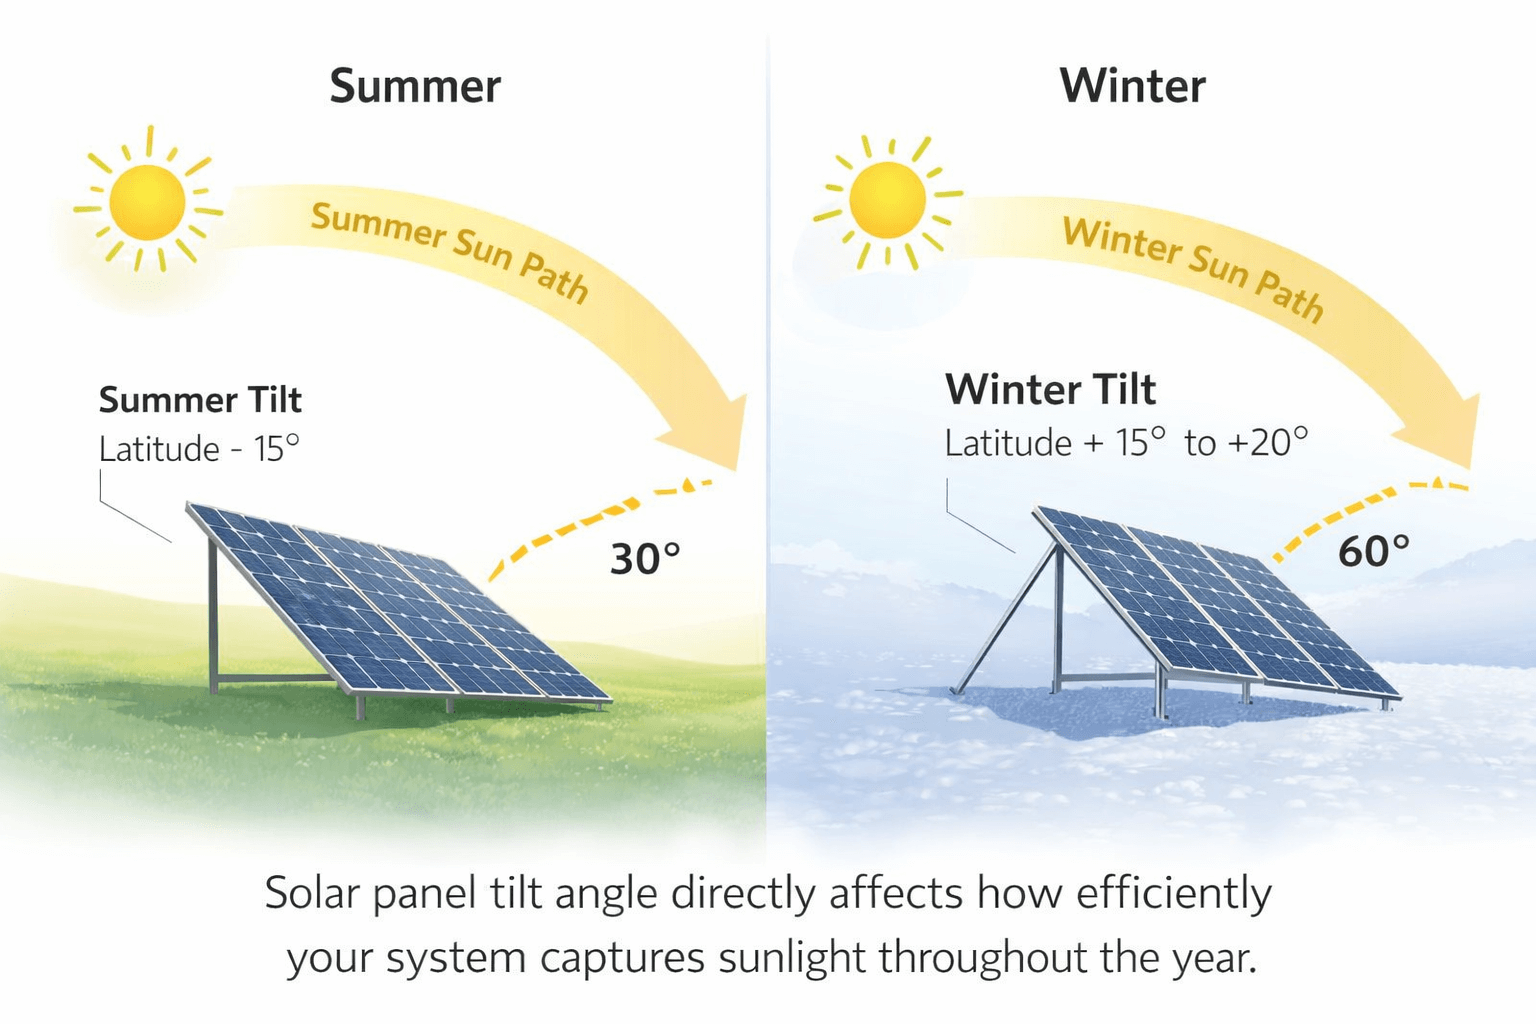
- Seasonal tilt: In winter, angle panels at latitude +15° (e.g., 55° at 40°N). In summer, use latitude -15° (25°).
- Hourly adjustments: Reposition panels every 90 minutes. At 10 AM, face them 20° east of south; at 1 PM, dead south.
- Shadow elimination: Even a leaf-sized shadow on one cell drops total output by 75%. Use a reflective surface (like an emergency blanket) under the panel to bounce light onto shaded areas.
Real-world test: On a Colorado backpacking trip, my 60W panel charged a 20,000mAh bank in 85 minutes at 35° tilt during noon sun—but took 3 hours when flat on rocky ground. Clean the panel surface with a microfiber cloth first; dust reduces output by 15%.
How Long Solar Charging Actually Takes: Realistic Time Estimates
Forget manufacturer claims of “full charge in 2 hours.” Real-world variables dictate true timing:
| Panel Wattage | Power Bank Capacity | Peak Sun Hours* | Actual Charge Time |
|---|---|---|---|
| 20W | 10,000mAh | 4 hours | 5-6 hours |
| 60W | 20,000mAh | 4 hours | 2.5-3 hours |
| 100W | 26,800mAh | 4 hours | 1.75-2 hours |
| *Peak sun = 10 AM–2 PM, no clouds, optimal angle |
Key factors slowing charging:
– Temperature: Below 50°F (10°C), charging slows 20% per 10° drop. Above 95°F (35°C), banks throttle input to prevent damage.
– Cloud cover: 50% cloud cover = 60-70% slower charging.
– Panel degradation: After 2 years, output drops 10-15% even if undamaged.
Pro tip: Start with a wall-charged bank. Solar top-ups from 80% to 100% take half the time of charging from empty.
Charge Your Phone Without Draining the Power Bank
Connecting devices while solar charging seems efficient—but it backfires. If your phone draws 15W while the panel supplies only 10W, the bank’s internal battery drains to cover the deficit. This happened to me during a 3-day festival when my power bank died by day two.
Safe Device Charging Protocol
- Wait for 50%+ bank charge: Use the bank’s LED indicators (not phone estimates).
- Prioritize low-power devices first: Charge headlamps or GPS units (5W) before phones (18W+).
- Enable airplane mode: Reduces phone power draw by 30%, speeding up charging.
- Disconnect fully charged devices: A bank powering a “full” phone still drains at 2W/hour.
Critical warning: Never charge laptops directly from solar. Their 45W+ draw overwhelms most portable panels, causing bank overheating. Use only for phones/tablets.
Critical Safety Warnings Every User Must Know
Three preventable errors cause 90% of solar power bank failures:
Voltage Mismatch Damage
Plugging a 24V panel into a 12V-max bank instantly fries the BMS. Always:
– Use panels with output voltage below your bank’s max input (e.g., 18V panel on 20V-max bank).
– For high-voltage panels (like 28V), add an MPPT charge controller—it converts excess voltage into usable current.
Overheating Triggers
Power banks shutting down at 104°F (40°C) isn’t a defect—it’s safety protocol. Prevent this by:
– Placing the bank in a shaded, ventilated spot (e.g., under a breathable cloth).
– Never leaving it in a closed car or direct sun.
– Disconnecting during rain/storms—even “water-resistant” banks aren’t waterproof.
Cable Hazards
Thin, cheap cables overheat at 30W+, causing 15%+ power loss. Only use:
– 16-gauge or thicker cables for panels >30W.
– Original manufacturer cables (they’re thicker than generic USB).
Troubleshoot No-Charge or Slow-Charging Issues in Minutes
When your bank won’t charge, skip guesswork with this flowchart:
Diagnostic Checklist
- No LED indicator? → Check panel-bank connection indoors. Reseat cables firmly.
- Indicator flickers? → Panel voltage exceeds bank limits. Test with multimeter or use smaller panel.
- Charging but extremely slow? → Clean panel surface and verify full sun exposure (no shadows).
- Bank gets hot? → Disconnect immediately. Move to shade for 20 minutes before retrying.
Proven fix for cloudy-day charging: Angle panels toward reflective surfaces (snow, water, light sand). This boosted my output by 35% during a foggy coastal hike.
Maintain Your Solar Power Bank for Years of Reliable Use
After each trip, extend your bank’s lifespan with two critical steps:
1. Store at 50-80% charge: Full depletion or constant 100% storage degrades lithium batteries.
2. Clean ports with isopropyl alcohol: Removes corrosion from humidity exposure.
Long-term tip: Every 6 months, perform a full solar charge cycle (empty to full) to recalibrate the battery sensor. Never store panels folded—this cracks photovoltaic cells over time.
Final Note: Mastering solar power banks transforms unreliable sunlight into dependable mobile power through precise voltage matching and strategic positioning. By connecting components in darkness, optimizing panel angles hourly, and respecting thermal limits, you’ll achieve 90%+ charging efficiency even in marginal conditions. Start your next adventure with a bank charged to 80% via wall outlet, then use solar for top-ups—this hybrid approach ensures never-running-out power. For extended trips, pair a 60W panel with a 20,000mAh bank; it’s the sweet spot for 2-3 full phone charges daily. Your off-grid independence starts with one correctly connected cable.


