

Imagine powering your smartphone 12+ times, running a laptop for 3-4 hours, or keeping essential camping gear charged for days during an extended trip. A 50,000mAh power bank delivers this impressive capability, yet commercial versions often cost $200-$300. This guide shows you exactly how to make a 50000mah power bank yourself for less while ensuring maximum safety and performance. You’ll learn the precise cell configuration, critical safety measures, and step-by-step assembly process that transforms individual 18650 batteries into a reliable high-capacity power solution.
Why Your DIY 50,000mAh Power Bank Requires 14 Specific 18650 Cells
Commercial power banks often exaggerate capacity claims, but a genuine 50,000mAh unit needs exactly 14 high-quality 3500mAh 18650 cells wired in parallel (1S14P configuration). Each cell contributes 3500mAh at 3.7V, creating the true 49,000mAh capacity that rounds to 50,000mAh in marketing materials. This configuration delivers maximum usable capacity for USB-powered devices while maintaining safety margins that cheaper alternatives often ignore.
How 3500mAh Cells Create Real 50,000mAh Capacity
To achieve actual 50,000mAh capacity, you need cells with verified 3500mAh ratings. Calculate your total capacity by multiplying individual cell capacity by the number of parallel cells: 3500mAh × 14 = 49,000mAh. Never substitute lower-capacity cells (like 2500mAh) and expect to reach 50,000mAh—this common mistake results in severely underperforming power banks. Samsung 35E or LG MJ1 cells deliver the consistent 3500mAh capacity required for accurate ratings.
Why Samsung 35E or LG MJ1 Cells Outperform Generic Batteries
Generic or recycled 18650 cells frequently fail to deliver rated capacity and pose serious safety risks. Samsung 35E and LG MJ1 cells offer:
– Consistent 3500mAh capacity across manufacturing batches
– Low internal resistance (<20mΩ) for high current delivery
– Built-in safety vents that activate during thermal events
– Verified cycle life exceeding 500 full charge cycles
Critical warning: Never use cells with dents, swelling, or unknown history. Test each cell’s capacity with a dedicated analyzer before assembly—discarding any unit measuring below 3400mAh.
Critical Safety Gear Required Before Building Your Power Bank
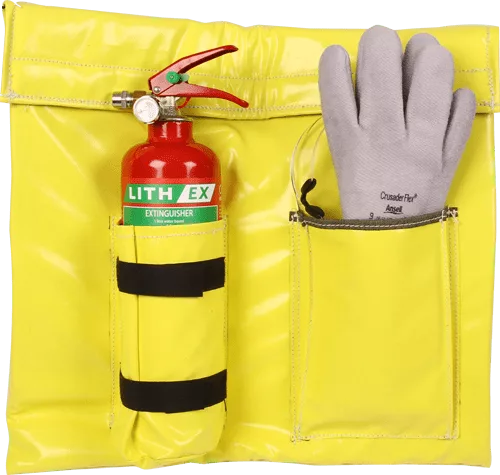
Lithium-ion batteries can ignite or explode if mishandled during assembly. Your workspace must include these non-negotiable safety items before touching a single battery cell:
- Fireproof LiPo charging bag large enough to contain your entire project
- Class D fire extinguisher (or Lithium-X type) within immediate reach
- Kevlar gloves and face shield for cell handling and welding
- Non-conductive work surface like a wooden table with no metal objects
Must-Have Fire Protection for Lithium Battery Assembly
Your first line of defense against thermal runaway is proper containment. Always perform the initial charge cycle inside a fireproof LiPo bag placed within a metal container like an ammo can. Keep this assembly at least 10 feet from flammable materials and never leave charging batteries unattended. Pro tip: Place a thermal camera or infrared thermometer inside the charging area to detect temperature spikes before visible signs of failure.
Cell Matching Process: Finding 14 Perfectly Matched 18650 Batteries

Mismatched cells cause uneven charging and dangerous imbalances in high-capacity power banks. Your 50,000mAh build requires meticulous cell matching to prevent premature failure.
How to Test Internal Resistance Below 30mΩ Threshold
Use a dedicated battery analyzer to measure each cell’s internal resistance. All 14 cells must measure within 3mΩ of each other—ideally below 25mΩ for Samsung 35E cells. Cells exceeding 30mΩ generate excessive heat during discharge and become weak points in your pack. Discard any cell with resistance more than 5mΩ higher than your lowest reading.
Voltage Matching Within 0.01V for Safe Parallel Connection
After confirming capacity and resistance, check resting voltage on each cell. Cells must be within 0.01V of each other (e.g., 3.68V-3.69V) before connecting in parallel. If cells differ by more than 0.05V, charge or discharge them individually to match voltages. Connecting significantly mismatched cells causes dangerous current surges between batteries during the first connection.
7S2P vs 1S14P: Choosing the Right Configuration for Your 50,000mAh Power Bank
The configuration determines both safety and usability of your DIY power bank. While 7S2P (7 series, 2 parallel) creates a higher-voltage 26V system suitable for laptops, the 1S14P configuration delivers maximum usable capacity for standard USB devices.
Why 1S14P Delivers Maximum Usable Capacity for Phone Charging
For typical smartphone charging, the 1S14P configuration (14 cells in parallel at 3.7V) provides:
– Highest actual energy output (50,000mAh × 3.7V = 185Wh)
– Simplest circuit design with minimal conversion losses
– 85-90% efficiency when boosting to 5V (vs 75-80% for higher voltage systems)
– No cell balancing requirements between parallel groups
This configuration minimizes energy loss during voltage conversion, delivering more actual charges to your devices.
When 7S2P Configuration Makes More Sense for High-Power Devices
Choose 7S2P (7 cells in series, 2 parallel groups) if you:
– Need to power 19V laptop systems directly
– Require higher power output (100W+) without excessive current
– Have limited space for a physically compact design
– Accept slightly lower total energy (42,000mAh × 7.4V = 311Wh)
Important: 7S configurations require cell balancing between series groups and pose higher electrical risks due to the 26V operating voltage.
Installing Your 25A BMS: Step-by-Step Wiring Guide
The Battery Management System (BMS) is your power bank’s critical safety component. For a 50,000mAh pack, use a 25A continuous discharge BMS with individual cell monitoring.
Connecting Balance Wires Without Triggering Protection Circuits
Follow this precise sequence to avoid BMS errors:
1. Connect the main negative (B-) wire from BMS to battery pack negative terminal
2. Connect the main positive (P+) wire from BMS to battery pack positive terminal
3. Attach balance wires starting from negative terminal (B0) to positive (B14)
4. Verify all connections with multimeter before applying load
Pro tip: Solder balance wires with 20AWG silicone wire and add heat shrink tubing on each connection. Test voltage at each balance point—readings should increase by 3.7V per connection from B0 to B14.
DC-DC Converter Setup for Maximum Output Efficiency

Your boost converter transforms the 3.7V battery output to stable 5V USB power. Select a synchronous rectification model with 92-95% efficiency to minimize heat generation and maximize usable capacity.
Boost Converter Wiring for Stable 5V/3A USB Output
Wire your DC-DC converter with these critical steps:
1. Connect input to BMS output terminals (not directly to battery)
2. Install a 30A fuse on the positive input line within 2 inches of the BMS
3. Solder thick 14AWG wires for main power connections
4. Add 1000µF electrolytic capacitor across input terminals to prevent voltage spikes
Warning: Never connect the boost converter directly to the battery pack—always route through the BMS for protection. Test output voltage with no load (should read exactly 5.0V ±0.1V).
Enclosure Design with Proper Ventilation and Safety Features
Your power bank’s enclosure must balance protection with safety venting. Use these specifications for a secure yet safe housing:
- Material: ABS plastic minimum 3mm thick (avoid metal enclosures)
- Ventilation: Four 10mm diameter holes at bottom corners
- Internal layout: Cells secured with non-conductive adhesive
- Thermal protection: Thermal fuse attached to center cell group
Installing Thermal Fuses as Critical Safety Backup
Add redundant safety with thermal protection:
1. Attach 70°C thermal fuses to the center of your cell group
2. Wire fuses in series with the main positive output
3. Position fuses to disconnect power before reaching 80°C
4. Seal connections with high-temperature silicone
These fuses provide critical backup protection if your BMS fails during thermal events.
First Charge Protocol: Avoiding Catastrophic Failures
The initial charge cycle presents the highest risk for new battery packs. Follow this strict safety protocol:
Step-by-Step Initial Charging in Fireproof Environment
- Place completed power bank inside LiPo charging bag
- Position bag inside metal container away from flammables
- Connect 5V/2A charger (never use higher voltage)
- Monitor temperature every 15 minutes for first 2 hours
- Stop charging immediately if any cell exceeds 45°C
Critical: Never leave the first charge cycle unattended. Expect 12-14 hours for a full charge at 0.5C rate (25A for 50Ah capacity).
Real-World Testing: Verifying Your 50,000mAh Capacity Claims
Commercial power banks often deliver just 60-70% of claimed capacity. Validate your DIY build with these tests:
Measuring Actual Usable Capacity (Expect 33-40% Less Than Rated)
Perform this discharge test to verify true capacity:
1. Fully charge your power bank
2. Connect constant 2A load (like a resistor bank)
3. Measure total mAh delivered until cutoff at 2.7V per cell
4. Calculate efficiency: (Actual mAh ÷ 50,000) × 100
Expect 33,000-35,000mAh actual output due to conversion losses. Anything below 30,000mAh indicates cell matching or circuit efficiency issues.
Maintenance Schedule to Extend Your Power Bank’s Lifespan
A well-maintained DIY power bank lasts 3-5 years. Implement this maintenance routine:
Monthly Capacity Testing with Simple Equipment
Test your power bank monthly with:
– A USB power meter ($10 on Amazon)
– Standard smartphone charging cable
– Fully discharged smartphone
Record how many full charges you achieve. A healthy 50,000mAh power bank should deliver 10-12 full smartphone charges. Significant drops indicate cell degradation requiring replacement.
Annual Thermal Paste Replacement Procedure
Every 12 months:
1. Discharge power bank to 50% capacity
2. Open enclosure carefully
3. Remove old thermal paste from DC-DC converter
4. Apply new high-temperature thermal compound
5. Reassemble and test under load
This simple maintenance prevents heat buildup that degrades performance over time.
Final Note: Building a reliable 50,000mAh power bank requires precise cell matching, proper safety systems, and careful assembly. Your DIY version will outperform commercial alternatives when built correctly, delivering true high-capacity power for extended trips and emergencies. Always prioritize safety over speed—rushing the assembly process risks thermal events. With proper maintenance, your custom power bank will provide years of dependable service while saving you significant money compared to retail equivalents. Remember that lithium batteries demand respect—never compromise on safety components or testing procedures.


