
Mounting a power strip to a wall securely is more frustrating than it sounds. The traditional method of balancing a strip on partially inserted screws leads to misalignment, dropped components, and stripped wall holes. Most power strips come with keyhole-shaped mounting slots, but standard household screws rarely fit properly, leaving you wrestling with the strip mid-air while trying to get screws to align.
This guide covers the most effective, user-tested methods for mounting a power strip to any wall surface. You will learn the painter’s tape transfer technique that eliminates measuring and balancing, which screws and anchors work best for different wall types, which adhesives to avoid, and how to choose the right approach for your specific situation.
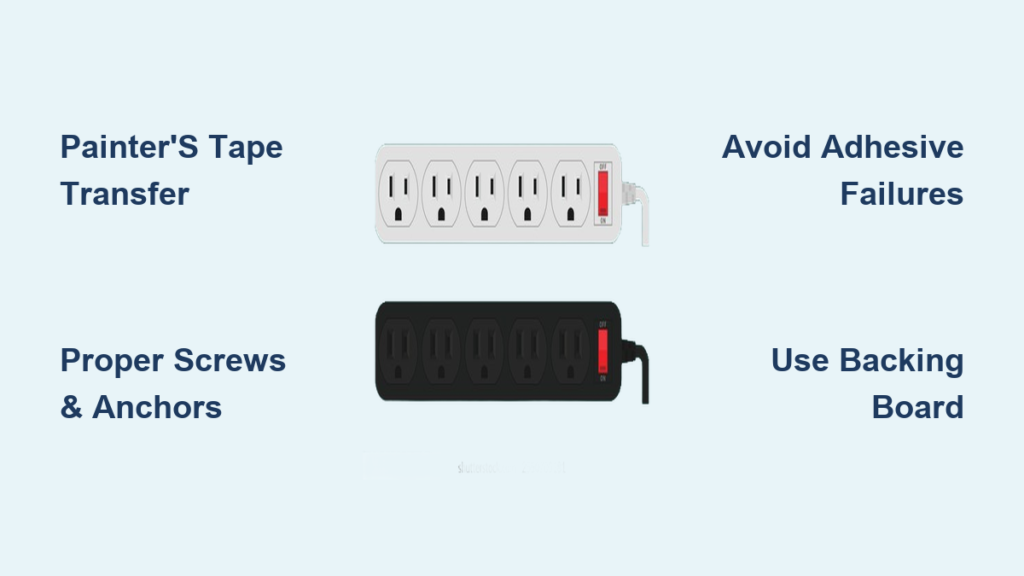
Use Painter’s Tape to Transfer Hole Positions
The painter’s tape method is the most accurate way to mount a power strip without measuring or balancing. This technique transfers exact hole positions from the strip directly to your wall.
Transfer Hole Positions Accurately
- Apply a strip of painter’s tape across the back of your power strip, covering all mounting slots completely.
- Poke through the narrow end of each keyhole using a mechanical pencil, pin, or the tip of your planned screw. This marks the exact center point.
- Peel the tape off carefully and press it onto your wall in the desired position.
- Drill or drive screws through the pilot holes in the tape into the wall. For drywall or masonry, install appropriate anchors first.
- Slide the power strip onto the screws and tighten fully.
Why This Method Works So Well
This approach eliminates the need to balance the strip mid-air and ensures perfect alignment every time. The tape captures exact spacing without requiring measurements. It works on any surface including drywall, wood, concrete, and tile. You need only tape, a pencil, and a screwdriver. Painter’s tape leaves no residue when removed promptly, making it ideal for tight spaces like under desks or behind entertainment centers.
Pro Tip: Use gaffer’s tape instead if you plan to leave it in place during drilling. Gaffer’s tape is stronger and less likely to tear.
Choose the Right Screws and Anchors for Your Wall
Mechanical fastening with screws provides the strongest, longest-lasting hold. However, not all screws fit power strip keyholes, and matching anchors to your wall material is critical.
Select Compatible Screws
Bring your power strip to the hardware store to test-fit screws before buying. Standard household screws often have heads that are too large or wrong-shaped for keyhole slots. Use pan-head or flat-head screws because they offer wider surface contact and fit keyhole slots better. Length should be 1/2″ to 1″ depending on wall material and anchor depth.
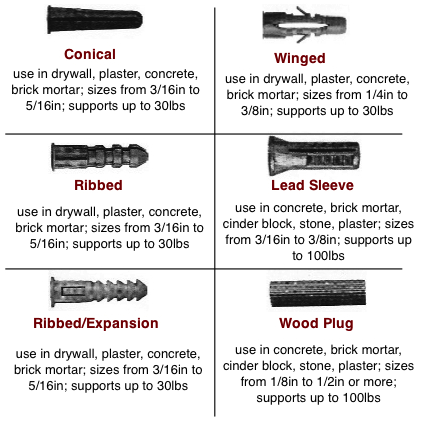
Match Anchors to Your Wall Type
Different wall materials require different anchoring solutions:
- Drywall: Use plastic expansion anchors or toggle bolts
- Wood: Direct wood screws without anchors work fine
- Concrete: Use Tapcon screws or masonry anchors
- Tile: Use a carbide-tipped drill bit and tile-specific anchors
Always pre-drill pilot holes for masonry or tile to prevent cracking.
Avoid Common Mounting Mistakes
Using drywall screws without anchors is a guaranteed failure. The screws pull out under the weight of the strip plus cords. Over-tightening screws on plastic-housed strips can crack the casing. Letting screws protrude too far into the strip can interfere with internal wiring and create safety hazards.
Warning: Never drill into the body of a powered device. Drilling near circuitry could lead to electrocution or fire.
Create a Paper Template for Accurate Drilling
:max_bytes(150000):strip_icc()/100673426-2a74ed411d274ca89a8d3a99702ac381.jpg)
If you lack painter’s tape, paper serves as a quick alternative template for drilling guide holes.
Make a Simple Paper Drill Guide
Hold a sheet of paper against the back of the power strip and either trace around the keyhole slots or poke holes directly through them using a pencil. Tape the paper to your wall in the exact position you want. Drill through the paper into the wall at each marked spot, then insert screws and mount the strip.
Limitations of Paper Templates
Paper tears easily during handling or drilling, which reduces accuracy. The paper can shift if not taped down securely. This method works for one-time installations but lacks the precision and durability of painter’s tape.
Try the Printed Template Method for Repeatable Results
For high-accuracy mounting, especially when installing multiple strips identically, create a digital template.
Make a 100% Scale Printout
Photograph or scan the back of your power strip and print the image at 100% scale on standard printer paper. Tape the printout to your wall and drill through the marked hole locations. This approach eliminates human error in tracing or poking holes and can be saved digitally for future use.
Avoid Weak Adhesives That Fail Under Load
Many people turn to tape or glue when drilling isn’t allowed, but most adhesive methods fail quickly under real-world stress.
Why Double-Sided Tape Fails
Standard double-sided tape lacks the strength to hold a power strip long term, especially when plugged-in cords pull downward. Generic brands perform worse than premium options. Even 3M tape only works for lightweight strips with minimal cord strain, and failure typically occurs within weeks.
Command Strips Are Only Temporary
3M Velcro Command Strips are popular for renters because they remove cleanly. However, multiple users report the power strip eventually falls down. One user stated directly: “I’ve used that in the past. The power strip eventually falls down.” These are not recommended for critical or frequently used setups.
Skip Dangerous Glue Methods Entirely
Some DIYers resort to permanent adhesives, but these pose serious safety risks.
Hot Glue Creates Fire Hazards
Applying hot glue to the back of a power strip seems fast and easy, but it degrades with heat and creates fire risk near electrical components. It also drips easily and can create electrical shorts if applied carelessly. Hot glue is difficult to remove without damaging your wall.
Industrial Adhesives Are Permanent
Gorilla Glue and epoxy create near-permanent bonds that destroy wall finish upon removal. These should only be considered for non-removable installations in controlled environments where heat generation is minimal.
User Feedback: One user reported using superglue to bond tape pieces together under an aquarium, achieving strong adhesion. However, they expressed hesitation about using this on walls due to permanence and potential code violations.
Try Zip Ties for Flexible Mounting
When screws won’t fit the keyholes, zip ties offer a flexible mechanical solution.
Install Anchors First Then Zip Ties
Drill holes and insert plastic wall anchors into your wall. Insert zip ties through the anchor loops, then loop the ties around the power strip body. Pull tight and trim the excess. This method bypasses the need for screw compatibility with keyholes entirely.
Best Applications for Zip Ties
Zip ties work well for vertical or overhead mounting, irregularly shaped strips without standard slots, and temporary or adjustable setups. However, UV exposure and heat degrade nylon over time, so inspect annually.
Use a Backing Board for Maximum Stability
For fragile walls or heavy-duty applications, a wood backing board spreads the load and prevents wall damage.
Build a Stable Mounting Platform
Cut a piece of plywood, OSB, or beechwood to fit behind your strip. Secure the board to the wall using toggle bolts for drywall, Tapcon screws for concrete, or wood screws into studs. Attach the power strip to the board using screws through keyholes, zip ties, or machine screws with nuts.
Add a French Cleat for Easy Removal
Attach a French cleat to the wall and a matching cleat to the backing board. This allows tool-free installation and removal while keeping the power strip level and secure. This approach is especially recommended for plaster, cement, or brick walls where direct mounting risks cracking.
Use Magnetic Mounting on Metal Surfaces
For metal surfaces like steel cabinets or tool racks, magnets offer instant, removable mounting.
Stick to Ferromagnetic Surfaces
Attach strong neodymium magnets to the back of the power strip using strong adhesive, then press onto a steel surface. Alternatively, use a pre-built magnetic power strip designed for industrial use. This method works perfectly in garages, workshops, or utility rooms.
Limitations of Magnetic Mounting
Magnets only work on magnetic iron or steel surfaces. Cord pulling can dislodge the strip if magnets are weak. This approach is not suitable for high-vibration areas.
Follow Essential Safety Guidelines
Secure mounting prevents hazards, not just convenience.
Prevent Electrical Risks
Never modify a UL-listed power strip unless the manufacturer designed it for modification. Avoid drilling into the housing where you risk contacting live parts. Ensure cords aren’t strained, which can loosen internal connections over time.
Avoid Fire Hazards
Do not enclose the strip in flammable materials. Leave space around the unit for ventilation. Avoid adhesives that degrade or ignite under heat.
Support the Full Load
A mounted strip must handle its own weight, the weight of attached cords, and the force from plugging and unplugging devices. Use mechanical fastening for any setup with frequent use or heavy devices.
Match Your Method to Your Specific Use Case
Choose the right mounting strategy based on your environment and needs.
| Scenario | Best Method |
|---|---|
| Workbench | Painter’s tape + screws |
| Under desk | Tape method or zip ties |
| Rental apartment | 3M Command Strips (short-term only) |
| Vertical wall | Screws with toggle bolts |
| Workshop with metal | Magnetic mounting |
| Plaster or brick wall | Backing board + Tapcon screws |
| Frequent reconfiguration | Backing board or French cleat |
Frequently Asked Questions About Mounting Power Strips
Can I mount a power strip without drilling?
You can use adhesive methods like Command strips or double-sided tape, but these are temporary solutions that typically fail within months. These options only work for lightweight strips with minimal cord strain.
What screws fit power strip keyholes?
Pan-head or flat-head screws work best. Bring your power strip to the hardware store to test fit screws before buying, as standard household screws often don’t match keyhole slot dimensions.
How do I mount a power strip on drywall securely?
Use the painter’s tape transfer method to mark hole positions accurately. Install plastic expansion anchors or toggle bolts, then mount with appropriate screws. Toggle bolts provide the strongest hold for heavier strips.
Are adhesive mounting methods safe?
Most adhesives are not recommended. Hot glue poses fire risk near electrical components. Industrial adhesives like Gorilla Glue create permanent bonds that damage walls upon removal. Command strips work temporarily but eventually fail.
Can I drill my own mounting holes in a power strip?
Only if the strip is not UL-listed and you understand electrical safety risks. Drilling near internal wiring risks short circuits or electrocution. This modification voids safety certifications and is not recommended.
Key Takeaways for Mounting Your Power Strip Securely

The painter’s tape transfer method combined with proper screws and wall anchors delivers the most reliable, precise, and long-lasting results. This technique eliminates the instability of traditional balancing, ensures accurate hole placement, and requires only minimal tools. Alternative methods like adhesives or zip ties suit temporary or specialized applications but lack the durability of mechanical fastening.
Your wall type determines anchor choice: plastic expansion anchors for drywall, direct screws for wood, Tapcon screws for concrete. Never drill into the power strip body itself, and avoid adhesives for permanent installations. For rental properties, accept that Command strips are temporary fixes. For heavy-duty or permanent setups, invest in a backing board with proper mechanical fastening.
Choose based on your specific needs: workbenches benefit from tape and screws, rental units need removable solutions, workshops with metal surfaces work well with magnets, and fragile walls require backing boards for load distribution.


