
Imagine losing power during a storm. Your lights go out, the fridge warms up, and your phone battery drains with no way to charge it. Now imagine flipping a switch on your own solar power station, silently powering lights, keeping devices charged, and running essential appliances, all from energy harvested by the sun. Building your own solar power station isn’t just for tech enthusiasts. It’s a practical, cost-effective way to achieve energy independence for camping, emergency backup, or off-grid living.
This guide walks you through every step from choosing the right battery to wiring safely and assembling a durable, portable system. You’ll learn how to build a fully functional solar power station for $400 to $1,500, saving up to 50% compared to commercial units while gaining full control over capacity, repairs, and future upgrades.
Choose the Right Battery for Your Solar Station
Your battery stores solar energy and powers everything else in your system. Get this wrong, and the whole station suffers. The best choice for DIY solar stations is Lithium Iron Phosphate, also known as LiFePO4.
Why LiFePO4 Outperforms Other Battery Types
LiFePO4 batteries last longer, run cooler, and are far safer than lead-acid or standard lithium-ion options. They resist overheating, won’t catch fire easily, and handle deep discharges without damage. Most LiFePO4 batteries last 2,000 to 5,000 charge cycles, which translates to 8 to 10 years of daily use. They also offer 80 to 100% usable capacity, meaning a 12V 100Ah battery gives you nearly 1,280 watt-hours of real power.
Lead-acid batteries, while cheaper upfront, only deliver 50% of their rated capacity before risking permanent damage. They’re heavier, bulkier, and wear out faster, making them ideal only for temporary or budget builds.
Match Voltage and Capacity to Your Needs
Most DIY solar stations use 12V systems, which work perfectly for portability and compatibility with common inverters and appliances. Larger setups like home backup systems may use 24V or 48V for better efficiency.
| Voltage | Capacity | Usable Energy | Best For |
|---|---|---|---|
| 12V | 100Ah | 1,280Wh | Camping, RVs, small devices |
| 12V | 300Ah | 3,840Wh | Sump pumps, extended off-grid |
| 48V | 100Ah | 5,120Wh | Whole-house essentials |
Start with a 12V 100Ah LiFePO4 if you’re powering lights, phones, laptops, or a mini-fridge. Need more capacity later? Simply add more batteries in parallel.
Size Your Solar Panels Correctly
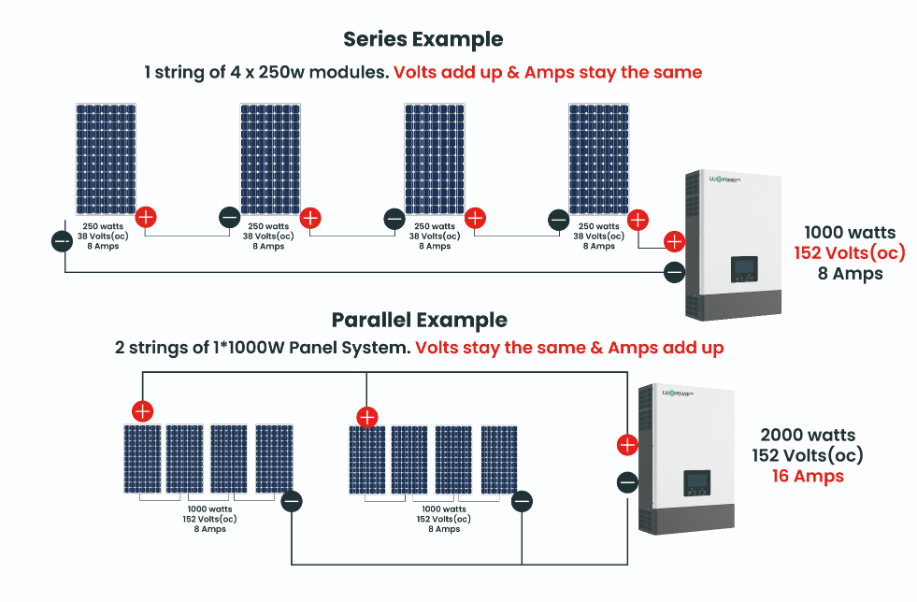
Solar panels charge your battery, so getting the sizing right matters. Too small, and you’ll wait days to fully recharge. Too large, and you waste money on excess capacity.
Calculate Minimum Solar Wattage
Use this simple formula to determine your minimum panel size: Solar Panel Wattage equals Battery Energy divided by Peak Sun Hours. Most areas receive 4 to 6 peak sun hours per day. For example, with a 1,280Wh battery and 5 peak sun hours, you need at least 256W. Round up to 300W for reliability and faster charging.
A 200W panel will work but charges slower, which is fine for weekend camping use. For daily use or emergency backup, go bigger.
Pick Monocrystalline Panels for Best Efficiency
Monocrystalline panels are 20 to 25% more efficient than polycrystalline and perform better in low light conditions. Two main types exist: rigid panels, which are durable and ideal for permanent mounts, and flexible panels, which are lightweight and perfect for RVs or portable setups.
You can find used 330W rigid panels on Facebook Marketplace or eBay for $100 to $140, which is a significant savings compared to buying new.
Select a Compatible MPPT Charge Controller
The charge controller regulates power flow from solar panels to your battery. Skip this component, and you risk overcharging and destroying your battery entirely.
MPPT vs PWM: Always Choose MPPT
PWM controllers are cheaper but waste 10 to 30% of solar energy. MPPT controllers optimize voltage and current, harvesting 20 to 30% more power, especially in cold or cloudy weather. For any serious DIY build, MPPT is non-negotiable.
Match Controller to Battery and Solar Input
Your controller must support your battery voltage and handle the total current from your solar array. As a rule of thumb, for every 100W of solar at 12V, you need about 8.3 amps of controller capacity. For 300W of solar on a 12V system, that’s 25 amps. Add a 25% safety margin, and you need at least a 40A MPPT controller.
Popular options include the Victron SmartSolar 75/15 for 150 to 200W systems or a 40A MPPT controller available on Amazon for $80 to $120. Ensure your controller supports LiFePO4 charging profiles.
Install a Pure Sine Wave Inverter
Your inverter converts stored 12V DC battery power into 120V AC, which is what your fridge, TV, and laptop charger need to operate.
Never Use Modified Sine Wave for Sensitive Devices
Cheap modified sine wave inverters can damage laptops, medical devices, and modern appliances. They cause buzzing in speakers and motors while reducing efficiency. Always use a pure sine wave inverter for clean, grid-quality power that’s safe for all electronics.
Size the Inverter for Your Largest Load
Check the wattage of your highest-draw device and add a 20 to 30% buffer to avoid overloading. A mini-fridge draws 300 to 500W, a microwave draws 800 to 1200W, and power tools typically draw 1000 to 1500W. If your fridge draws 400W, choose at least a 500W inverter. Running a microwave? Go with 1500W or higher.
Common sizes include 500 to 1000W for lights, phones, laptops, and small fridges, 2000 to 3000W for microwaves and power tools, and 4000W plus for whole-home essentials with a large battery bank.
Add a Battery Monitor for Accurate Readings
LiFePO4 batteries have a flat discharge curve. Voltage stays near 13.2V until suddenly dropping at 20% charge. Relying on voltage alone will fool you into thinking you have more power than you actually do.
Use a Shunt-Based Monitor for Accuracy
A battery monitor with a shunt measures actual power going in and out, giving you the state of charge as a percentage, amp-hours used and remaining, time to full charge or discharge, and real-time current flow. Top options include the Victron SmartShunt with Bluetooth connectivity, the Time USB Monitor with color LCD display, or budget-friendly Drok or Renogy models.
Install the shunt in series with the battery’s negative terminal and connect the monitor display to a front panel for easy viewing. Without a monitor, you’re flying blind and risk deep discharges that shorten battery life.
Wire the System Safely and Efficiently
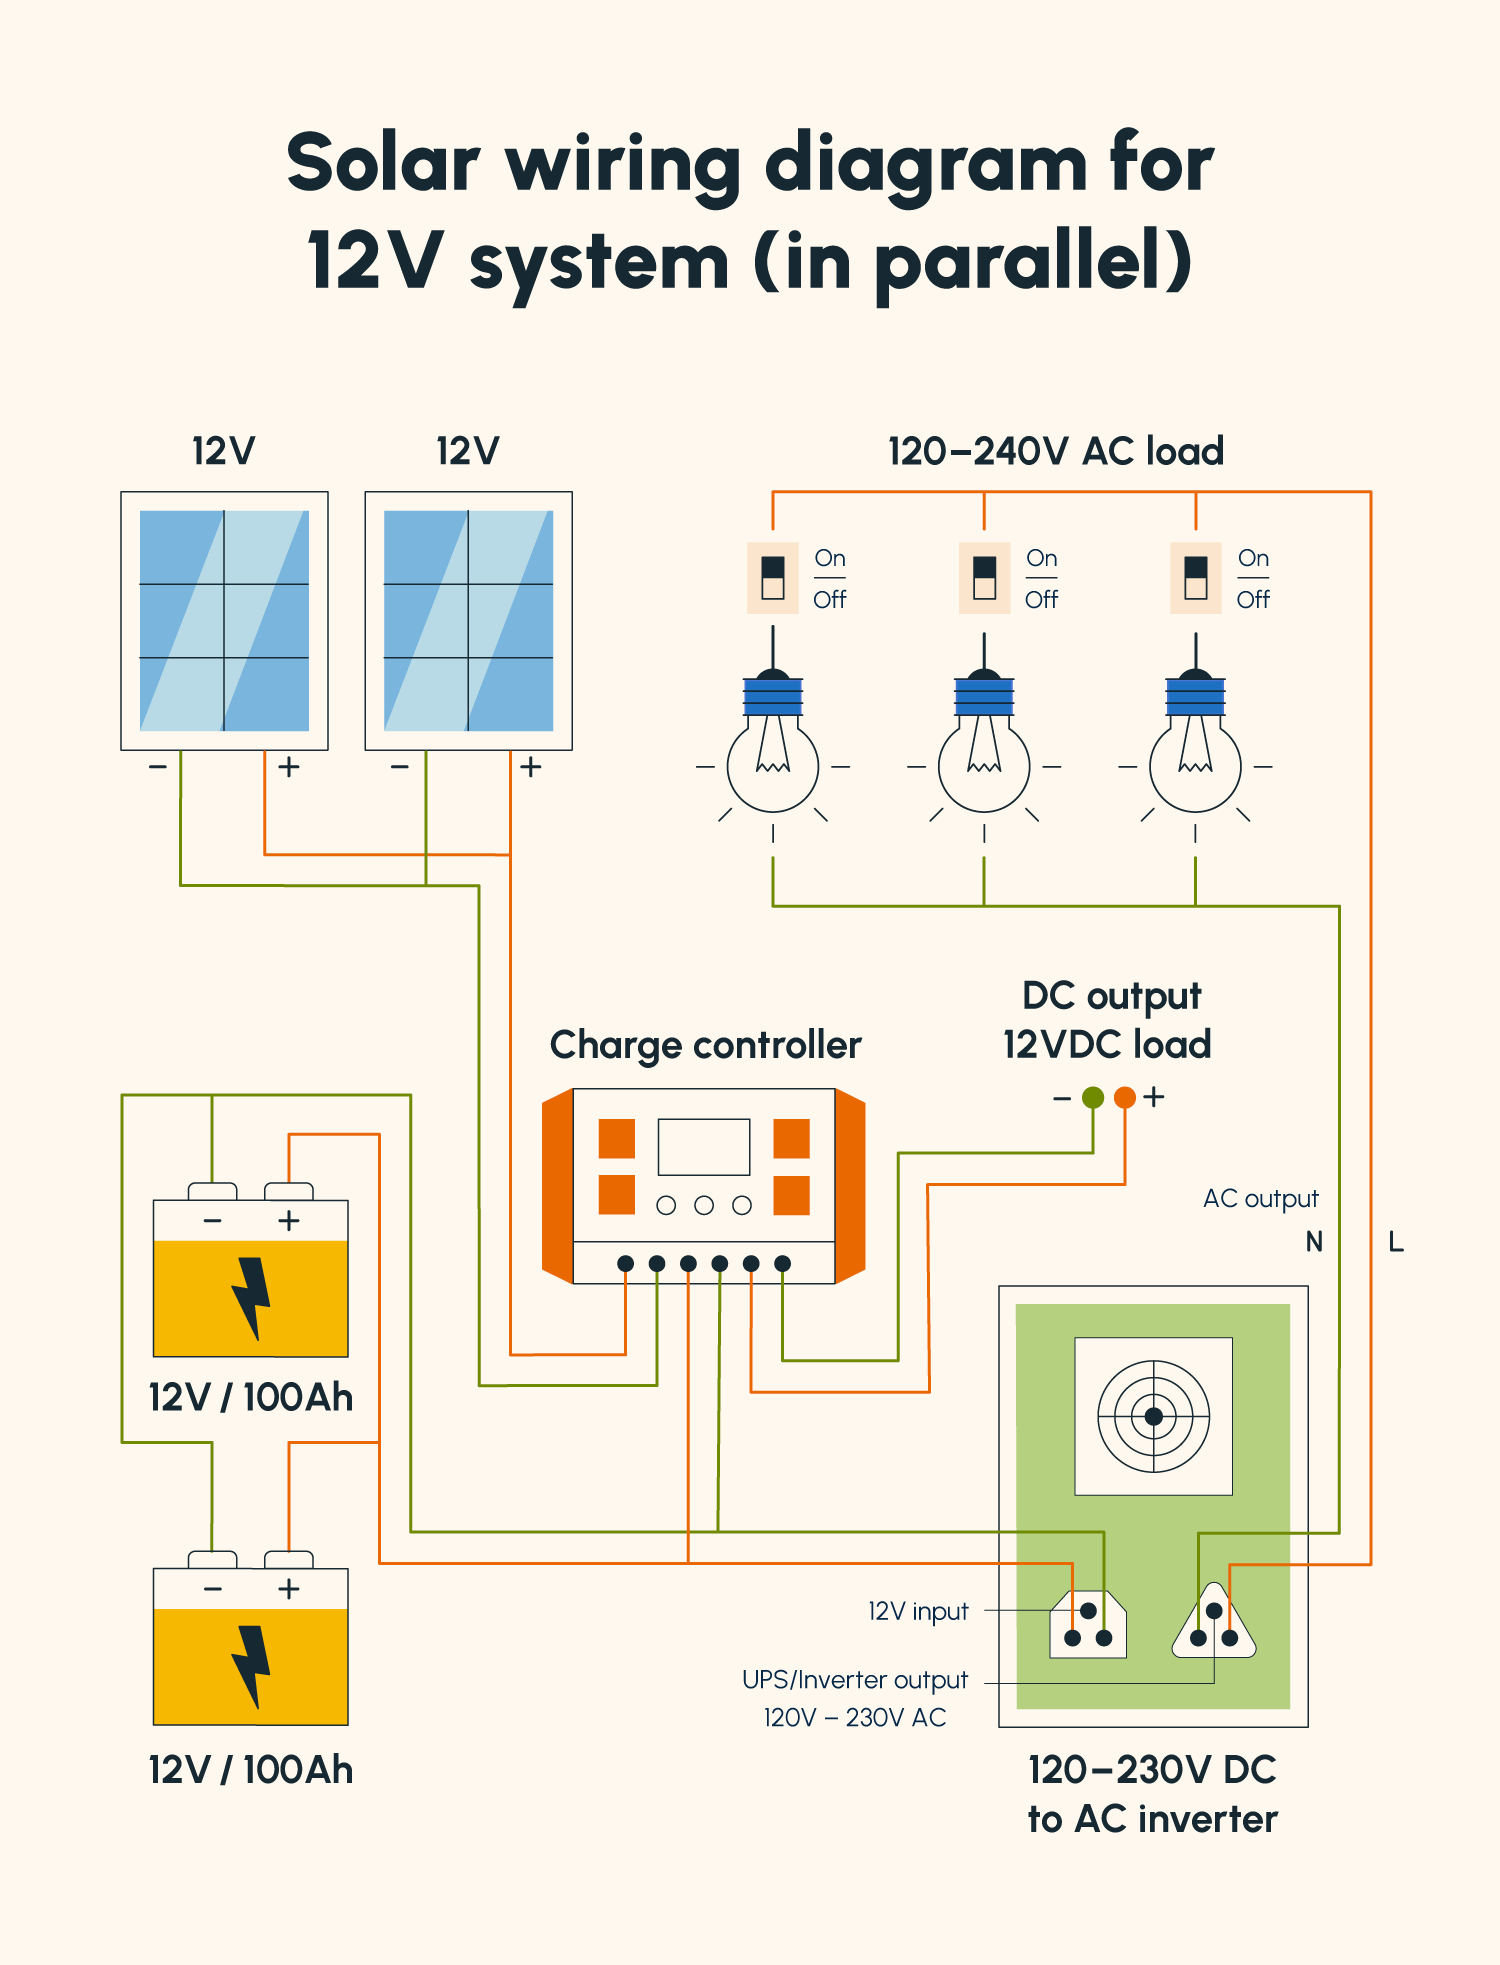
Even perfect components fail if wiring is sloppy. Bad connections cause voltage drops, overheating, and potential fire hazards.
Use Correct Wire Gauge
Undersized wires overheat and create fire risks. For a 12V system, use 10 AWG for up to 500W, 8 AWG for 500 to 1000W, 4 AWG for 1000 to 2000W, and 2/0 AWG for 3000W and above. For 24V systems, you can use one gauge smaller.
For inverters drawing 1000W or more, use 25mm² copper wire with short, direct runs to battery terminals.
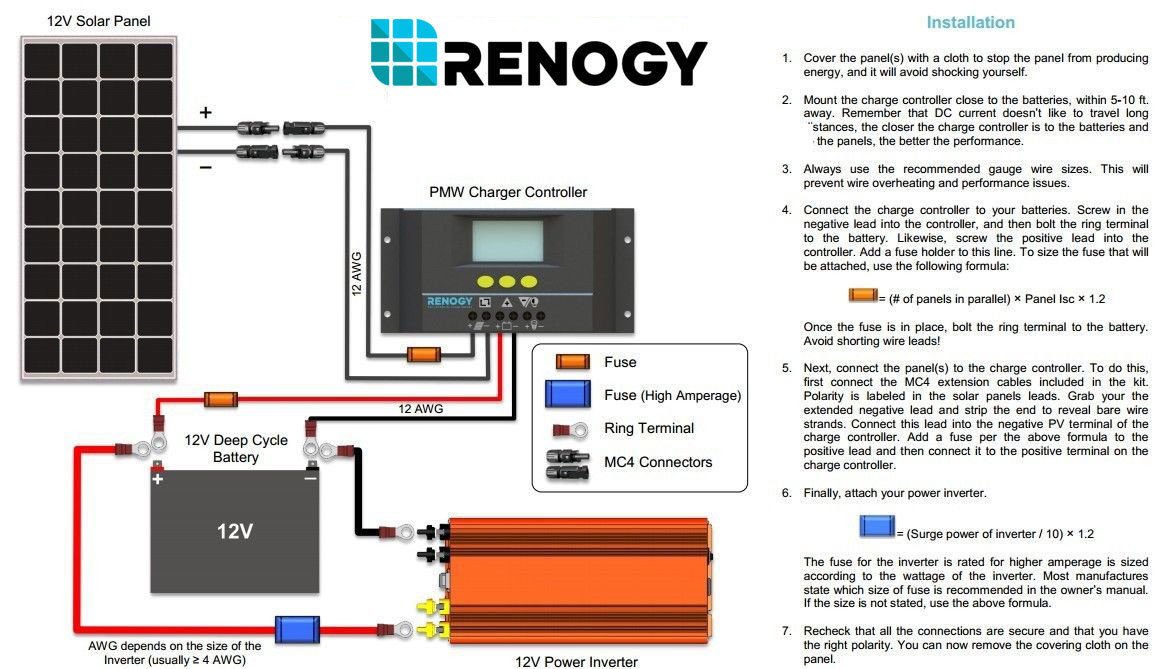
Install Fuses on Every Critical Connection
Fuses protect against short circuits and should be installed between the battery and inverter using an ANL or Mega fuse, and between the battery and charge controller using a 30 to 40A fuse for typical 12V setups. Place fuses within 18 inches of the battery terminal to minimize fire risk.
Organize with Bus Bars and Connectors
Use positive and negative bus bars to centralize connections and keep wiring clean. For modular builds, use Anderson SB50 or Powerpole connectors for tool-free solar input and battery swaps. Label every wire with simple markers like “SOLAR IN” or “INV OUT” to save time during troubleshooting.
Build a Durable, Portable Enclosure
Your enclosure protects components from dust, moisture, and impact while enabling portability and proper cooling.
Choose the Right Case
Best options include plastic totes or toolboxes that are lightweight and non-conductive, the Apache 3800 case that’s rugged and stackable, or an HDPE cutting board base that’s rigid and perfect for mounting components. Avoid metal cases unless fully insulated, as exposed metal can cause dangerous shorts.
Mount Components Securely
Cut a plastic cutting board to fit inside the case, then screw down bus bars, the charge controller, and the inverter. Place the battery on foam padding and secure it with straps. Leave adequate space for airflow around heat-generating parts like the inverter and charge controller.
Add Ventilation and Cooling
Install intake and exhaust vents on opposite sides of the enclosure. Add a 12V blower fan with temperature control that turns on at 95°F. Mount a thermostat sensor near the inverter to trigger cooling when needed. A properly cooled system runs longer and safer, especially in summer or enclosed spaces.
Plan Your Port Layout for Easy Access
A well-designed port layout makes your solar station user-friendly and ready for real-world use.
Front Panel: Daily Use Ports
Your front panel should include AC outlets for laptops and lights, USB ports including USB-A at 5V/2.4A and USB-C PD at 20V/3A for fast charging, a 12V cigarette lighter socket for car devices, and the battery monitor display positioned front and center.
Side or Rear Panel: Charging and Expansion
Add an MC4 input for solar panels, an Anderson SB50 connector for daisy-chaining or off-board charging, an AC charging port allowing wall charging via a 12V battery charger, and a DC-DC input for vehicle charging while driving.
Assemble and Test Your Solar Power Station
Now it’s time to build. Follow this order to avoid costly mistakes.
Step 1: Mount All Components
Attach the cutting board base inside your enclosure. Screw down bus bars, inverter, controller, and monitor. Place the battery on foam and secure with straps. Install the fan and thermostat sensor.
Step 2: Wire the Battery First
Connect the shunt to the battery negative terminal. Link bus bars to battery terminals via fused cables. Attach the inverter to the positive bus bar using a fused connection. Connect the charge controller to battery terminals, also fused.
Never connect solar panels before wiring the battery. The controller needs battery reference voltage to function properly.
Step 3: Connect Solar and Monitor
Run solar input cables to the MC4 or Anderson port. Link the monitor display to the shunt. Install a master power switch on the positive line.
Step 4: Test Before Closing Up
Keep one battery terminal disconnected while double-checking all polarities. Reconnect and power on, then verify the inverter powers up correctly, the monitor shows proper voltage and state of charge, the controller detects solar input, and the fan turns on when components warm up. If anything looks off, disconnect immediately and recheck your work.
Maintain and Maximize System Lifespan
A well-built solar power station can last a decade. Keep it healthy with simple maintenance habits.
Safety First
Always fuse battery connections, use a master disconnect switch, never bypass the BMS or shunt, and store the system in a dry, temperature-controlled space.
Maintenance Routine
Clean solar panels every 1 to 3 months since dust can reduce output by 15 to 30%. Inspect wire connections every 6 months for looseness. Update firmware on smart controllers and monitors regularly. Store the battery at 50 to 80% charge if unused for extended periods.
LiFePO4 batteries degrade slowly and typically retain 80% capacity after 2,000 cycles.
DIY vs Commercial: Why Build Your Own
Commercial solar power stations cost $1,500 to $2,000 and offer limited customization or repairability. DIY builds cost $400 to $1,500 and give you full control over capacity, the ability to replace individual parts instead of the entire unit, and easy scalability as your needs grow.
Commercial units are convenient but overpriced and nearly impossible to upgrade. DIY gives you more power, better durability, and roughly half the cost.
Key Takeaways for Building Your First Solar Power Station
Building a DIY solar power station is a cost-effective way to achieve energy independence. Start with a 12V 100Ah LiFePO4 battery, pair it with an MPPT charge controller and pure sine wave inverter, and add a shunt-based battery monitor for accurate readings. Use proper wire gauges, install fuses on all critical connections, and build your system inside a durable, ventilated enclosure.
The biggest advantage of going DIY is flexibility. You can scale up by adding more batteries or panels, replace individual components when they fail, and customize ports and layout to match your specific needs. With the right components and proper wiring, your DIY solar power station will last 8 to 10 years while costing half as much as a commercial unit.
Start small, learn as you go, and scale up over time. The sun provides free energy. Your job is simply to harness it.
Frequently Asked Questions About Building a Solar Power Station
How much does it cost to build a DIY solar power station?
A basic DIY solar power station costs $400 to $600 for a compact camping setup with a 12V 100Ah battery, 200 to 300W of solar, and a 500W inverter. Larger systems with 5kWh capacity run $1,000 to $1,500, still saving 30 to 50% compared to commercial units.
Do I need electrical experience to build one?
No. Users report success even with limited electrical experience. Basic skills like connecting wires, using a screwdriver, and following diagrams are sufficient. Pre-built components with plug-and-play connectors make the process surprisingly accessible.
How long does it take to build?
A basic system takes 4 to 8 hours for a first-time builder, including planning, sourcing parts, and assembly. Experienced builders can complete a simple setup in 2 to 3 hours.
How long do solar panels and batteries last?
LiFePO4 batteries last 8 to 10 years with 2,000 to 5,000 charge cycles. Solar panels last 20 to 25 years, with 20-year warranties being common. Inverters and controllers typically last 2 to 5 years depending on quality and usage.
Can I expand my system later?
Yes. DIY systems are inherently scalable. You can add more batteries in parallel, expand your solar array up to your controller’s maximum input, add an AC charger for grid charging, or install a DC-DC charger for vehicle charging. Using Anderson or Powerpole connectors allows you to daisy-chain multiple stations for increased capacity.


